WhatIFF Issue 1.01 WhatIFF Issue 1.02 WhatIFF Issue 1.03 WhatIFF Issue 1.04 WhatIFF Issue 1.05 WhatIFF Issue 1.06 WhatIFF Issue 1.07 WhatIFF Issue 1.08 WhatIFF Issue 2.09 WhatIFF Issue 2.10 WhatIFF Issue 2.11 WhatIFF Issue 2.12 WhatIFF Issue 3.13 WhatIFF Issue 3.14 WhatIFF Issue 3.15 WhatIFF Issue 4.16 WhatIFF Issue 4.17 WhatIFF Issue 4.18 WhatIFF Issue 5.19 WhatIFF Issue 5.20 WhatIFF Issue 5.21
Download PDFWhatIFF? Issue 3.14
TopWhatIFF? For The Creative Amiga User
CONTENTS +#### #### ###%## +####+########+########+ +####+ '#+ '## #' ## '## '##+ +#+ '##+ +#+ +##+ +#+ ## ## # +#+ +#+ +#+ #' +#+ #' +#' ## ## ## +# ## # ## ## + ## + +#+ +#+ +## #+ ## %#. ## ## +# ## +# ## ## ###+ # ##+#+ +#.## #### ## ##### ##### ##' ## #+## # #####+ ##+### +# ## ## +# ## +# +#' +#+# ##+# ##'+## +#+ ## ## ## ## + ## + #+ ..:###.###+.+#+ ## ## #+ +#+ +#+ +#+ +#+ +' ::::##+:###::##::+##:##+:+#..##..##'..##'......##'............. :::::+#::+#+::##::##+%+##:###%##:;##:::##:::::::##:::::::::::##::::.. '::::#:::#:::#+::+##::+##+ #:+######+####+:::+####+:::::::::##::aNdy; ..;::::::::::::::::::::::::::::::::::::::::::::::::::::::::::::::;' .::::::::::::::::::::::::::::::::::::::::::::::::::::::::::::;' ':::::::::; ,:::::::::::::::::;''.::::::::::::::::::::;' ':::::; :::::::::::::::;' '::::;' For The Creative Amiga User! ':::::::::;' >> ENTER MAGAZINE <<TopWelcome to WhatIFF?
CONTENTS============================================================================ -# WhatIFF? - Issue 3.14 - August 2024 #- Music ---------------------------------------------------------------------------- --EDITORS DESK-- -MEET THE WRITERS-- A few words from the editor and meet the writers of WhatIFF? ---SHELL TALK--- -----TALK BACK----- Shell Talk: WhatIFF? equivalent of the soapbox and readers letters. laundry or just talk about anything Amiga related! -----REVIEWS---- ---GAME REVIEWS---- Reviews of hardware and software, old and new covered. -----GUIDES----- -----ARTICLES------ Guides and support to all things Amiga. -TALKING AMIGA-- Hear from the people making hardware and software for the Amiga. -----LINKS------ ---AMIGA VENDORS--- ---AMIGA GROUPS---- Amiga related links and Amiga vendor websites. -ADVERTISEMENTS- Vendor advertisements and more. -INVENTS CORNER- ---COVER DISK--- Get the latest from Kevin and find out whats on this issue's coverdisk. --------===============================================================----- NEXT ISSUE *All content copyright of the respective authors 2024* --------===============================================================-----
TopFrom The Editor's Desk
CONTENTS ============================================================================ From The Editor's Desk - by: Timo Paul ============================================================================ August is here and with it comes another issue of WhatIFF? and this issue is packed to the gills with new content. We welcome Martyn Bampton as a full time writer, he has contributed three hardware reviews and Kristian GK has joined the team to help with editing and writing articles, he edited the article by Steve Lord and wrote about Kickstart 02. I should also mention at this point that the magazine is now using OS3.2 inline images when needed. If you view the magazine under 3.1 you will not be able to see the images only with 3.2, however the images can take time to decode so do not be surprised if it takes around 30 seconds to open a link. On my TF1260 running at 50 Mhz it takes around 5 seconds to open a page that has a few images, so expect longer if you have a slower Amiga. Andy Vaisey has a new series on programming basics starting with setting your your BlitzBasic programming environment. This takes me nicely onto the next big announcement, we have teamed up with Michael Rupp of TAWS, he had kindly offered to host all the issues of WhatIFF? and provides a direct link on the WhatIFF? website to TAWS. This link will open the magazine automatically on TAWS providing an easy way to read the magazine away from a real Amiga. TAWS will also support inline images. There is so much more content such as a guide on setting up WPA2 on a PiStorm from John Scolieri, audio guide from Roald Strauss and much more. I will leave you now to enjoy the magazine and hope that you will find the articles and guides of use. As usual if you have any commments please send them into: submissions@whatiff.infoTopLetters From WhatIFF? Readers
CONTENTS ============================================================================ Talk Back: Letters From WhatIFF? Readers January-March 2024 ============================================================================ Welcome to Talk Back, the section of the magazine where we publish a select few of the letters that we receive. Thank you to everyone who has written in and those who have gone on to write articles for the magazine. We always welcome any written contributions to the magazine. Wveryone has a unique perspective and Amiga story to tell. If you wish to write to the magazine or contribute then please contact us at: submissions@whatiff.info ---------------------------------------------------------------------------- ---------------------------------------------------------------------------TopFree For All About Anything
CONTENTS ============================================================================ Shell Talk - by: Timo Paul ============================================================================ When is an Amiga not an Amiga ... In the last few years the Amiga has been enjoying a resurgence in popularity and along with this renew interest we have received new Amiga "computers", the A500 Mini comes to mind and now the A600GS has recently joined the fray. It is an exciting time to be part of the Amiga scene with the mini consoles providing a lower entry price point. This is especially imporant due to the rising prices for classic Amiga hardware. As many of those who have been in the Amiga scene since the beginning they can attest to the rather alarming rise in prices. I remember buying a second A1200 for 75 GBP now a person would be lucky to find an heavily yellowed and beat up A1200 for 250 GBP. It is a sadly a result of the growing interest in retro computers and games which has even spread to my place of residence, Japan. When I first moved to Japan in 2006 I was able to pick up a Sega Saturn and Super Famicom for 300 YEN each. Even the rarer PC Engine was sold for 4,000 YEN. More so I bought a NeoGeo CD for 5,000 YEN. Today the average price of a Super Famicom is around 6,000 YEN. A Neo Geo CD? 35,000 YEN ... the prices have gone through the roof, it is rather sickening. And that has happened to our favourite computer as well, with people who never owned an Amiga but are collectors or flush with cash are paying high prices and putting owning class hardware out of the reach of many returnee users. In this regard the A500 Mini and A600GS are filling a badly needed niche in the Amiga scene. It is opening the gate to new users who otherwise could not afford the rising asking prices. However, it also worries me. The A500 Mini and A600GS both have an issue that I find is quite a big one and that is a lack of a keyboard. The Amiga while had amazing games was not a games console, it was and always will be a home computer. The A500 Mini and A600GS both push the idea of the Amiga as being a games console, the default interfaces are simple interfaces like that of a games console. While you can run Workbench or Amibench these are secondary to the main carrosel interfaces. We need something akin to the C64 Max, RetroGames is supposed to be releasing an A500 Max but there has not been much news on its progress. With out a system like that we will have a generation of new Amiga users growing up in the A500 Mini and A600GS believing the Amiga was a games console like their Switch of PS5. The Amiga was amazing home computer and should be remembered like that, not some watered down game console version. The A600GS kind of has it right with more applications available from the get go, but it does not come with a keyboard as default and it does not boot into Workbench default. The A500 Mini and A600GS are new Amigas but yet I would not classify them as Amigas. Amigas that are not Amigas.TopWelcome to the reviews section!
CONTENTS ============================================================================ -= R E V I E W S =---------------------------------------------------------- ---------------------------------------------------------------------------- -= Hardware Review: SDBox v2 =- New staff writer Martyn kicks off with an indepth look at the SDBoxv2 with some great insights. -= Hardware Review: TF536 A500 Accelerator =- Are you looking to boost your A500 and add a hard disk, then see what Martyn has to say about the TF536 030 accelerator. -= Software Review: Amiga GPT =- Modern AI capability on your Amiga, we take a look at the latest version the Amiga version of ChatGPT. -= Software Review: Backdrop Pattern Generator Want to make your own background pattern but find the built in software not up to scratch, find out if this free download fits the bill. -= Software Review: Redit =- Not related to the famous website but a small text editor that is available for free. -= Hardware Review: Retronics Plastic Covers =- Martyn has a look at the plastic covers for your precious Amiga from retronics. -= Software Review: Apollo Explorer =- File transfer has never been easier with this little utility for Amigas with the V4 accelerator. -= Software Review: 32se =- In the past we had ClassicWB, BetterWB and AmigaKit, 32se is another Amiga OS 3.2 upgrade kit for RTG Amigas. ---------------------------------------------------------------------------- #Reviews - WhatIFF? Issue 3.14 - August 2024#TopHardware review: TF536 Accelerator
Reviews ============================================================================ Hardware Review:TF536 A500 Accelerator - by Martyn Bampton ============================================================================ Product Name TerribleFire 536 Developed By Stephen Leary Available From https://www.amigastore.eu https://www.amiga-shop.net https://www.retropassion.co.uk https://www.sordan.ie Local builder via https://www.amibay.com Others Price 165 USD/155 EUR/160 GBP (ex VAT) Hardware Requirements Direct DIP 68000 replacement. Amiga 500 and Amiga 500+. Amiga 2000, CDTV and Amiga 1000 also possible with the appropriate CPU relocator/adapter. Kickstart ROM 2.05 or higher. Test Machine Amiga 500 Rev 6A.Introduction I recently became the proud owner of an Amiga 500 for the first time in 30 years. After getting it up and running once again and addressing basic challenges like display, mouse and power I started to think about upgrades! One of the most sought after upgrades when I owned my first A500 and later A500+ was the GVP A530 Turbo, a sidecar style edge connector expansion profiled to match the A500's left side. I loved how it just fit right in and made the A500 visually bigger and more impressive, although you needed a big enough desk to accommodate everything. It's a 68030 based accelerator with up to 8MB of RAM and a built in SCSI adapter for an internal harddrive and a rear port for other devices daisy-chained externally. It cost more than both my A500 and A500+ combined and therefore remained out of reach. A quick check online suggests that situation hasn't changed!
It didn't take long to find the TerribleFire line of modern accelerators designed by Stephen Leary and the TF53x boards specifically. While the TF530 (obsolete) and TF534 both have a 68030 and FPU, the TF536 drops the FPU but gives you 64MB of RAM rather than 2MB or 4MB! They also come with an onboard IDE header so I could finally have an 030 and a "harddrive" on my Amiga 500! I placed an order for a TF536 with AMIGAstore.eu who also included a CPU relocator. The board has a soldered (not socketed) 68030 clocked at 50Mhz and includes a simple passive heatsink to keep the CPU temperatures a bit cooler, not that these CPUs get very hot at their rated frequencies. A heatsink may or may not be included and the 030 may or may not be socketed depending on your chosen vendor. It's a drop in replacement for the 68000 CPU in the computer and so needs to be fitted internally. Hardware and Installation The board is about 10cm square and contains the CPU, CPLD and two RAM chips along with some support components. Along one edge is the 68000 CPU connector adjacent to that is the 44 pin IDE header. Installation was fairly straight forward although you do need to open up your Amiga and remove the RF shield if you haven't already (Amiga 500). You need Kickstart 2.05 so presumably you have or will be upgrading your ROM too, I have a Rev 6A but if you have a Rev 5 or a 3 you'll also need a ROM adapter. While you don't need to remove the motherboard it does make things easier and puts less flex/stress on it while installing the accelerator. When leaving the board in place I sometimes temporarily put some layers of card underneath the motherboard between the board and the insulation sheet. This is to both support the area and protect the insulation sheet when installing anything you have to exert force on. Carefully remove the original 68000 (or current replacement) and keep it safe somewhere, I use the flat end of a plastic spudger to gently rock one end of the chip from side to side along its short edge, rocking the spudger along its axis not levering it up. Alternate this at both ends of the chip to gradually free it from the socket. Be careful not to gouge the motherboard, socket or the CPU itself, it was quite hard to free it after 33 years! I would strongly recommend not using a metal screwdriver and going at it end-on. Use a proper curved DIP lifter tool (admittedly they look like a screwdriver) if you're going to do that, or invest in a quality chip puller. I tried a cheap puller once and ended up gouging a chip, only cosmetic damage but still it was enough for me not to want to use it again.
Once the CPU socket is free have a check for any debris in the pin holes and remove if present. It may not be necessary to use the CPU locator but you'll probably want to do so in order to give the CPU more headroom, especially if socketed. Mine was soldered directly to the board but since it came with a heatsink I chose to use the relocator. I also have a long RGB2HDMI board so I needed to use the pin header strips kindly provided with the RGB2HDMI board to give the TF536 room to clear the Raspberry Pi Zero. Someone at AMIGAstore.eu clearly realised the extra height would be needed and thoughtfully included the header strips. I placed a small rectangle of thin adhesive foam tape to the back of the GPIO pins of the Raspberry Pi Zero to insulate it from the TF536, just in case. Finally I fitted a Compact Flash to IDE adapter and a CF card with AmigaOS 3.2 installed. I had to remove, rotate and replace the heatsink so it is parallel to the CF adapter rather than 45 degrees like the CPU, otherwise the adapter wouldn't fit. If you use a CF adapter on a short ribbon cable this may not be necessary. Be careful to align and double check the pins before firmly pressing things together, one at a time. It's quite a stack once assembled so again take your time fitting it into the motherboard CPU socket. One last visual inspection to make sure everything's in place and it's time to power it up! I test booted it before putting the motherboard back in the case but I needn't have worried, it fired up fine first time.
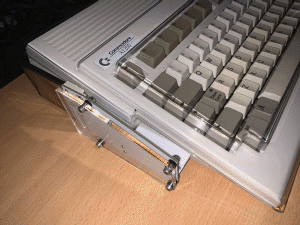
When reassembling the A500 and replacing the keyboard and top case I noticed that the front edge of the TF536 came close to the keyboard. The CF adapter board edge was also touching the metal keyboard back plate, I had to skew the keyboard ever so slightly to get everything to fit safely and a small strip of tape to insulate the keyboard metal might be a good idea. I think that this is all down to the specific Amiga in question and variances in how each Amiga fits together. I could probably disassemble and reassemble it to end up with a better fit, or worse? :) I'm reminded of an episode of Father Ted where Ted tries to get a small dent out of a car (a 1985 Rover) and destroys the car. Perhaps I'll leave it be then. One other thing I noticed was the heatsink just touches the underside of the case. The outside of the case at this spot got to over 43 degrees C at idle which I think is a bit warm. I don't know if this would discolour or weaken the plastic over time but something to consider if you're worried. I may replace the provided heatsink with a larger but lower profile heatsink and add a fan inside to circulate air. Otherwise it all fits quite nicely in the case without needing a longer desk. ;) Software and Performance I used the installer on the included floppy disk which quickly copied the 68030 and MMU libraries over to Workbench. You can download and install these yourself but I like to use the floppies when provided for the complete installation experience! After a reboot Sysinfo reported performance around twice the speed of a 25Mhz 030 A3000 as you'd expect and CF harddisk performance was around ~1.3 MB/s by default. To improve this I downloaded and installed the full MMULib package and added the appropriate lines to my startup sequence to enable MuFastROM. This increased drive access speeds to around ~3.3 MB/s which is an excellent and noticeable boost.
MMULib package: https://aminet.net/package/util/libs/MMULib Add to S:startup_sequence to enable MuFastRom at boot (change C: to install location): C:MuFastRom ON Protect >NIL: I did do some benchmarking which is of limited use but included below anyway: Base A500, 68000, floppy drive. +-----------+------+-------+------------+------------+ | Benchmark | MHz | MIPS | Dhrystones | Drive MB/s | +-----------+------+-------+------------+------------+ | Sysinfo | 7.1 | 0.57 | 549 | N/A | +-----------+------+-------+------------+------------+ TF536, 6030, 1 MB Chip, 64 MB Fast, 1.5 MB Slow, CF-IDE system drive. +-----------+------+-------+------------+------------+ | Benchmark | MHz | MIPS | Dhrystones | Drive MB/s | +-----------+------+-------+------------+------------+ | Sysinfo | 51.8 | 9.69 | 9288 | 3.35 | +-----------+------+-------+------------+------------+ | SysSpeed | 51.0 | 16.52 | N/A | 3.38 raw | +-----------+------+-------+------------+------------+ | AIBB | 50.0 | N/A | 19310 | N/A | +-----------+------+-------+------------+------------+ In general use Workbench felt much more fluid and apps were faster. I could play AIFF files (converted from MP3s) with Eagleplayer and output through AHI without issues, this took about 30% CPU usage. MP3s were a stuttery mess when attempted but did open and "play". WHDLoad games were fine and Wing Commander and Doom were quite playable. It's exactly what I would have expected both 30 years ago and now: A significant speed boost making an 68000 Amiga much faster and enjoyable to use, enabling it to run more demanding software. Summary The TF536 is a great upgrade and thanks should go to Stephen Leary and project contributors for their work. Performance is good and gives an A500 a great all round boost in Workbench, applications and games. If you value lots of RAM over having an FPU and don't mind using an adapter or two to fit it around other upgrades you may have, I wholeheartedly recommend it. It may not be a GVP A530 Turbo and to be fair using 90s vs modern products is a whole different debate. I'm lucky enough to have a Blizzard 1230 IV and CyberStorm 060 so I understand the value of using products of the time. However the point of the TerribleFire line is to have affordable upgrades which give more people the opportunity to enjoy an upgraded computer and the TF536 does the job admirably. Pros and Cons + 68030 with MMU at 50Mhz give a great speed boost. + 64MB Fast RAM. + Unbuffered 44 Pin IDE header (buffered versions possible, ask your vendor). + Great CF drive performance when using MuFastROM. + Can be installed over long RGB2HDMI with relocator and extra pin headers. + No issues when installed alongside 2.5 MB trapdoor memory with 1 MB Chip mod. + Great value compared to both modern and vintage alternatives. - Potential fit issues. - May want to consider active cooling if you have a crowded A500. Other Key Points: * No FPU (whether this is a pro or a con is up to your specific use case). * Compatible with A500/A500+ or A2000 with CPU slot adapter. * Requires 2.05 ROMs or newer, 3.1 or higher recommended if using onboard IDE. * Install MMULibs and especially MuFastRom for better drive speeds. * Can also be installed in CDTV and A1000. * CPU relocator recommended for A500. Scores Ease of use: 90% Documentation: 90% Value for money: 96% Overall: 92% - WhatIFF Gold Sources and Credits Sold by AMIGAstore.eu:https://amigastore.eu/885-terrible-fire-536-64mb.html Created by Stephen Leary: https://github.com/terriblefire
TopSoftware review: 32se
Reviews ============================================================================ Software Review:32se - by Timo Paul ============================================================================ Product Name 32se Developed By Sami Vehmaa Available From https://8080.itch.io Price 5 USD Hardware/Software Requirements Amiga OS3.2/128MB RAM/030+ Test Machine V4+ Standalone Amiga OS3.2 Review 32se is aimed at Amiga OS3.2 users who wish to improve the usability and look of the standard Workbench install. Where as packs such as ClassicWB targeted real/basic systems, 32se is primarily aimed at RTG Amigas and Vampire Amigas. For this review I will have a look at 32se from the viewpoint of a V4SA user as I do not have an RTG capable 'real' Amiga. Unlike the prevously mentioned package 32se is not free costing 5 USD with an extra install package that is available for free. Installation Once you have downloaded the zipped files, copy them to your Workbench 3.2 partition and make sure you have a lotof space. Unpacked the install folders will take up just under 400MB. You will need to install 32se_1of2_install first however, it will not install from the get go. The tooltypes for the Installer need to be changed. Make sure 'Execute' is not ticked and 'Script' is otherwise you will get an error causing it to not launch. One the installer is running it will take a while to unpack and install the files so go grab a cold drink and some snacks. Be close to your Amiga though as it will ask at one point if you have an RTG Amiga or Vampire Amiga during the install process. After a short while your the installer will stop and ask you to wait 10 seconds and then hard reboot. A Whole New Workbench When you Amiga reboots you will be presented with a highly customised Workbench including the ever useful MagicMenu, new fonts, backdrops and more. From the menu you can change the theme of which there are many, if you installed the second pack. It looks very nice at first glance, the Woekbench looks much more modern than the old grey and black default install. However, on closer exploration you will find drawers randomly placed, with no logical organisation, windows need to be scrolled to find programmes and drawers. At one point I thought there was a lack of software due to the drawers being so far away. Basically a haphazzard mess. The basic software is installed for unpacking files, a file manager, IBrowse and other random software. But with all the customisation and extra software installed it still very much feels like a snapshot of a person's harddisk. Many of the essential utilities for using the V4 are not easy to find such as mounting the SD card or ApolloBoot. More worrying is the tendency for it to freeze my V4SA, before I had installed 32se my Amiga OS3.2 install was not that unstable. Saying all of the above, it is obvious a lot of work has gone into creating the themes, with custom wallpapers, sounds, menus, different fonts and using utilities such as Birdie to give the Workbench a very customised look. The problem is that it is competing against the likes of ClassicWB. ClassicWB is firstly free, second, overall it is a far more polished product where everything is organised logically and provides a much more stable Workbench experience. Final Thoughts It is nice to have a Workbench install for 3.2 since there is nothing like ClassicWB for it (Yet!) but when you have to pay for it there is a certain expectation of receiving a more finished product. As it stands it is a mixed bag. Workbench looks great, but also quite messy, things are not logically organised, the themes are quite garish and then there is the instability. I wish I could say more positive things but as it currently stands it is hard to recommend 32se. Hopefully in the future the developer will clean up the install but for the moment it is something that I have regretted installing and have gone back to my original OS3.2 install.TopSoftware review: AmigaGPT
Reviews ============================================================================ Software Review:AmigaGPT - by Timo Paul ============================================================================ Product Name Amiga GPT Developed By Cameron Armstrong Available From http://aminet.net/package/util/misc/AmigaGPT Price FREE Hardware/Software Requirements Amiga OS3.2/3.9 Test Machine Amiga 1200/3.2/TF1260 V4+ Standalone/Coffin Review In 2023 you could not escape from ChatGPT, no matter where you looked there was some magazine, TV or radio show talking about it. While the current generation of computers had access to AI our venerable Amiga was left out in the cold until the enterprising Cameron decided the create AmigaGPT. Available as a free download from Aminet, it requires at least Amiga OS3.2 and/or 3.9, currently 3.1 is not supported. Saying that it is nice to see software taking advantage of the newer OS. Installation The progamme comes in at just under 1mb and was a quick download from Aminet, when unpacking the .lha archive I got several errors though: Error on reading file 'AmigaGPT' 'AmigaGPT/devs/' 'AmigaGPT/devs/speech/' 'AmigaGPT/devs/speech/34' 'AmigaGPT/devs/speech/37' These errors did not seem to have any affect when using the programme, however, before being able to use AmigaGPT you need to copy the narrator.device usually found in the Devs directory of your Workbench. It needs to be copied to the both the directories marked 34 and 37 in the AmigaGPT drawer. Once the necessary files are copied into their respective locations you can load the programme. If you have ever used ChatGPT then the window will be familiar, your chats/requests history is displayed on the left in a column, a large panel on the right for the output and a smaller text box for your enquiries. There is also another tab at the top where you can access the image generation tools. Using the menu bar brings additional settings; Edit (Cut, Copy, Paste), View (Chat font, UI font), Speech (Accent, Speech Sys), OpenAI (API Key, Chat System, Chat Model, Image Model), DALL-E 2 (Image sizes) and DALL-E 3 (Image sizes). It is great to see Cameron has incoporated so many extra features into the programme. While the AmigaGPT is free to use, you do need to have an OpenAI account with an active API key, which essentially means a paid account. If you have a paid account, AmigaGPT becomes a very useful tool, you are able to copy and paste from other programmes, having ChatGPT check your spelling, grammar etc. Want it to create the framework for an AMOS game? No, problem, just copy the code straight into a text editor. AmigaGPT is a great tool for accessing some of the latest in AI technology on your Amiga. While you do need to pay for the API key access, it is a a great experience to have your Amiga. Doing some further research there are attempts to have a free API by other groups but I was unable to find out how to link this to AmigaGPT, hopefully in the future AmigaGPT will support other free APIs opening up the programme to a larger user base. Final Thoughts AmigaGPT is a very well done implementation of ChatGPT on the Amiga, the user interface is easy to use and the menu options helpful. However, it is hindered by being only able to use a paid API, which puts it out of use of some users. If it is possible in the future to use a free API then the programme will probably become an essential utility on the Amiga but as it currently stands it is only for those with a paid OpenAI account.TopSoftware review: Background Pattern Generator
Reviews ============================================================================ Software Review: Background Pattern Generator - by Timo Paul ============================================================================ Product Name Background Pattern Generator Developed By Stefano Maria Regattin Available From http://aminet.net/package/gfx/edit/BackdPattGener Price FREE Hardware/Software Requirements None Test Machine Amiga 1200/3.2/TF1260 V4+ Standalone/Coffin Review If you spend a lot of time in Workbench, it is highly likely that you have spent a certain amount of it trying out various backdrops and creating your own. In this very issue we have a guide on creating MagicWB backdrops from high colour images. However what if you want to start from scratch and are not interested in a full screen image but just a pattern. You can use one of the many art packages available on the Amiga or a dedicated pattern programme. BackDropPatternGenerator is available from Aminet and currently stands at version 2.3 can be run on any classic Amiga. The file size is a download friendly 63Kb and needs no installation. Upon loading the prgramme you are presented with a window that is oddly not moveable, so you are stuck with it in the top left side of the window. You also need to be running Hires Laced or higher, otherwise the programme will give you an error message and guru your machine. There are no drop down menus, so all actions have to done via the buttons and sliders spread throughout the window. Starting from the top left you have three sets of buttons each with a number on them, the first one sets the pattern size, the second one zoom amount which can be seen in the right window. Finally the third button cycles through several palette presets. Following on from the buttons you get a strip of colours, a mix button, something that looks like a pattern or dither setting and a clear (Clr) button. If you choose one of the colours from the palette strip and click on Mix and then Clr it will clear the screen to the colour you have chosen. Otherwise pressing Clr will clear the screen to the default WB grey. Under the Mix and Clr buttons there is a window, though it is not apparent right away, this is where you can draw your patterns. When you do so, you will see the pattern repeated on the left side, 9 times, to give you an idea of what your pattern will look like. Underneath the drawing area you are provided with some default patterns to get some inspiration or learn how the patterns are drawn. Further down from there are four more buttons: 50%, New, Load and Save, the latter three are self expanatory however the prior one is still a mystery to me. When I changed the value I could discern no change in the pattern or window. In Use At the time of writing the BackdropPatternGenerator does not appear to support any other types of drawing tools, the only current tool is a dotted brush, there is no continuous brush, fill, square/rectangle, line or circle tools. When you draw, there is no undo function either requiring you to draw over the mistake in a different colour or clear the entire image. While it lacks many functions that you would expect for this type of programme the ability to show the pattern repeated in the left is a nice feature giving you a better idea of how your pattern will look. However the lack of more solid drawing tools makes it quite limited in scope. More so the inability to move the window is most frustrating, when in use I am unable to access any icons or drives that may lie under the programme window. The general layout of the programme is not intuitive and forces the user to use much guess work and exploration to learn how to use the software. There are still bugs which can be frustrating such as when choosing a colour for the palette strip and a different colour showing up than the one clicked on. BackdropPatternGenerator is a nice idea for a programme but it needs several improvements: - Moveable window - Better labeled buttons - More drawing options i.e. fill, line, object - Fix the colour palette - Create a more logical layout, think of Iconian as a good example Final Thoughts BackdropPatternGenerator is a good idea but still needs a lot more development regarding the user interface, available tools and bug fixes. I look forward to coming back to this programme in the future and see what the author has improved as while it is still quite rough around the edges it is a promising piece of software.TopSoftware Review: Redit
Reviews ============================================================================ Software Review:Redit - by: Timo Paul ============================================================================ Product Name Redit Developed By Kaii Scherrer Available From http://www.kaiiv.de/redit/ Price Free Hardware/Software Requirements Kickstart 1.2 / 1MB Ram Test Machine A1200/TF1260/3.2 V4+Standalone/Coffin r63 Review Since starting WhatIFF? I spend a lot of time editing text on my Amiga, as such I am always interested when a new text editor is available. Strictly speaking Redit 2.0 is not a new programme, the About menu shows the date 10.3.2018, so by now it is around six years old. To be honest, I had not heard about Redit until reading about it in a recent issue of Amiga Future, or perhaps I have but never paid it much attention until now. As it goes, I have been using Protext to edit the magazine and while it has done a great job of editing it, I am always on the lookout for something more modern. When I first saw the review for Redit in AmigaFuture I thought it was a programme for posting on Reddit but then on a closer look I realised it has only one 'd', so I proceeded to read the article. So, what is Redit? It is a modern text editor for all Amigas, be it 1.2 or 3.9, and can be run within half a megabyte of ram. There is no need to run an installer, you can copy the drawer to any location and run Redit from there. It supports configurable tabs (Done from Too Types), has Undo/Redo, Cut/Copy/Paste, and Find/Replace/Replace All. You can open several documents at a time and configure the colours, again from the Tool Types. At the bottom on the Redit window is a column and line counter, this is very useful feature (At least for me) as when writing and editing articles for the magazine I try to keep everything within 75 columns to fit NTSC HiRes screen modes. Redit opens on the Workbench and by default uses a white background with black text. Traditionally most text editors use the standard grey background so I was pleasantly surprised. It is a small thing but it makes the editor feel more modern. The Edit commands follow the current standards used on all modern editors/word processors i.e. Left A + C for Copy, Left A + V for Paste, Left A + U for Undo and Left A + Z for Undo. While I enjoy the editing abilities of Protext, it does not use the standard keyboard commands like Redit. You are able to jump words using Ctrl + arrow keys which makes it a fast experience to jump to a word using just the keyboard. With many users now using mice with scroll wheels it is nice to see Redit supporting this. I noticed that it functioned well under ClassicWB on UAE but there were slight differences when using the HID2AMI driver. With the former I was able to scroll the entire document but with HID2AMI installed it scrolled by paragraph using the cursor. Not a bad thing but interesting to note how it works differently. You cannot change fonts, bold, italic, etc. but Redit is not meant to be a RTF editor and in this case it excels. Of all the editors that I have used over the years this one is the most intuitive and functional. It has a clean interface with no clutter, the menus actions are limited but useful and do the job. In regards to editing for WhatIFF? I have not found myself wanting for more. In fact, I think that I will be switching over to Redit as my main go to text editor from now on. Redit can be downloaded from the author{s website: http://www.kaiiv.de/redit/ It can be accessed from an Amiga browser which was nice of the developer to consider. It feels wrong sometimes to have to download Amiga software on my Mac just to run it on the Amiga, especially when my Amiga has internet capability. The website is in German as is the documentation but the programme itself runs in English so there should be no issues for English speakers. If you are looking for a simple, light and modern text editor then I highly recommend Redit. A simple programme that has just the right balance of simplicity and features and it able to run on all Amiga configurations.TopSoftware Review: ApolloExplorer
Reviews ============================================================================ Software Review: ApolloExplorer - by: Timo Paul ============================================================================ Product Name ApolloExplorer Developed By Rony Beck Available From https://www.apollo-computer.com/downloads.php https://github.com/ronybeck/ApolloExplorer Price Free Hardware/Software Requirements V4 Equipped Amiga/V4 Standalone Test Machine V4+ Standalone Review I recently discovered a helpful utility called ApolloExplorer for my Amiga V4SA that I believe can be quite useful for other Amiga users as well. ApolloExplorer is a file-sharing tool that comes included with ApolloBoot or can be downloaded from the following URLs: http://www.apollo-computers.com/downloads https://github.com/ronybeck/ApolloExplorer *Latest version here When you download the package, it's better to do it from the PC or Mac side as the compressed file is 27MB, which may take some time to download on the Amiga. After unpacking the software, you will find four directories: Amiga Side Server, Linux Client, Mac Client, and Windows Client. The Amiga side installation is straightforward, there's no installer, just copy the program to your preferred location. You may also want to find a suitable icon for easier launching. For the Windows, Mac, and Linux installs, it's a similar process of copying the program to the relevant location. After that, you just need to launch ApolloExplorer from the Amiga first and then from the Windows/Mac/Linux side. If your V4 Amiga is connected to the same network, you will see the Amiga appear on the left side, including all mounted partitions. You can then navigate through all the directories to copy files to and from the Amiga. However, you are not able to perform these actions from the Amiga side. When you launch ApolloExplorer from the Amiga, a small window will pop up with a stop button when you are finished. A nice feature is being able to name your V4 device via the icon Tooltypes this can be achieved by typing in: name="anyname" system="for example standalone" The names will then appear on the PC/Mac client and change the icon under 'System Info'. I have to thank 'roarrr' from the WhatIFF? Discord channel for this little tidbit. When transferring a file from the Amiga, you cannot drag the file over. Instead, you need to double-click the file, which brings up another file requestor, allowing you to choose where to put your file. All other actions are performed from the client side. In terms of speed, I have attained a maximum transfer speed of 1.2MB/sec over a WiFi connection from a MacBook Air M1 to the V4SA (Ethernet). Generally, transfers are quite fast without errors. The interface on the client side are user-friendly and straight forward, there is no need to understand networks, just drag and drop, that's it. The program has proven to be quite stable; however, I have encountered some issues when exiting the program, requiring a reboot of the Amiga. It doesn't happen every time, but it's something to be aware of. Just to be on the safe side I always save my data just before stopping ApolloExplorer. Final Thoughts Networking an Amiga has never been easy job, and transferring data more so. However, ApolloExplorer makes networked file transfer easy, bringing the Amiga, or at least V4-equipped Amigas, into the 21st century. With easy drag-and-drop file transfer, you can give the ever-fragile PCMCIA slot a rest. This is just another great example of how the Apollo Team is using the V4 to create a modern Amiga experience. It would be interesting to see if ApolloExplorer could be implemented on none V4 systems.TopHardware Review: SDBox v2
Reviews ============================================================================ Hardware Review: SDBox v2 - by: Martyn Bampton ============================================================================ Product Name SDBox V2. Developed By Jorgen Bilander, Niklas Ekstrom and Tobias Niva. Available From https://www.amigastore.eu Price 50 USD/45 EUR Hardware Requirements Amiga with a working parallel port. Machines used for testing A500 TF364 (1 MB Chip, 64 MB Fast, 1.5 MB Slow, 68030 50 MHz) A600 (2 MB Chip, 8 MB Fast, 1.5 MB Slow, 68000 7 MHz) A600 xT Turbo (2 MB Chip, 8 MB Fast, 1.5 MB Slow, 1.5 MB Other, 68SEC000 28 MHz) A1200 stock (2 MB Chip, 68020 14 MHz) A1200 TF1260 (2 MB Chip, 128 MB Fast, 68060 50 MHz)Introduction I've been enjoying the relative simplicity of using a Compact Flash card to transfer data to and from my Amiga 1200 and 600 via the PCMCIA slot. I remember using SerNET and ParNET in the 90s and floppies of course. It worked but it wasn't ideal, being able to almost normalise Amiga data transfers with standard memory cards has been brilliant! However it's not been as convenient with my A500. I had been resorting to removing the CF card from my TF536's IDE to CF adapter but it was getting to be a right pain and I was concerned about damaging things in the long term. So! I've been looking for an alternative for Amigas without a PCMCIA slot that doesn't require me to turn off my Amiga and remove the case. How about a microSD card reader that connects via the parallel port? That"s exactly what the SDBox (now on version 2) does. It's a very clever solution that uses an Arduino Nano V3 to interface the Amiga's parallel port to the SD card. There's a single 4GB partition limit and naturally it"s confined to parallel port speeds topping out at around 350 KB/s theoretically, but customer feedback suggests it works well! I had to get one and see for myself!
Hardware and Installation The SDBox V2 by Jorgen Bilander (incorporating work by Niklas Ekstrom and Tobias Niva) is another amazing open source project where you are free to download the various files, have your own PCBs made, order the components and get soldering! However for most of us buying one already assembled, cased and tested is likely the better option. My unit came from AmigaStore.eu in their usual high quality card packaging with a floppy containing the setup software. It was also good to see the creators credited on the box. It's a 5cm square case about 2cm high with the parallel connector on one side and Micro USB power in along with a microSD slot on the other. I would have preferred USB C power but it's not really a problem as I'm sure most of us have lots of Micro USB power cables and USB chargers out of work and looking for a job, sorted! There are two LEDs on the top to indicate power (green) and activity (red) and the 3D printed case is functional, matching the A500's or perhaps the A520 modulator's case aesthetic.
Installation is simple. With the computer turned OFF plug the Micro USB cable into the SDBox V2 and then plug the SDBox V2 into your parallel port. Connect the other end of the Micro USB cable to USB power and wait for it to power up, then turn on the Amiga. So again the correct sequence is SDBox V2 first and the Amiga last. You want the SDBox V2 to be running and be ready for the Amiga to detect it. You"ll now have to prepare a 4GB (maximum) microSD card partition, be it an actual 4GB card or a 4GB partition on a larger card. I didn"t test a partition size less than 4GB but it should would work fine if you have a smaller card. I placed the partition at the start of the card as instructed. In most cases 4GB makes sense, FAT32 formatted. You can do this easily on most OSes using the appropriate disk management tool. I did find inserting and removing the microSD card a bit tricky as the slot is recessed into the case, if you don"t have long enough finger nails to reach you may find it easier to use a thin plastic tool to push the card in. My unit has the spring loaded push to click in - push to release type of slot which I prefer, not the friction fit kind. Of course the location of the slot right at the back of your Amiga doesn"t help either but this is a minor point overall.
Software and Performance Installing the driver was simple as usual, just insert the floppy if it was included or download, extract and transfer the archive to your Amiga if not. Run the installer and reboot for good measure. You don"t need to turn the Amiga off or reboot to insert a microSD card, it should just be recognised and show up in the usual fashion on Workbench after a slight delay. It's identical to using any other floppy disk or CF card. Transfer speeds weren't bad, not as fast as the PCMCIA slot but given most Amiga related files aren't more than a few MB and I don't have to open up my Amiga or resort to other less convenient methods I don"t mind at all. Ease of use wins! Stability was okay, at least once I had to reboot in order for the SD card to show up but it was just once and it was rock solid otherwise. I experienced no transfer errors but be aware the driver does no CRC verification so you'll have to verify your files once copied over. One thing I noticed in all test cases was the Amiga's boot time increased by around 10 seconds as the card was read during start up. The creator of the driver, Niklas Ekstrom explains the theoretical maximum speed: "The throughput of the adapter is limited by how fast the 68K CPU can access the CIA chips. The CPU can make one access (a read or a write) to a CIA chip per E-cycle. An E-cycle is one tenth of the frequency of an original Amiga. The E-cycle frequency is thus roughly 700 KHz, regardless if the Amiga uses an accelerator or not. The protocol used by the SPI adapter can communicate one byte every two E-cycles which gives a theoretical upper limit of 350 KB/s."
You can read more here: I tested transfer speeds between the system drive the the SDBox V2 using various setups running AmigaOS 2.1 or 3.2 and in all cases I used a single 3.4 MB file. I tested both read and write speeds three times and averaged the results. I also tested PCMCIA and RAM: transfers for comparison where possible and these results are included at the end of the review for those who"d find the data useful. +-----------------+-----------------------+------------------------+ | Setup | Read | Write | +-----------------+-----------------------+------------------------+ | 1) A600 8MB | 39 seconds (89 KB/s) | 39 seconds (89 KB/s) | +-----------------+-----------------------+------------------------+ | 2) A600 xT | 26 seconds (134 KB/s) | 26 seconds (134 KB/s) | +------------------+----------------------+------------------------+ | 3) A500 TF536 | 16 seconds (218 KB/s) | 14 seconds (249 KB/s) | +-----------------+-----------------------+------------------------+ | 4) A1200 | 25 seconds (139 KB/s) | 23 seconds (151 KB/s) | +-----------------+-----------------------+------------------------+ | 5) A1200 TF1260 | 27 seconds (129 KB/s) | 27 seconds (129 KB/s) | | Using TF IDE | 27 seconds (129 KB/s) | 24 seconds (145 KB/s) | +-----------------+----------------------+-------------------------+ I would expect that in general a better equipped Amiga will perform faster transfers but the Amiga"s parallel port and its performance didn"t change much between models. Clearly accelerators help but there"s a still a limit to what the CIA chips can do. The A1200 results are puzzling as I would have expected them to perform better, perhaps I'll revisit that in the future. I encountered no transfer errors on any setup over several days of testing but I would still check anything important.
Summary The SDBox V2 is a simple tool, cleverly implemented and gives my A500 a usable alternative to PCMCIA CF card transfers. It"s easy to use although it does have some quirks you need to be aware of. It's about twice the price of a PCMCIA/CF based solution and slower but a real option for those looking to do regular or even just occasional data transfers with the familiarity and simplicity of microSD memory cards. Just watch for potential transfer errors. Pros and Cons + Easily connected via the parallel port (A1000 needs a gender changer). + Great option for Amigas without PCMCIA slots (or broken slots eh Editor? *cough*) Editor: Ahem, yes, my poor A1200. + Support for AmigaOS 1.3 and up. + Accepts microSD cards with a FAT32 partition up to 4GB. + Auto detects inserted cards. + Worked reliably on all test setups and particularly well on the intended use case 030 A500. + Good value at ~$50 USD considering an Arduino Nano V3 alone is $25 USD (at the time of writing). + I don"t have to turn my A500 off and take it apart! + Open source if you want to build one yourself. - Transfers need to be verified. - Not as fast as other solutions, such as PCMCIA CF. - Odd speeds on A1200 setups tested. Other Key Points: * Power off your Amiga before connecting or disconnecting the SDBox V2. * Turn the SDBox V2 on first before the Amiga. * Requires an external 5V source, most conveniently USB charger, via Micro USB cable. * Transfer speeds of up to 350 KB/s in theory but typically around 100 KB/s to 250 KB/s in use. * Accelerators generally help, even the xT Turbo gives a nice boost, the TF536 even more so. * May slow down your Amiga"s boot time as the card is read during start up. Scores Ease of use: 95% Documentation: 90% Value for money: 85% Overall: 90% - WhatIFF Gold Sources and Credits Sold by AMIGAStore.eu: https://amigastore.eu/en/825-sdbox-v2.html). Created by Jorgen Bilander: https://github.com/jbilander/SDBox-v2 Driver and concept Niklas Ekstrom: https://github.com/niklasekstrom/amiga-par-to-spi-adapter 3D case model by Tobias Niva: http://www.niva3d.com Full Test Results
Topfulltestresults
Reviews Full test results Setup 1) A600 with a 8 MB CPU mounted RAM expansion + 1MB RAM trapdoor expansion ECS / 68000 7Mhz / 2 MB Chip / 8 MB Fast / 1.5 MB Slow / SD-IDE (motherboard) 2.1 System drive Sysinfo speeds DH0: 628 KB/s, SD0: 123 KB/s Setup 2) A600 with a xT Turbo CPU mounted accelerator + 1MB RAM trapdoor expansion ECS / 68SEC000 28Mhz / 2MB Chip / 8 MB Fast / 1.5 MB Slow / 1.5 MB Other / CF-IDE (motherboard) 3.2 System drive Sysinfo speeds DH0: 1.35 MB/s, SD0: 160 KB/s Setup 3) TF536 based A500 with 2 MB RAM Expansion. OCS / 68030 50Mhz / 1 MB Chip / 64 MB Fast / 1.5MB Slow / CF-IDE (TF) 3.2 System drive Sysinfo speeds DH0: 3.26 MB/s, SD0: 320 KB/s Setup 4) Stock A1200. AGA / 68020 14 Mhz / 2 MB Chip / No Fast / CF-IDE (motherboard) 3.2 System drive Sysinfo speeds DH0: 1.04MB/s, SD0: 200 KB/s Setup 5) TF1260 based A1200. AGA / 68060 50Mhz / 2MB Chip / 128MB Fast / CF-IDE (motherboard/TF1260) 3.2 System drive Using motherboard IDE Sysinfo speeds DH0: 1.84MB/s SD0: 164 KB/s Using TF1260 IDE Sysinfo speeds DH0: N/A (FFS 4K blocks) SD0: 164 KB/s Amiga 600 8 MB (motherboard IDE) CF card to SD-IDE (read) = 19 seconds (183 KB/s) SD-IDE to CF card (write) = 18 seconds (193 KB/s) SD card to SD-IDE (read) = 39 seconds (89 KB/s) SD-IDE to SD card (write) = 39 seconds (89 KB/s) SD card to RAM: (read) = 39 seconds (89 KB/s) RAM: to SD card (write) = 36 seconds (97 KB/s) Amiga 600 xT Turbo (motherboard IDE) CF card to CF-IDE (read) = 7 seconds (497 KB/s) CF-IDE to CF card (write) = 7 seconds (497 KB/s) SD card to CF-IDE (read) = 26 seconds (134 KB/s) CF-IDE to SD card (write) = 26 seconds (134 KB/s) SD card to RAM: (read) = 25 seconds (139 KB/s) RAM: to SD card (write) = 24 seconds (145 KB/s) Amiga 500 (TF536 IDE) CF card to CF-IDE (read) = N/A (no PCMCIA slot) CF-IDE to CF card (write) = N/A (no PCMCIA slot) SD card to CF-IDE (read) = 16 seconds (218 KB/s) CF-IDE to SD card (write) = 14 seconds (249 KB/s) SD card to RAM: (read) = 14 seconds (249 KB/s) RAM: to SD card (write) = 12 seconds (290 KB/s) A1200 stock with CF-IDE CF card to CF-IDE (read) = 11 seconds (317KB/s) CF-IDE to CF card (write) = 9 seconds (387 KB/s) SD card to CF-IDE (read) = 25 seconds (139 KB/s) CF-IDE to SD card (write) = 23 seconds (151 KB/s) SD card to RAM: (read) = N/A (not enough RAM) RAM: to SD card (write) = N/A (not enough RAM) Amiga 1200 (motherboard IDE) CF card to CF-IDE (read) = 8 seconds (435 KB/s) CF-IDE to CF card (write) = 8 seconds (435 KB/s) SD card to CF-IDE (read) = 27 seconds (129 KB/s) CF-IDE to SD card (write) = 27 seconds (129 KB/s) SD card to RAM: (read) = 22 seconds (158 KB/s) RAM: to SD card (write) = 22 seconds (158 KB/s) Amiga 1200 (TF1260 IDE) CF card to CF-IDE (read) = 7 seconds (497 KB/s) CF-IDE to CF card (write) = 4 seconds (870 KB/s) SD card to CF-IDE (read) = 27 seconds (129 KB/s) CF-IDE to SD card (write) = 24 seconds (145 KB/s) SD card to RAM: (read) = 23 seconds (151 KB/s) RAM: to SD card (write) = 22 seconds (158 KB/s) Notes: - 3.4 MB file used for testing. - All tests performed three times and averaged. - CF card is in a CF PCMCIA slot reader. - CF-IDE is an internal CF card in a CF to IDE adapter. - SD-IDE is an internal SD card in a SD to IDE adapter. Test Systems +-----------------+----------+----------+------------+----------------+-----+------------------+--------------+ | Setup | Chip RAM | Fast RAM | Slow/Other | CPU | OS | DH0: Sysinfo | SD0: Sysinfo | +-----------------+----------+----------+------------+----------------+-----+------------------+--------------+ | 1) A600 8MB | 2 MB | 8 MB | 1.5 MB | 68000 7 MHz | 2.1 | SD-IDE 628 KB/s | 123 KB/s | +-----------------+----------+----------+------------+----------------+-----+------------------+--------------+ | 2) A600 xT | 2 MB | 8 MB | 3 MB | 68SEC00 28 MHz | 3.2 | CF-IDE 1.35 MB/s | 160 KB/s | +------------------+---------+----------+------------+----------------+-----+------------------+--------------+ | 3) A500 TF536 | 1 MB | 64 MB | 1.5 MB | 68030 50 MHz | 3.2 | CF-IDE 3.26 MB/s | 320 KB/s | +-----------------+----------+----------+------------+----------------+-----+------------------+--------------+ | 4) A1200 | 2 MB | 0 MB | 0 MB | 68EC020 14 MHz | 3.2 | CF-IDE 1.04 MB/s | 200 KB/s | +-----------------+----------+----------+------------+----------------+-----+------------------+--------------+ | 5) A1200 TF1260 | 2 MB | 128 MB | 0 MB | 68LC060 50 MHz | 3.2 | CF-IDE 1.84 MB/s | 164 KB/s | | Using TF IDE | | | | | | CF-TF IDE N/A* | 164 KB/s | +-----------------+----------+----------+------------+----------------+-----+------------------+--------------+ * There is an issue with Sysinfo when measuring speed for 4K block FFS drives via TF ehide.device. Relevant SD0: Results +-----------------+-----------------------+-----------------------+ | Setup | Read | Write | +-----------------+-----------------------+-----------------------+ | 1) A600 8MB | 39 seconds (89 KB/s) | 39 seconds (89 KB/s) | +-----------------+-----------------------+-----------------------+ | 2) A600 xT | 26 seconds (134 KB/s) | 26 seconds (134 KB/s) | +-----------------+-----------------------+-----------------------+ | 3) A500 TF536 | 16 seconds (218 KB/s) | 14 seconds (249 KB/s) | +-----------------+-----------------------+-----------------------+ | 4) A1200 | 25 seconds (139 KB/s) | 23 seconds (151 KB/s) | +-----------------+-----------------------+-----------------------+ | 5) A1200 TF1260 | 27 seconds (129 KB/s) | 27 seconds (129 KB/s) | | Using TF IDE | 27 seconds (129 KB/s) | 24 seconds (145 KB/s) | +-----------------+-----------------------+-----------------------+ Full Results +-----------------+------------------------+-------------------------+-------------------------+--------------------------+-------------------------+--------------------------+ | Setup | PCMCIA CF to DH0: Read | DH0: to PCMCIA CF Write | SDBox SD0: to DH0: Read | DH0: to SDBox SD0: Write | SDBox SD0: to RAM: Read | RAM: to SDBox SD0: Write | +-----------------+------------------------+-------------------------+-------------------------+--------------------------+-------------------------+--------------------------+ | 1) A600 8MB | 19 seconds (183 KB/s) | 18 seconds (193 KB/s) | 39 seconds (89 KB/s) | 39 seconds (89 KB/s) | 39 seconds (89 KB/s) | 36 seconds (97 KB/s) | +-----------------+------------------------+-------------------------+-------------------------+--------------------------+-------------------------+--------------------------+ | 2) A600 xT | 7 seconds (497 KB/s) | 7 seconds (497 KB/s) | 26 seconds (134 KB/s) | 26 seconds (134 KB/s) | 25 seconds (139 KB/s) | 24 seconds (145 KB/s) | +-----------------+------------------------+-------------------------+-------------------------+--------------------------+-------------------------+--------------------------+ | 3) A500 TF536 | N/A* | N/A* | 16 seconds (218 KB/s) | 14 seconds (249 KB/s) | 14 seconds (249 KB/s) | 12 seconds (290 KB/s) | +-----------------+------------------------+-------------------------+-------------------------+--------------------------+-------------------------+--------------------------+ | 4) A1200 | 11 seconds (317KB/s) | 9 seconds (387 KB/s) | 25 seconds (139 KB/s) | 23 seconds (151 KB/s) | N/A** | N/A** | +-----------------+------------------------+-------------------------+-------------------------+--------------------------+-------------------------+--------------------------+ | 5) A1200 TF1260 | 8 seconds (435 KB/s) | 8 seconds (435 KB/s) | 27 seconds (129 KB/s) | 27 seconds (129 KB/s) | 22 seconds (158 KB/s) | 22 seconds (158 KB/s) | | Using TF IDE | 7 seconds (497 KB/s) | 4 seconds (870 KB/s) | 27 seconds (129 KB/s) | 24 seconds (145 KB/s) | 23 seconds (151 KB/s) | 22 seconds (158 KB/s) | +-----------------+------------------------+-------------------------+-------------------------+--------------------------+-------------------------+--------------------------+ * No PCMCIA slot. ** Not enough free RAM.TopHardware Review: Retronics Plastic Covers
Reviews ============================================================================ Hardware Review: Retronics Plastic Covers - by: Martyn Bampton ============================================================================ Product Name Plastic Dust Covers (A1200/A500/A600/CD32 and more) Developed By Retronics Available From retronics.eu AMIGAstore.eu amiga-shop.net sordan.ie eBay Price Varies but typical best prices are 27 USD/25 EUR Hardware Requirements An appropriate computer :) At the time of writing covers are available for: * A1200/600/500(+), CD32 and Amiga 2000/3000/4000/CDTV keyboards. * Commodore 64/64C/128/16/+4/VIC-20 and 128D keyboard. * Atari ST and STFM/STE/Falcon and 800XL/XE. * ZX Spectrum 48K/Plus/128K/+2/+3. * Amstrad CPC464/6128. * BBC Model B. * Texas Instrumets Ti-99/4A. * Timex TC2048. * Datasets - Commodore 1530/1531, Atari 1010/XC12. Test Machines Amiga 1200 Amiga 600Introduction Protecting your devices is always a good idea, I always had dust covers for my computers and peripherals in the past and there are solid reasons to use one. While there's dust and crumbs to consider there's also the threat of liquid spills too, needless to say you should always try and prevent any (usually sticky) fluids finding their way inside your computer. Also, when your computer is switched off and left unattended it's nice to know anything falling on it will be less likely to leave a mark, hopefully. Another point I didn't think much about in the past is UV exposure - I'm sure some of my dust covers also lessened the yellowing my original Amigas would have suffered. My A1200 in particular was always under one of those translucent PVC covers from the 90s when not in use, the only yellowing on the case is on the bottom left edge that would have been subject to light coming in from the window. I recall the cover itself did slightly yellow over time so I'm really glad I did what I could to project my Amiga then. I'm certainly making sure to do the same now. I was really happy to find these transparent from-fitting covers from Polish company Retronics (Where bytes travel back in time) and thought they'd be good to look at. You may have seen them in the background of many online articles and videos.
Impressions and Use The cover arrived in a very nice retail box and was wrapped in a protective plastic bag so it was free of any scuffs or scrapes. Retronics have manufactured their dust covers out of vacuum formed 1 mm thick transparent plastic sheet, rather than soft plastic or fabric material sewn into the correct shape. /It seemed slightly thinner than 1 mm to me but that's probably down to the material stretching during the forming process. This creates a close fit when placed on top of the intended computer and it looks really great, almost display worthy. At 1 mm thick the cover does have some flex to it and isn't completely ridged, less ridged than I was expecting. I'd describe it as similar to the more rugged clear retail packaging materials (those which can be so hard to open without injuring yourself!) than a solid acrylic style cover. As Retronics say it's not flimsy but it's ridged enough to protect against damage, it's also light enough to sit on your computer without any worry of wear spots forming. The finish is great in general but a little more care could be taken around the edges where it was cut from the formed sheet, especially for the asking price. My covers were a bit sharp on the corners but you can carefully sand any problem spots down if need be. As a bonus the plastic also protects against UV!
I've been using these covers for my A1200 and A600 for several months now and I love them. I like to walk past my desk and see my computers on display rather than hidden under a more traditional dust cover. The ports are fully accessible and I can even leave a RastPort KA02 external PCMCIA adapter connected without the cover getting in the way. This is because the covers don't fully cover the back and sides of the computer, stopping about halfway down. One point I will make though is these covers are may not fit correctly if you have any protruding case accessories or modifications on the upper part of your Amiga. I have some HDMI port clip-on housings and there are also Gotek displays which sit on the upper vents. These will cause the cover to sit unevenly at best and not fit at all at worst. I'm fortunate enough to own a few different Amigas so I can use traditional covers in those cases, it's just something to consider.
Summary Protective covers are worth having and if you're in the market for a new one then I would seriously consider a Retronics cover. They may seem a bit expensive for a bit of plastic sheet but consider their size and the packaging required to get it to you undamaged. I'd watch for sharp edges and be aware of the fit if you have any case modifications but if you think it'll work for your computer then you won't be disappointed. They are accurately formed and look fantastic in use, giving your computer a display quality appearance. The packaging is excellent and I really enjoyed opening it up and putting it on my Amiga for the first time actually, every time as the fit is quite satisfying. Pros and Cons + Dust and water protection. + Formed to fit snugly. + Strong and flexible enough to absorb casual impacts. + Does not block ports and leaves PCMCIA devices accessible. + UV protection. + Looks great! - More expensive than alternatives but requires more packaging than foldable material. - May have sharp or unfinished corners. Other Key Points: * Fit could be affected by case modifications. * Back and sides not fully covered so ports are accessible but no protection from accidents or UV. Scores Ease of use: 100% Documentation/Packaging: 90% Value for money: 70% Overall: 90% - WhatIFF Gold Sources and Credits Sold by AMIGAstore.eu: https://amigastore.eu/en/761-high-quality-dust-cover-for-amiga-computers.html Created by Retronics: https://retronics.eu
Topgamereviews
CONTENTS ============================================================================ -= G A M E R E V I E W S =------------------------------------------------- ---------------------------------------------------------------------------- -= Game Review: Cecconoid =- Black and white graphics, music by Hoffman and frantic shooting, this is going to be interesting! -= Game Review: ZombieSurvivor =- Zombies, zombies and more zombies, we take a look at the new game for RTG Amigas from 8080. -= Game Review: Shift =- A new puzzle game for the Amiga that will have you thinking upside down and inside out. ----------------------------------------------------------------------------Topshiftreview
Gamereviews ============================================================================ Game Review: Shift - by Timo Paul ============================================================================ Product Name Shift Developed By Ali Pouladi (Code, Graphics, SFX) Andy Johns (Graphics) Marukpa (Graphics, Scripting) Available From ttps:///h4plo.itch.io/shift Price Name your own price Hardware/Software Requirements OCS+ Test Machine Amiga 1200 TF1260 Apollo Computer V4+Standalone Review It is not often that I come across a game that draws me in so quickly and taxes my brain as the same time. Shift came out just a few weeks before this issue's release but after playing it for a few rounds, I knew that I had to spread the word about this little game. The original game was developed by Antony Lavelle as a Flash game in 2008 and has since been converted to Windows, Mac, iOS, PlayStation and Nintendo 3DS. Now in 2024 the Amiga, C64 and Atari have been treated to the fun that is Shift. At it's basic core, Shift is a puzzle platform game, your goal is to reach the door by jumping across platforms, pushing switches and the main gameplay element, shifting the screen. What do I mean by shifting? Shifting is done with the joystick button, and it will reverse the image vertically and inverse the colours. A fantastically simple but very effective gameplay element. Areas that were inaccessible such as platforms too high to jump to suddenly become available when everything is shifted. The game starts out easily enough and you will not encounter much difficulty until stage 13 or 14 but that is just me and I'll be the first to admit I my gaming skills leave much to be desired. Most people however will get much further before getting stuck. At the start of each stage you are given a password which can be typed in on the start screen. So, have your smartphone ready to take a photo when you get to the later stages. During the game you can turn off the music by pressing M and R to restart the stage. Control is only via the joystick and while it works well, I would have liked to have had the option to use a keyboard. Having played the game under emulation I found the gameplay worked better with keyboard control. The graphics are simple black and white, (It seems a theme of this issue with Cecconoid being another black white game reviewed), they do the job well and are nicely animated. Auditory wise you are treated to a funky bass, guitar and drums track that is nice but can grate after a while, so I was glad of the option to mute the music. That is to say the music is not bad and I enjoyed it at first but it would have been nicer to have more variety of music. Final Thoughts We are very lucky this year, so many great new games have been released and more are on the horizon. However, even with all the amazing games Shift should be on your list of essential games to play. Everything about the game works so well from the tight controls and gamplay, to the stylised black and white graphics. I have been playing this game with my wife for a couple of days now and she has gotten a bit addicted to it, a mark of a great game. Pros and Cons: + Fantastic idea for a game + Addictive + Makes you think very hard - Music can be a bit repetitive Scores Gameplay: 10/10 Graphics: 7.5/10 Sound: 6/10 Overall: 7.8/10Topcecconoidreview
Gamereviews ============================================================================ Game Review: Cecconoid - by Timo Paul ============================================================================ Product Name Cecconoid Developed By Hoffman Available From https://www.thalamusdigital.itch.io Price 9.99 USD Hardware/Software Requirements Any Amiga with 512kb Chip and 512kb any other RAM Test Machine Amiga 1200 TF1260 Apollo Computer V4+Standalone Review Cecconoid originally available for the Windows and Linux was made available in Amiga form in 2024 by the legendary Hoffman. Known for his spotless music creations Hoffman has of recent put his talents to converting MSX games and Cecconoid is his latest conversion. A flip screen shooter that has black and white graphics reminicent of classic ZX Spectrum games it is not a game that you would associate with the Amiga on first glance. However those who choose to pass on Cecconoid are missing out on a fantastic gaming experience. The game play is of the dual shooter variety, which for the unitiated means that you control the ship with one controller, aim and fire with another controller (I had to look this up as I did not know what dual shooter was until playing Cecconoid). Since I do not have two joysticks I used the keyboard to control the ship, and aimed/fired with the mouse. This worked quite well, though I was a bit disappointed that you can only fire in 8 directions instead of the full 360 degrees offered by the mouse. When you fire the effect is not particularly noticeable as each bullet is only one pixel but given the low resolution this is understandable. You do get some nice explosions made up of numerous pixels which looks very stylized. The game starts out easily and while it is black and white the graphics work well in the game. It seems there has been a trend for black and white games on the Amiga, Tenebra being one that comes to mind. And they work well on the Amiga. I think most users have gotten over their Amiga superiority complex and can accept a game can be good regardless of it having 16, 32, 256 or even 2 colours. And this is what yout get with Cecconoid, a tight little game with gameplay that is simple to learn but can take a little while getting used to. Almost everything on screen can be blown up, and it pays off to shoot at anything to get extra points. It would be amiss of me to not mention the music, and the listener is not let down with Hoffman taking the reigns. You are treated to classic Hoffman breaks, drum and bass and electro soundings. The samples are all clear and punchy. I used to load up the game just to listen to the music until I discovered the mods drawer. Final Thoughts Gaming on the Amiga has become quite the exciting past time with new games seeming to come out every few months. It is a great time to be an Amiga gamer and when we get games like Cecconoid it is just the icing on the cake. Though the game started out on the PC, Hoffman has done a fantastic job of making it feel like an original Amiga game. The gameplay is adjusted at just the right level of difficulty and the graphics nostalgic yet feel modern. A fun shooter that is easy to get into but hard to master. Pros and Cons: + Fun gamplay mechanics + Graphics are nostalgic but still modern + Amazing music! - Mouse firing control limited to 15 degree increments Scores Gameplay: 7/10 Graphics: 7/10 Sound: 10/10 Overall: 8/10Topzombiesurvivorreview
Gamereviews ============================================================================ Game Review: ZombieSurvivor - by Timo Paul ============================================================================ Product Name Zombie Survivor Developed By 8080/Sami Vehmaa Available From https://8080.itch.io Price 3.00 USD Hardware/Software Requirements Apollo Computer V4 Test Machine Apollo Computer V4+ Standalone Review Sometime in the future after the original surgance of Corona, a variant has cropped up, this time however, it is not attacking the lungs but the brains turning normal humans into mindless flesh eating zombies. So starts the intro to ZombieSurvivors and all in high RTG graphics. If you have ever played VampireSurvivors then you will know what to expect from ZombieSurvivors. For those not familiar with the game, it is a rogue style game where you have to survive for as long as possible killing zombies. There is no fire button, it is all done automatically bu the computer. As you progress you can power up to fire faster or increase the damage of your weapons. The game can be bought for the reasonable price of 3 USD and can be run on all RTG Amigas. Initially I had some trouble running it on my V4SA due to the load screen being in 1080p and none of my monitors supporting the V4SA 1080p output. However, after talking to 8080 he informed me of a newer release that took better advantage of the V4 hardware. While the loading screen is still 1080p and not viewable on my monitor the game does load up after a black screen. After the loading screen you are presented with a very nicely done main menu with the following options (These are the default settings for the V4, it might be vary on non-V4 systems): * Original Map/User Map * Map Edit * New Game * New Story Game * Settings * Quit The settings menu brings up the following options: - Resolution 640 x 360 - Colors 512 - Limit Zombies 50 - Tumbleweed Off - Z collition (sic) Off Sik - Z counter Off - FPS Counter Off - Z Blood Show - Z Stamina Off - Dead Zombies Off Game Play Much like VampireSurvivors(VS), you walk around a large play area with numerous zombies appearing from both sides of the screen. Luckily they walk slowly as your character has a tendancy to drag his feet while walking. You start the game with no weapons and if you are lucky you will come across a pistol, sword or fire. At the beginning the weapon fires every 5 seconds. Each zombie that you kill will leave behind a green bottle, collect enough of these and the day will finish, giving you the chance to upgrade your weapon's speed or power. If you get low on energy then there are chicken legs and beer spread through out the game to power up. Sadly no food for vegans like myself though. The game starts out with a good difficulty curve, it is not so difficult to get up to three or four days. After that things start to get a bit more tough. I have played several versions of the game over this review as 8080 is still updating the game with tweaks and extra features. The latest version as of 19th July, has better play mechanics. There is less walking around with nothing happening, there is also the fire weapon which was not available in earlier versions. It is a simple game that is easy to get into and has the essential just one more go hook. I find myself popping into the game in moments of free time just to see how far I can get. Visual and Audio The screens inbetween gameplay are very well done, high resolution with lots of detail, they look very much like a modern PC/Mac game. In game the graphics are nothing to write home about. They are functional, yes more colour than a standard Amiga game but overall they are bland. There are little touches such as signs, rocks, tents, houses and bunches of grass but nothing much else. Audio wise you are treated to some classic synthwave music that is played during the game. It is quiet and not too intrusive during the game, there are also the standard zombie samples, and voices from your character. Final Thoughts ZombieSurvivors is one of 8080's better games and at 3 USD it is good value. The graphics are good, not great but work well in the in game. If your system can handle the higher resolutions then go for it. As for myself my only RTG system is the V4SA and it is able to run at 640x360 in 512 colours smoothly. Any resolution higher than that and the game starts to crawl. Overall this is a fun little game with the added benefit is still being updated. If you have a fast RTG Amiga or V4 then give this game a try. It is fun game to play with your mates just to see how far each person can get. Pros and Cons: + Functional if a little dull graphics + Music and sound effects are effective + Simple gameplay + Has many options - High spec requirements - Could get boring Scores Gameplay: 7.5/10 Graphics: 7.5/10 Sound: 6.5/10 Overall: 7.1/10 A nice game that is the cost of a pint of beer and will give you a better time for longer.TopWelcome to the guides section!
CONTENTS ============================================================================ -= T U T O R I A L S / G U I D E S =---------------------------------------- ---------------------------------------------------------------------------- -= Blitz Basic Basics Part 1: Introduction and Setup =- Andy Vaisey kicks off the first part in an on going BlitzBasic tutorial series for beginners. -= How to Setup WPA2 Encrypted WIFI on the PiStorm =- John Scolieri explores connecting the Amiga using modern WIFI standards with the PiStorm. -= More On Noise Reduction with 8-Bit Samples =- Roald Strauss continues his series on improving Amiga audio samples with More on Noise Reduction. -= ApolloBoot: Getting started with ApolloBoot for beginners =- A quick and easy guide on settup up ApolloBoot with information that is not covered in the existing material. -= Creative Graphics: Creating Custom Brushes =- A fun guide on how to create custom brushes for exciting painting effects in your favourite art package. -= First Time: Creating MagicWB Backdrops From Modern Images =- If you are new to the Amiga and have admired the plethora of MagicWB backdrops available and want to make your own, then find out inside. ---------------------------------------------------------------------------- #Tutorials/Guides - WhatIFF? Issue 3.14 - August 2024#TopBlitzBasic Basics: Getting Setup
Guides ============================================================================= Blitz Basic Basics Part 1: Introduction and Setup - by: Andy Vaisey ============================================================================= Introduction Welcome to the first part of "Blitz Basic Basics" where I hope to introduce those existing Amiga users, those returning to the Amiga world after many years or those who are new to the Amiga, to programming using the rather wonderful Blitz Basic 2! Why Blitz Basic 2 and not 68000 assembler? Although 68K assembler is more powerful and possibly gives more low level control over the Amiga, it is frankly a little harder to learn. Blitz Basic 2 (hereafter BB2) provides a more user-friendly experience and a gentler learning curve. It enables you to create games, demos or simple OS friendly Workbench applications with ease! Don't be fooled by the word basic in the name. While you're unlikely to code something that will rival Uridium 2 or Photogenics, BB2 is very powerful indeed, probably more powerful than most people realise! Before any programming begins, however, it is important to setup an environment where you can be creative and everything is at hand, a coding playground if you like. There is nothing worse than starting a project and then having to stop because a needed application or file is not installed or is missing. At the risk of sounding controversial, I would strongly recommend that any programing for retro machines be done on a modern computer. Most of the people I know who create games and demos for the Amiga, Commodore64, Plus/4 and ZX Spectrum, use cross-assembly methods. That is they produce code, graphics and music for a target machine on their modern machine, test regularly using emulators and at regular stages transfer and test on the actual target computer. If this sounds like heresy, don't forget that towards the end of the 1980's and into the 1990's the majority of developers, both large and independent, were using some kind cross development system. Ocean Software used an in- house Atari ST system to develop for a range of 8- and 16bit machines, while two-man Graftgold developed their own system using some OPUS PCs, Avocet cross assembler and self-built cables! There was even a commercial system called PDS that allowed developers to use a PC based system to develop for and then transfer to a range of 8- and 16bit machines. Of course, I'm not saying you shouldn't develop natively, it's just that using a modern cross development system can allow you to be more productive. When I'm working on an Amiga or C64 project, if I have bit of spare time in work or if I'm away on a short break, I can download my code/graphics/music to my laptop from a cloud service, work on it, test in an emulator and then upload back to the cloud. Much easier than dragging my A1200 or C64 around with me! An emulator also allows little cheats such as virtually speeding up floppy drives, allowing dragging and dropping of files between the emulator and host machine and so on! Incredibly useful! What do I use to develop on the Amiga? I have a real A1200 with OS3.1, a 1230/16Mb card, a 4Gb CF Hard Disk with Workbench3.1 and an internal Gotek floppy drive (my real floppy drive failed last year). While I may do some tweaking or small edits, this system is mainly used for testing only. I actually develop using WinUAE on my laptop. By using WinUAE or other similar emulator, you can run multiple Amiga systems. I have a dedicated, development only configuration which is almost identical to my real Amiga system, but run other emulated configurations as well in order test my code on as many different versions of Amiga as possible, all the way from a standard KS1.3 1Mb A500, up to a KS3.2 32Mb A1200/040 and everything else in either side and in-between. For the purpose of these tutorials, I'm going to assume you have a basic familiarity with the Amiga and will be using a cross-development system such as mine, but, if you are developing natively, everything will still be fine, you'll just need to skip some of the set-up below and/or be prepared to do a bit more work to transfer over and install the various bits of software on your real Amiga hardware. Be warned, if you're running only a floppy based 1Mb OS1.3 A500, you and BB2 are likely to struggle! I'm also going to assume you will be developing all the code, graphics and sound yourself, as I do. Sure, you can work in a team but sometimes, as the lead programmer, it's a struggle getting others to produce graphics or sound on time and to the specification you require! I know, I've been there! Set-Up As already stated, I'd suggest setting up an Amiga emulator on your choice of modern hardware. Installing and setting up an emulator is outside the scope of this tutorial, so you'll have to refer to the instructions for your chosen emulator, but when up and running you should create a Amiga system dedicated solely to development similar to that below: * An A1200 with OS3.1 running Workbench3.1 * An 030 processor. * 1Gb of Fast RAM. * A virtual Hard Disk (minimum 4Gb). IMPORTANT NOTE: To run an emulated Amiga, you will need Kickstart ROMs (the chips that hold the Amiga's bootstrap firmware) and Workbench floppy disk images. They are easily available online, albeit illegally, if you hunt around, but we cannot provide a download link here as they're still copyrighted. If you want to do things legally, the required ROMs and disks can be copied from your real machine using various pieces of software, but the easiest route is to purchase the Amiga Forever Plus package: https://bit.ly/whatiff-foreverplus Why the above emulated system? Developing on an OS3.1 A1200 with a 68030 gives a good compromise between performance and compatibility with both older, less powerful systems and today's more powerful, upgraded systems. Combine that with the fact that, in an emulator, you can use a slider to give yourself a ridiculous amount of Fast RAM, you end up with an environment that is very stable and reliable; BB2 will be a very happy programming language indeed! I would recommend that the virtual hard disk operates as folders/directories on your host system and not a hardfile, to allow simple drag-drop operations. I also recommend that these hard disk folders exist in a folder /partition that is automatically backed-up to a cloud service. My System (Workbench) and Work (programs and data) disk folders exist in my Dropbox folder so my code and work files are always available wherever I am! This is just my preference of course, your mileage my vary! Again, installing a full Workbench 3.1 to hard disk is outside the scope of this tutorial, but there are many really good online articles and YouTube videos explaining the process. Once your virtual Amiga is ready, you will need to install BB2. While you should use at least version 2.1, there is an @b{}ultimate edition that includes all updates and resources, with the edition of a modern manual. Download this version here: https://bit.ly/whatiff-bb2 It comes in a ZIP package and once unzipped, will leave you with an Amiga LHA archive. Now, the beauty of using an emulator such as WinUAE (or similar) is that LHA archives can be mounted as a drive via the CD & Hard drives section! You will then have access to the archive as a drive within Workbench itself and can proceed with an install of BB2 to your Amiga hard disk; just follow all the instructions and allow it to install everything! The only thing you'll have to choose at the start is where you want to install it (my BB2 install is on my Work partition, separate to the System partition holding Workbench). Once installed, you should have a Blitz2 drawer wherever you chose to install BB2 and inside that drawer, lots of files and drawers including a program file called Blitz2, which is the editor with built in compiler used to enter and run your code. Try running it to make sure it works and have a snoop around! At a later date, we may enhance this BB2 installation by adding additional libraries which offer extra commands and useful features. We will also discuss the newer revisions of BB2 called AmiBlitz, a further development of, partially redesigned and modernised version of the open source BB2 codebase. However, before we start coding, we need to augment our development environment with some extra applications to deal with graphics and music. If you need suggestions, all I can do is tell you what I used to create my Amiga game Spheroid, which worked nicely alongside BB2: Deluxe Paint: for creating and editing bitmaps and brushes. Ideally you'll need at least Version 4 or up, with Version 5 being the best for AGA graphics. Personal Paint: for creating and editing bitmaps and brushes. Later editions come with the ability to import and save more modern graphic formats such as PNG files. Version 7.1c is available for free from the website: https://www.ppaint.com (scroll to the bottom of the page). OctaMED: for loading, saving and editing music tracker files in both MED and MOD format. My preference is Version 5, but BB2 only supports playback (with extra controls) for MED files up to Version 3, so consider that or remember to save out for that version if using later versions! AudioMaster IV: for capturing, loading, saving and editing sound samples. It's quite old and looks rather dated on KS3.0 and above, but it works great and is quite powerful. Directory Opus (DOpus): a file manager program for managing files and drawers. Very useful for moving files between floppy and hard disks. VirusZ III: if you're downloading Amiga resources from the internet, it's probably a good idea for your Amiga to be running a virus scanner/killer! Get one here: https://bit.ly/whatiff-virusz ReOrg: a little utility to reorganise or defragment your real/virtual disks. These programs and many more can be found on the excellent Aminet website: https://aminet.net/ After sourcing and installing all of the above, you should have a quite (very) capable Amiga and BB2 based development system. Of course, previous issues of WhatIFF? have contained excellent articles and tutorials on creating music using OctaMED, grabbing and editing samples and more, so you should be partially up to speed with those! If not, download some past issues and get reading! In the next instalment of Blitz Basic Basics, we'll get into actual coding, I promise! I'm not going to spend valuable disk space and time explaining all the individual BB2 language commands though. I'm a believer in getting stuck straight in and learning through doing, so I'll be providing simple code examples, explaining what that code does and will perhaps set some simple challenges for you to complete! In the meantime, if you want to browse the BB2 instruction set in a handy online reference, take a look here: https://bit.ly/whatiff-bb2guideTopHow to Setup WPA2 Encrypted WIFI on the PiStorm
Guides ============================================================================= How to Setup WPA2 Encrypted WIFI on the PiStorm - by: John Scolieri ============================================================================= Onboard WiFi setup with WPA2 encryption on your PiStorm32 and EMU68 running OS3.2 The PiStorm team has activated native wifi on the Raspberry Pi side of the PiStorm32 using the 'wifipi' driver running with EMU68 and AmigaOS3.2 and it's stable and fast! Here's how to get it running: 1- make sure your PiStorm32 has the newest firmware installed and you have a TCP stack (i.e. Roadshow etc.) installed. 2- download the latest Emu68-tools package at: github.com/michalsc/Emu68-tools 3- download prism2v2.lha at aminet.net 4- extract the Emu68-tools file and copy files from the Emu68-WiFi folder and also the prism2v2 files to RAM 5- From RAM open the folder Emu68-wifi and Devs folder. There you will see two folders called Firmware and Networks. 6- Copy the Firmware and Networks folders (both full folders!) into your Sys:Devs folder. 6. From Sys:Storage folder open the NetInterfaces folder. Choose any file in the folder (I used cnet but any file will work) 7- Copy the file you chose in Step 6 to Sys:Devs/NetInterfaces folder. 8- Rename the file in Step 7 to 'wifipi' (no apostrophes). 9- Open the wifipi file with MultiEdit or your favourite text editor and near the top of the screen you will see a line without a # in front of it saying device=xxxx.device (xxxx being the file you choose in Step 6). Change the 'xxxx' to wifipi so the line will read 'device=wifi.device'. 10- A few lines below device=wifi.device you will see 'address=xxx.xxx.xx.xx' and 'netmask=xxx.xxx.xx.x' Make sure the address and netmask numbers are the same as your home server. 11- Skip this part if you already have a previous wireless adapter installed. From your RAM open the prism2v2 folder and run the install program. 12- When prompted enter your wireless network SSID name and WPA/WPA2 password to complete the installation. 13- Open your favourite text editor as we'll need to modify the s:user-startup file to add the line 'wirelessmanager wifipi.device' (no apostrophes). 14- Reboot your Amiga and if all went well you're now connected to wifi via the PiStorm32! Using AmiSpeedTest from amint.net to get wifi upload/download speeds on my Amiga 1200 with the onboard wifipi on my PiStorm32-3A+ gives me an average download speed=21,978kb/s and upload speed= 23,573 kb/s. Compared to my A314-cp wifi of average download speed=3,171kb/s and upload speed=2,071kb/s which is a massive improvement !!! If you use and enjoy the PiStorm32 with your Amiga 1200 I strongly recommend making a donation at https://github.com/PiStorm/pistorm32-lite-hardware cheers, G. ScolieriTopMore on noise-reduction in 8-bit audio
Guides ============================================================================= More on noise-reduction in 8-bit audio - by: Roald Strauss ============================================================================= Back in WhatIFF? issue 2.11 I wrote a small article about various options available for reducing noise in 8-bit audio. This article is a follow-up, and can be considered part 2 of 3 on the topic. Because there are actually 3 kinds of noise we have to deal with on Amiga, and in my previous article I only addressed one of them: Quantisation noise. For the next issue of WhatIFF? Magazine, I'll write part 3 with tips'n'tricks for avoiding another kind of noise: Clicks'n'pops. And here in part 2 I'll address harmonic overtones, and describe a little trick you can use on those. But first, let me share some of the new insights I've gained about quantisation noise since issue 2.11. We're getting old One of my favourite methods for noise reduction, that I described in my previous article, was the Shibatch Sample Rate Converter (SSRC) noise- shaping method, where I had managed to "hack" the source code a bit to allow me to create a 27.132 Hz 8-bit sample with very little noise. Except that's not what I had done at all. At least not according to my better half! (And spectrum analysers agree with her). The saying goes that the human ear can hear between 20 Hz and 20 kHz. But this actually only applies to young people. The older we get, the less we're able to hear the higher frequencies. Already at age 24, the highest frequency we can hear has dropped to around 17 kHz. At age 30 the top frequency is 16 kHz. At age 40 we're down to 15 kHz and at age 50 it has dropped to 12 kHz! When we take a 16 kHz 16-bit sample and truncates it to 8-bit, the resulting quantisation noise appears to be anywhere between 2 kHz and 8 kHz. Everyone can hear those frequencies, regardless of age. In fact, the frequencies in that area are the ones we are the most sensitive to, which means it's the worst possible placement of unwanted noise. All noise-shapers work by moving the noise to a different frequency range, preferably one completely outside our hearing range. Shibatch Sample Rate Converter moves noise up to a higher range. For a 27.132 Hz samplerate forexample, noise is moved up to between 7 kHz and 13 kHz. Now, in my article in issue 2.11, I wrote that SSRC "moves the noise up to a frequency most people can't hear". But while that is technically what SSRC does in general, it can't quite do it on Amiga because of the limited supported samplerates. It does move the noise up, but not to a range that most people can't hear. It's only moves it up to a range that us older folks can't hear. Younger people with better hearing actually hears more noise in the SSRC version. To understand why, here's a visual presentation of a random bass sample (meaning the actual tone is in the lower frequencies) - truncated vs SSRC.The red line is the normal 8-bit truncated version. The green line is the 8-bit SSRC version. And the blue line is the 16-bit original. You can see in the SSRC version that the noise level at 4 kHz is as low as -89 dB. Then it climbs up to about -74 dB at 9 kHz where it stays. The truncated version has about -74 dB of noise at 4 kHz, then slowly dropping to -79 dB at 13 kHz. That means the noise at 4 kHz in the SSRC version is actually 75% less loud than in the truncated version. That's an amazing result. But in return, the noise level above 9 kHz in the SSRC version is roughly 25% louder than the truncated version. So if you're capable of hearing up to 13 kHz, then you will indeed actually hear more noise in the SSRC version than in the truncated version. But to an older person, it will sound almost noiseless. So what does that mean? Well first of all, it means that I've apparently aged into an old geezer who'll probably be needing a hearing aid soon - but at least I evidently also have a hot young girlfriend, since she can hear those upper frequencies with ease... Secondly, it also means that we definitely can't use the SSRC noise-shaping method if we want to please the young audiophiles. But... how many young audiophiles do we have in the Amiga community? I'm guessing not many. In fact, I dare say that most of us are over 40 years old. So if we're considering the target group, then the SSRC method isn't completely useless. It will actually work for many of us in the Amiga community. Just don't try to impress your kids (or your hot young girlfriend) with "the awesome audio quality". Anyway, let's review the other noise-reduction options again. We still have the 14-bit trick. I obviously haven't been able to find anything better than the 14-bit trick. Nothing beats a higher resolution in regards of quantisation noise. I did stumble across another 14-bit trick though, invented by orangespider, and described in https://eab.abime.net/showthread.php?t=105744 As orangespider promises in his forum post, this alternative approach does indeed give an even better and more boosted quality than the old 14-bit trick - but sadly I could only get it working in Milkytracker (and Protracker 2.3d clone on Linux). I can't get it working in Protracker on a real Amiga for some reason. I asked about it in that forum thread a year ago, but no one replied. If anyone out there knows of any tricks I'm missing to get this technique working in Protracker on a real Amiga, please do let me know. As with the old 14-bit trick, it works by playing two samples at the same time. But unlike the old 14-bit trick, it has the downside that both samples always has to be played at the same time. Meaning, if you use this technique, we'll always have to occupy two channels. One of them doesn't work alone, like the old 14-bit trick does. I prefer a method that let's me use 14-bit'ish quality when I want, and then, when I run out of channels, let's me use the 8-bit part of that sample set alone. And this 8-bit part of the sample set should also be in a better quality than a standard truncated sample. And that scenario is actually possible.. LAQ to the rescue! In my previous article I also briefly described "The Least Amount of Quantisation". Short recap: "The Least Amount of Quantisation" (from here on referred to as LAQ), shapes the sound so that the quantisation of the sample values are always the smallest ones possible. This technique moves some of the noise down to the 1-20 Hz range, which basically none of us can hear (for real this time). So it's quite effective. But it'll only work for short samples. The longer the sample is, the bigger the chances for the signal to wander off outside the scope. But it also depends on the waveform. Some waveforms work better than others for the LAQ approach. In order to counter the wandering-off effect, we can change the audio a bit. For example, adjust DC offset, or reduce volume a bit before applying the algorithm. Or we can run the algorithm on a series of different samplerates, and pick the one that works best. If we're lucky, we can then also create a sample with additional data to be played at the same time, in order to achieve 14-bit'ish quality. But we can only do this if that sample too stays within the available amplitude, and it can be really tricky to find a samplerate where both the actual sample and the additional data to achieve a 14-bit'ish quality both stay inside the scope. In the Extras folder you will find Noiseless.xm and Noiseless.mod, demonstrating this method. Listen to the Noiseless.xm example. It plays 4 patterns: Pattern 0: The original 16-bit sample Pattern 1: The 8-bit truncated version - lots of quantisation noise. Pattern 2: 8-bit LAQ version, always picking the least amount of quantisation. Still some noise (of course) but far less in my opinion. Pattern 3: 8-bit LAQ version + a 14-bit'ish trick to up the quality even more. Or the Noiseless.mod example, which has excluded the 16-bit pattern: Pattern 0: The 8-bit truncated version - lots of quantisation noise. Pattern 1: 8-bit LAQ version, always picking the least amount of quantisation. Still some noise (of course) but far less in my opinion. Pattern 2: 8-bit LAQ version + a 14-bit'ish trick to up the quality even more. Here's a visual presentation of the bass sample that is used in the example, truncated version vs LAQ version.
The red line is the 8-bit truncated version. The green line is the 8-bit LAQ version. And the blue line is the original 16-bit version. Notice how the LAQ method cuts away about 9 dB of noise in the higher frequencies of the sample compared to the truncated version. That's almost half the noise gone. Enough to make a difference. In return, the lower bands around 8 Hz has increased from -41 dB to -20 dB (impossible to see on the graph though), which means the loudness in that band has doubled - twice. But we don't care about that, because no human being can hear 8 Hz. And even if we could, it would be filtered away by our speakers and/or headphones anyway, because most of them doesn't support a frequency that low. So when the LAQ method works, it works rather well. But it may require a bit of luck to get working, depending on the waveform. The higher the samplerate, the less effective the LAQ method becomes. You'll be able to hear a big difference with lower samplerates, and then a decrease in the effect the higher samplerate you use. In other words, LAQ is only useful for bass instruments and such. But those has also always been the worst in regards of noise, so that suits me fine. I don't think I'll be able to make any more discoveries about reducing quantisation noise on the Amiga at this point. But I'm also quite satisfied with the discoveries I've made. All the times I asked other musicians online for tips'n'tricks to reduce noise in 8-bit audio, it was exactly something like the SSRC and LAQ approach I was looking for. Considering how many people told me there was absolutely nothing I could do about quantisation noise, it is somewhat surprising that I managed to find two different methods, apart from the 14-bit trick (that I also didn't know about at the time). I've now explored each method and found the pros and cons for each. It's been very interesting, and I hope someone out there has found it useful too. And that finally brings us to the next type of noise we can encounter on the Amiga. Harmonic overtones Using (too) low samplerates on Amiga introduces another issue: Since there is no kind of interpolation applied, low samplerates will produce harmonic overtones (also referred to as aliasing) with the frequency of half the samplerate used. If for example we use a samplerate of 4000 Hz, then we will hear a harmonic overtone of 2000 Hz when playing the sample. The lower the samplerate, the louder the overtone. There is no way we can get rid of this. Not when using such low samplerates. The only thing we can do in order to make this overtone less unpleasent to listen to, is to make sure it matches the tone of the actual instrument. We can do this by using a samplerate equal to the tone of frequency multiplied by 2 to the power of n. If, for example, we're sampling a 110 Hz tone, then we should use a samplerate of 110*2^n Hz, where n is any integer we want, as long as the resulting samplerate is within the supported range. 110*2^6 = 7040 Hz for example. That'll make sure the overtone becomes 3520 Hz, which is exactly 5 octaves higher than the actual instrument - in tune with the instrument tone. The downside to this method, is that it'll most likely require us to resample all the samples we want to use in the track, to make sure the samplerates of all the samples match eachother. Otherwise it'll most likely be difficult to make all the samples be in tune with each other. Protracker doesn't support any samplerate. It'll "snap" to the nearest supported one. So samples with different samplerate-tables can end up being out of tune without any way of fixing it. The Amiga does actually offer a filter though, which was made with the very purpose of filtering out higher frequencies aliasing when using lower samplerates. A low-pass filter that can be turned on/off with command E0x in Protracker. I don't personally find this filter particular useful for reducing harmonic overtones though. Sure, it does reduce the overtone a bit - but everything else is also reduced. And the effect applies for all 4 channels - not just the single channel where the command entered. In other words, it's somewhat the equivalent of covering your ears with your hands - and that's not how we want to listen to music now, is it? Not that it doesn't have its usecases. It's ideal for example in games where the player character goes under water. But that's about it really. I can't think of anything else to say about harmonic overtones, which means that's it for part 2 in this small series. Stay tuned for part 3 in next issue of WhatIFF? Magazine, where I will share some tips'n'tricks for getting rid of a 3rd kind of noise: Clicks'n'pops.
TopApolloBoot: Getting started
Guides ============================================================================= ApolloBoot: Getting started - by: Timo Paul ============================================================================= ApolloBoot Setup: For First Time Users ApolloBoot is a fantastic way to run multiple OSs on your V4 standalone or equipped Amiga. Available for free once you have registered with Willem Drijver, you can run from Amiga OS 1.2 up to 3.2 plus various other packages such as Coffin or Amigakit. If you so wish you can also install and run Atari software ... if you are into that kind of thing. However, if you are new to the V4 it can be a bit intimidating figuring out how to install everything. In this issue we will look at setting up ApolloBoot TRIO, it is the version that allows you to have Apollo OS, Amiga OS3.2 and Coffin. ApolloBoot OMNI supports more OSs plus Atari but to keep things simple I will concentrate on TRIO. However, what you learn here can be applied to OMNI as well. First Steps Once you have your V4 card or V4 Standalone you will need to obtain several bits before any installation can occur. Firstly you need to contact Willem Drijver via e-mail and ask for the ApolloBoot link, he will then send you an e-mail with links to a Google drive which contains the latest versions of ApolloBoot. In my case I am concentrating on ApolloBoot TRIO, in the e-mail there are three links: ApolloBootSOLO R9.1 ApolloBootTRIO + OMNI R9.1 ApolloBoot ZERO (Proof of Concept) Click on the ApolloBootTRIO link and you will be presented with several files to download. We want to download the following two files: ApolloBoot-TRIO-R91-P2-CF-Card.img.zip ApolloBoot-OMNI-R91-SD-Card.zip Do not worry that the second file is has the word OMNI in there, it is still important to the TRIO install. Now we have those files, unpack them to your Desktop or the same download directory. The ApolloBoot-TRIO-R91-P2-CF-Card.img.zip will expand into a file called ApolloBott-TRIO-R91-CF-Card.img, when you unpack the ApolloBoot-OMNI-R91-SD-Card.zip file you will get a folder titled SD0. Opening the folder you will see the following directories: AOS32 Cores EmuTOS Install Kickstarts Personal UAE Update As we are dealing with TRIO, the folders of most interest are AOS32, Kickstarts, Install and UAE. OSs Next we need to download our OSs, OMNI supports ApolloOS, Amiga OS 3.2 and Amiga OS3.9 via Coffin. The most recent version of ApollBoot now supports Coffin r63 which is more stable than then previous release. If you have ApolloBoot-TRIO-R91-P1-CF-Card.img.zip then you need to go back to the Google drive and find ApolloBoot-TRIO-R91-P2-CF-Card.img.zip, note the P2 which refers to patch two. 1. ApolloOS can be found at https://www.apollo-computers.com under the downloads section. 2. Coffin can be found at https://www.getcoffin.net. Please be aware that you will need Amiga OS3.9 disk image which can be found at https://www.archive.org, just do a search for Amiga OS3.9. 3. Amiga OS3.2, since it is still being commerially sold, if do you not own a copy then please find it online. When you have it you will receive a CD image that contains all the install files and ADFs. However it is by default named: AmigaOS3.2CD.iso if you leave it as is ApolloBoot will not be able to run the installer as it is looking for the file: AmigOS32.iso as such please make a copy of the iso image and rename it accordingly. Getting Set Up It will take a while to download Coffin and Apollo OS, while you wait for the downloads unpack the ApolloBoot-TRIO-R91-P2-CF-Card.img.zip, it will turn into a 64GB iso file. I should mention at this point you will need around 100GB of free disk space to install everything for ApolloBoot TRIO. To make it easier organising everything, create a new directory called ApolloBootFiles, copy the following files into it: ApolloBoot-TRIO-R91-CF-Card.img AmigaOS39.iso ApolloOS_R9.4-Release.img coffin_r63_32gb.img BoingBag39-1.lha - can be obtained freely by doing a Google search BoingBag39-2.lha Next copy the SD0 folde to the ApolloBootFiles folder, and then open the folder called AOS32. Copy the Amiga OS3.2 iso that you renamed to AmigaOS32.iso and the latest Update3.2.2.lha that can be downloaded from the Hyperion website. Cores and EmuTOS you can ignore, for the Install folder you can copy programme keys such as for Roadshow or IBrowse. The Kickstarts folder will already contain the necessary ApolloROM and the other Kickstarts will be copied from Coffin. The last folder we need to look at is UAE. Inside you will find the ApolloBoot_Turbo_Install.fs-uae file, copy this to the FS-UAE/Configurations directory on your computer. When you load up FS-UAW the ApolloBoot option will appear in the left panel. Almost There! Now you have all the files necessary to make a full install of ApolloBoot TRIO next we need to set up FS-UAE. When you have FS-UAE loaded, click once on the ApolloBoot_Turbo_Install, then go to the Hard Drives tab. You will see each drive has been assigned to a disk image: ApolloBoot-TRIO-R91-P2-CF-Card.img (/ ...) ApolloOS_R9.4-Release.img (/...) coffin_r63_32GB.img (/...) SD0 (/...) By default the directory locations are set to Willem's drive so you will need to find the same files in your location. This was the reason for setting up the directory Apollo Boot Files since you have everything ready there. Once you have the directorys pointing to the correct files, just press Start on FS-UAE. You will get the classic blue and yellow screen with a menu of buttons on the left. By clicking on ApolloOS, Coffin or Amiga OS3.2. it will initiate the install process. I find that doing Coffin first is a good bet since it is the largest and longest install. When it is done, restart FS-UAE to clear the memory. Repeat this each for ApolloOS, Coffin and AmigaOS3.2, when it is finished you can burn the ApolloBoot-TRIO-R91-P2-CF-Card.img image to a 128GB CF card with balenaEtcher or something similar. I have found that the SANDisk Extreme CF cards work best as the card included with the V4 has a tendency to get corrupted over a short period of time. So that is a very simple tutorial on how to get setup with ApolloBoot TRIO, I hope this will prove helpful if you run into any problems.TopCreative Graphics: Creating Custom Brushes
Guides ============================================================================= Creative Graphics: Creating Custom Brushes - by: Timo Paul ============================================================================= With traditional media, you have a variety of painting mediums; oil, acrylic watercolour, Gouache, pastel ... the list goes on. As anyone who has worked with the traditional paint package on the Amiga, DPaint and Brilliance do not offer this types of mediums. If you wish to recreate the same or a semblance to some of the listed mediums then you will need to look at art packages such as Photogenics or TVPaint ... or do you? In this part of the Creative Graphics series we will look at how you can make custom brushes for painting in DPaint or Brilliance to create or at least an impression of a painting medium. Getting Started To begin with load up your favourite art package and think first of the colours that you want to use, it is a good idea to have a rough idea of the type of medium you are going for. In my case I wanted something akin to an oil painting. To better help me I had a look at some images online, zoomed into them to get an idea of what makes oil painting look like an oil painting. You can see the swirls of the brush and the how the layered oil paint catches the light to add depth to the image. What we are going to do is very similar by "mixing" some colours. To make this tutorial easier to follow I will use the default palette that is used with Brilliance. Mixing Your Colours To begin with, I will work on the water part of my image, after some experimenting I found the following technique gave me a nice oil painting effect for water. I chose four colours to make up my water, they are the first three blue colours near the top, or the values of: Blues 0 136 255 0 68 255 0 0 255 White 221 221 221 Selecting one of the blue colours I used the brush to draw a wavy line, (Make sure that you use the connected brush) with a thickness of about 4 pixels, the second from the left brush size is fine. The line does not need to be very long, just one bump/curve will be fine. Repeat the process until you have three layered bumps, do not try to follow them exactly as we want to create some randomness to the effect. The final part for this task is to use the thinnest paint brush and draw a white line at the top of the curve, remembering to not keep it as one line but break it up so that you have one pixel or two, and then several. Now you can use the Cut Brush tool, leave plenty of space around the object you are picking up. Next click on the Brush tool making sure Draw is selected, not Connected Draw. Now "paint" your ocean, do not paint continously but use the same motions that you would do if you were painting for real with a brush. But this time instead of lifting the brush the surface lift your finger from the left mouse button. This helps to create a random/ realistic(ish) effect. After you have done this, next click of the Transparent tool and keep it at the default setting of 50%. Paint over the ocean scene and once again pressing and depressing the mouse button. This will quickly take the edge and sharpness off the "brush strokes" and give it an oil painting esque look. If you are not happy with the look then clear the screen and using the same colours and technique, draw out the curves differently, repeat the process until you are happy with the result. Next Came The ... For my image, I had imagined a tree sitting on a cliff overseeing a rough and frothy ocean. With the ocean done it I needed to add the cliff face. For the rock face I created a slighly different rock texture, instead of wavy lines I put down several grey dots and then pasted them down using the same technique as above. It should be noted that changing your brush size can also give your image more detail, use the Distort Brush tool to change the size of your brush. Paint over the existing rock face and then use the Transparent tool again to add some more colour/shading to the image. Next is to add the tree, taking into consideration the type of texture a tree has you might want to use verticle wavy lines, in my instance I found that use of dots worked best. The same technique that was used for the ocean and cliff face should be used, then reducing the brush size and using the Transparent tool. Before you start painting it is a good idea to spread the brown colours to more than the standard Brilliance palette has, otherwise when you use the Transparent tool you will loose much fine detail. When it comes to painting the sky, use the same process. Choose your colours, overlay them by drawing randomly with different brush sizes, cut a brush from it then paint with the Brush draw tool. When you have created the desired shape then use the Transparency tool at 50% again to smooth out and give the impression of oil paints. I have included an example of what you can achieve with this simple technique. I need to mention that this will not create realistic images but is a tool that you can learn to help you explore your creative processes. The Creative Graphics series is more about experimenting, it is not a road to becoming a skilled artist but one that helps you open your mind to the various processes and possibilities that are possible even with the simple art packages like DPaint or Brilliance. I hope that you have found this short Creative Graphics tutorial helpful and most importantly fun. Until next time!TopFirst Time: MagicWB Backdrops
Guides ============================================================================= First Time: MagicWB Backdrops - by: Timo Paul ============================================================================= MagicWB is probably the most common icon pack used on Amigas, it is fast and still looks good. Over the years there have been many MagicWB backgrounds images uploaded onto Aminet, and for this issues Creative Graphics tutorial I wanted to help newcomers learn how to make their own MagicWB backdrop using modern images from the internet and all done on the Amiga. Bringing In Your Image As image standards have improved it has become increasingly difficult to load modern .jpeg images into Amiga programs. When we think of image processors there are two classic programs and one new that most of us turn to: - ImageFX - Art Deparment Pro (ADPro) - ArtPro - PPaint* *If we think about art packages with DPaint and Brilliance being the best known, they are only able to import iff files. While PPaint is regarded as a traditional art program like the previously mentioned applications it has some additional features that are usually seen in image processers such as the ability to import .jpeg images. For this project I wanted to use the Amiga for every aspect, so my first port of call was IBrowse. Doing a quick image search in Google I found a pleasing waterfall image that would do well as a background for my Workbench, the image is 1280 x 1024 and in the jpeg format. My favourite program for image processing is ImageFX, so my first step was to load it up in ImageFX. When I did I got an "Unsupported SOF Marker" error, no worries, I have ADPro as a backup, however this also had the same SOF issue, next I tried ArtPro but it also struggled to load the file citing lack of memory. As a final resort I went to PPaint, surprisingly PPaint had no issues loading the image but it does require at least 16MB of Fast Ram to be able to load and process the image. If I remember back, one of PPaint's big features was that it is able to use Fast Ram for loading images which gives it a leg up over the better known art packages. Converting Your Image Once the image is loaded into PPaint, you can choose to leave it in 24BIT colour mode or reduce to 128 colours and the current set PPaint screenmode. In my case PPaint is set to the Workbench screenmode of PAL HiRes. The colour reduction looked great, but I need to reduce the image down to 8 colour. Before doing this we need to enable dithering, this can be done from the menu bar under "Setting" -> "Dithering" -> "Floyd-Steinberg". Once that is finished you can reduce the colours by useing the menu bar again and going to "Color" -> "Less Colors ...", use the slider to reduce the colour count to 8. PPaint will take a moment to process and then you will see a nicely dithered 8 colour image. At the moment your image is using the default palette for the image and this can cause issues if you are running an 8 colour MagicWB so, we need to apply the MagicWB palette to the image. Applying The MagicWB Palette MagicWB Colour Settings M Pen 0 A 155 155 155 G Pen 1 I 0 0 0 C Pen 2 255 255 255 W Pen 3 B 80 120 160 Pen 4 P 120 120 120 A Pen 5 L 175 175 175 E Pen 6 T 170 145 125 T Pen 7 E 255 170 150 To change the palette settings in your picture, use the menu bar again and find "Color" -> "Palette" -> "Edit". A requestor will pop up allowing you to input the above values. As you move along you will see the image change and by the time you are finished it will not look particulary good, no worries! PPaint has a wonderful tool for remapping palettes, once again go to the menu bar and find "Color" -> "Remap", it will take a short moment and your image will come out colour corrected within the MagicWB palette scheme. If you feel lazy to input the palette settings I have included the PPaint MagicWB file that you can just load and apply to your image. I hope this little tutorial will help you in converting or making your own MagicWB backdrops.TopArticles
CONTENTS ============================================================================ -= A R T I C L E S =------------------------------------------------------- ---------------------------------------------------------------------------- -= Show Report: Kickstart 02 =- Kristian GK reports from Kickstart 02 in UK. -= Old Computer Challenge 2023 =- Steve Lord takes on the old computer challenge with his 1.3 CDTV, find out inside how he fared. -= The Elements Of The Game =- Roald Strauss takes a deep and detailed dive into the aspects that make up a good game. Essential for those thinking of making their own game. -= FPU or not FPU =- An experience of going from a rev 4 060 to rev 5 060, was it worth the extra investment? -= Full Circle =- Lessons learnt going from a stock to next generation Amiga and back again. ---------------------------------------------------------------------------- #Articles - WhatIFF? Issue 3.14 - August 2024#TopShow Report: Kickstart 02
Articles ============================================================================ Show Report: Kickstart 02 Show Nottingham - by: Kristian GK ============================================================================ The Amiga Kickstart 02 show was held in Nottingham over the last weekend in June at Meadow Lane football stadium, the home of Notts County FC. I arrive in town on the Friday and, after meeting my brother and checking into the hotel, decide to head to the famous pub and tourist attraction, Ye Olde Trip to Jerusalem, for a tipple or two. We are surprised to recognise some faces, as an outside table has been comandeered by some of the Amiga faithful. I manage to grab a quick word with Dan Wood and Ravi Abbott (the organiser of the event), amongst other familiar faces, before they have to disappear for some preparation work ahead of the show. Saturday My brother and I get to the show shortly after the doors open at 10AM and have a wander around. The layout had been revised since the year prior with talks taking place a level above the User Groups and Traders' space below.We meet Rob C (Daedalus) the inventor of the Solas system, which is an incredible home entertainment light system controlled by an Amiga via the clockport. You really have to see it in action glowing in syncronicity with Paula playing a mod file. It has been expanded to allow Amiga fan control and temp monitoring via software and probably lots more by the time you read this.
Next up is a talk by Stoo Cambridge upstairs. He tells some cool stories about working in the Sensible Software team back in the 1990's and talks about the joys of restricted palette pixel art and aliasing. His hidden graphics in Cannon Fodder come up which are definitely worth searching up on the internet for a giggle.
The trading hall is a full smorgasboard of Amiga retro goodness. Amiga Addict have a table set-up with an impressive array of past issues of their splendid magazine. Steve Jones is here demonstrating the latest versions of the Checkmate monitors and modular components which are looking great. Many traders are set-up selling a wide variety of Amiga items.
A-EON have a working A1222 set-up with some motherboards/units for sale. The system seems nice and responsive, although the price quoted is a little out of my reach. Dominik from Digital Retro Bay is promoting his wonderful GoDrive Gotek devices which allow installation alongside a floppy disk disk and without modifying the original Amiga casing.
I recognise the logo and design of the new A600 GS system from the AmigaKit stand. This seems like a good solution for users wanting a more Amiga-like emulation box experience than you can get with an A500 mini, for example. The unit looks slim and compact and the DB9 joystick ports are a nice touch. I pick up a RTC Clockport module I have been meaning to purchase for my A1200.
After the show there is the afterparty which this year was hosted at Saltbox bar in town. The set begins with David Wise and some intense saxaphone before moving into the Amiga synth-based pop of Vogue Renege (who manages to blow the system with some seriously loud Amiga pop hooks). We are then treated to a set from H0ffman demonstrating his awesome PT1210 drum and bass software, mixing and MOD making abilities. The final performance is a jungle DJ set from 8-bit sample fan Pete Cannon ahead of his appearance at Glastonbury festival the following evening which draws the evening to a close at 2AM. Sunday Day 2 is a quieter affair with many attendees presumably having planned to only attend the Saturday and travel back home on the Sunday. My brother and I get the opportunity to talk with David Pleasance who reveals details of his forthcoming Kickstarter for a new book 'Dare to Dream: Commodore and Amiga Today?' which he is working on with David Haynie.
Then there is a talk held upstairs by Tony Warriner of Revolution Software where he describes working on the 'Virtual Theatre' system used in both Lure of the Temptress and Beneath a Steel Sky. We learn that the former was a finished game completely lacking any Temptress whatsoever, and had to be reworked, all because the publisher liked the name!
In the afternoon a Sensible World of Soccer tournament is announced and at some point we make our way to the User Groups' area to sign up. Due to an odd number of contestants Rob C kindly drops out to allow us to play (thanks Rob!) and battle commences. I manage to beat my brother and hold my own against the eventual winner from Norwich Amiga Group (a tragic 4-3 loss) which was great fun. Apologies to everyone as I forget your names!
Other highlights include: - 2 player Napalm played over network - 8 player Blitz Bombers looked like a laugh - Amiga game inspired Candles on sale - the Sensi Soccer ones really smelt like grass! - AB3D2 TKG Karlos version running incredibly smoothly on a A1200 PiStorm tower - Cool Amigas everywhere - Great vibes - Much more I have not captured here All in all a great trip, great to see everyone again in Nottingham :)
Top@Node "Day2" "Old Computer Challenge 2023 - Day 2" Articles ============================================================================ Old Computer Challenge - Day 2 - by: Steve Lord ============================================================================ Old Computer Challenge 2023, Day 2 11 Jul, 2023 For the longest time I've felt modern computing is a mistake. By modern computing I mean the act of attempting to turn every piece of commercial software into a rental SaaS model, infesting OSes with ads and spyware, and slowing the computer down in the name of security, while doing the absolute utmost to violate user privacy. Our computers have never been so powerful, yet so determined to work against users' interests. By mistake I mean all of this should be yeeted into the fucking Sun. Part of this years Old Computer Challenge to me meant going further than I had previously, or indeed most people would. For example, did you know that a Mac IIx from the late 80s could run a fairly modern-ish Adobe Photoshop 4 with full access to the complete Pantone colour set and no activation or rental bullshit? Did you know you could simulate an old Mac in a Web Browser? I know Solene's challenge permits up to 512mb of RAM, but I still see that as bloat. We can do better. So today I set out with 9Mb of RAM and a simulated 68020 CPU to see what I could do with the best* OS of the 1980s. Hasta La Vista, Baby Vista Pro rendering while playing music in HippoPlayerOld Computer Challenge
Articles ============================================================================ Old Computer Challenge - Day 1 - by: Steve Lord ============================================================================ Articles Old Computer Challenge 2023, Day 1 10 Jul, 2023 My upgraded Rom switcher for the CDTV hasn't arrived and neither has the desk for the CDTV. Instead I've decided to do the Old Computer Challenge on my MiSTer FPGA board. It feels weird doing something called the Old Computer Challenge on kit so modern, but I'll be running an Amiga build so it won't feel quite so weird. To recap, the main things I want to get done this week: 1. Process photos taken on a recent trip for the #CrappyCameraChallenge 2. Look into the feasibility of a Spartan/Gemini server for KS1.3 I doubt I'll get far into the second one, at least not without a ton of compromises. I've set aside a couple of hours a day over the week for working solely on this, but even if I only get as far as I did with my original CDTV setup, that's fine too. I'm using Amiga Vision's A500 HD Build as the starting point for my setup. Before I packed it up for a move, my CDTV had 9mb of RAM, a SCSI2SD card for storage and SCSI Zip drive for transfer. I used a serial cable to link it to a Raspberry Pi for file transfer over UUCP, terminal access and to talk to a Pakratt PK-232 TNC for amateur radio comms. I used the CDTV for all kinds of things, from writing for WhatIFF Magazine to casual gaming, including CDTV-only releases (some of which were actually pretty good for the time). I also started doing some light C coding, but since packing for the move in the spring I haven't had a chance to sit down. At the new place the CDTV will have a specific role more as an art station with a drawing tablet and Vidi Amiga 12 capture card. I have an upgraded 030/50 board to put in and this really needs a more modern kickstart. I wanted an "old blue" 1.3 machine for coding and doing 1.3 things, and tbh the new AGS setup provides exactly that. The Setup AmigaVision had an update in July, so I needed to copy it over to the system, then copy the A500 HD's ADF file so I can use it without risking it being overwritten by upgrades. I then tweaked the settings as so: - Switch display from NTSC to PAL - 68020, DCache On, ECS chipset - 2MB of Chip RAM, 384MB Fast RAM I put a bunch of tools into the shared folder. Some are staples, some aren't. I'll go through them over the coming days. Most of the day was spent installing things, cursing when they didn't work. Starting The Challenge I took my Kodak DC210 on a photowalk around Furness Abbey with a friend last month and had a bunch of photos to edit. These are all 640x480, which is at the upper end of what would be comfortable of a machine of this spec. Although the Amiga looks very powerful, it's actually similar in raw performance to an original Macintosh or Atari ST, but with some of the overhead associated with it's graphics and sound capabilities. To start with I used Art Department Professional (AdPro) to load in the photos and save them as 24-bit IFFs. The Amiga uses a container format called IFF (Interchangeable File Format) developed by Electronic Arts back when they were a pretty cool company. The Inter-Leaved Bit-Map (ILBM) data layout was used for images, and stored each bitplane separately. Because I'm running Workbench 1.3 this is the land before Datatypes, and IFF-ILBM was the standard. I decided to use 24-bit IFFs for working with data, then I'd use AdPro to convert back to 24-bit JPEG images at the end of the process. Everything on this level of Amiga is slow. Loading JPEGs is slow. Converting them to IFF is slow. Rendering them to screen is slow, saving them as 24-bit IFFs is slow. Be prepared to wait. The MiSTer's 020 made things slow but bearably slow. Based on my experiences with my CDTV I suspect 68000 mode will be slightly less bearable. Editing The Photos Once I had 24-bit IFFs to work with I loaded them into a tool called True Brilliance 2.0. This is a really cool 24-bit image editor. It's not like Photoshop and has a bit of a learning curve but Kevin Saunders' YouTube channel and WhatIFF tutorials will get you on the right track. I used a wide brush and set the paint mode to darken with a value of 5 and began touching up over-exposed areas. I can't recover light data from JPEGs but it's better than nothing. True Brilliance shows a 320 pixel wide view in HAM-6 mode, while working with 24-bit data underneath. This means you need to be patient, and that while images may give you an idea of how things could look, they're not the same as the finished product. Everything felt magnified and it's hard to get an overall view of the image. There is an Interlace mode option, but this is still 320 pixels wide due to HAM chipset restrictions. The image will look squished when using it. After finishing my touch-ups I saved a separate 24-bit RGB IFF, but I wanted to see the difference between before and after. To do this I used HamLab Plus. This tool lets me take advantage of some non-standard Amiga features to generate close to or sometimes better than HAM quality at higher resolutions. I played around with the settings till I got what I wanted and saved it to disk. I then used the command line viewer Mostra to automatically cycle between images every few seconds to get an idea of the changes. Once I was finally happy with the result I loaded the 24-bit RGB IFF back into AdPro and saved it as a JPEG. The MiSTer's Amiga setup supports a shared filesystem which makes it much easier to get things on and off the machine. I've put photos from today's experiments on my fediverse account although this will disappear after 7 days. I haven't paid for an upgrade to Bear Blog yet, but I'll try to get round to it before the end of the challenge so I can upload photos to here in the vain hope someone else might like to give it a try. Tomorrow I'm hoping to introduce ImageFX 1.5 to the workflow. ImageFX is another advanced photo editor that I use on my A4000. Hopefully the earlier version isn't bad on a non-RTG machine. I guess we'll find out. @{" Day 2 " Link "Day2"}First I installed Vista Pro. If you've never heard of it, it's a 3d Landscape generator, popular in the early 90s. If you've ever used Bryce 3D, it's similar to that. Amiga Format gave away a limited version on a cover disk, but I have the full Pro version of Vista Pro 2.0.2. Clockwise from top left: A low-poly quick render of a crater in an ocean, a higher poly HAM render with stippled horizon, A hires-laced 32 colour Floyd-Steinberg dithered preview render of a 24-bit image that looks better than the Vista HAM preview, and A greyscale view of the 24-bit IFF version of the 2nd render loaded into ImageFX
I did some test renders of a snow-capped crater, then a large-ish (for the time) 24-bit 640x400 render, which I saved to disk. The Amiga can only display complex colour pictures with certain restrictions and doing this in 640x400 is hard. I used the tool ImageFX to load in my 24-bit render and save it out as a JPEG. The resulting 24-bit Vista render converted to a JPEG image
It looks a bit like an Xbox or PSP game to me. I could spend more time adding trees, lakes, other things in Vista but this was just for a quick nostalgia hit and to try out ImageFX 1.5. Look Ma, No PhotoShop! A 640x480 32-colour render of the photo as taken in ImageFX
I then loaded in a photo I took using a Kodak DC210 on a photowalk in Furness Abbey. I wanted to clean up the photo over-exposure and maybe do a bit of photo processing if I could. I had a kind of Schindler's List effect in mind. Selecting a doorway on the photo to manipulate the white balance, gamma and contrast
ImageFX 1.5 is surprisingly useful for it's age. The software is over 30 years old, but handles pretty well, considering this came out before PhotoShop v2 (to the best of my knowledge PhotoShop introduced layers in V3). If you look at the image above you'll see the black and white lines around the doorway. That's the selection system. By default ImageFX uses a greyscale preview to bypass the limitations of the Amiga's 12-bit palette. This makes it fine for tone-related touchups but some creativity is needed when working with colour. A 32-colour render of the photo after desaturating the walls but nothing else. The render introduces new red and green colour effects instead of rendering the walls grey
In the photo above shows walls with a mixture of Orange and green. The colours aren't really there. This is a product of a 640x512 preview render that's limited to a 32 colour palette. The Amiga's 4096-colour HAM mode only works at resolutions up to 320x512 on the original chipset, so you have to becreative with your interpretations, or with the way you preview things. A 320x256 HAM render of the same image. Note the grey walls, orange doorway and green background through the doorway.
For example, this is the same image previewed in 320x256 HAM mode. Here you can see some colourful speckle effects caused by HAM fringing, but the walls are definitely grey, the doorway grey and orange, as they're meant to be. A greyscale preview of the original photo in ImageFX
I touched up the balance and desaturated the walls and floors before rendering to a final JPEG, which I'm quite happy with. The final 24-bit JPEG image
So there we have it, a 24-bit photo taken on a crappy 90s digital camera, edited using 90s software on an 80s operating system, on simulated 80s hardware. I was surprised how much quicker editing was with ImageFX compared to the prior workflow. Tomorrow I'm going to focus more on using the Amiga for writing up an article for WhatIFF Magazine, so I'll get Arnor Protext and Excellence up and running. In the meantime consider this: What I'm doing on this simulated Amiga setup is roughly not far from the equivalent of working with gigapixel photography on a current-spec Macbook Pro. It's probably at the upper end of what it was meant to do but it will happily do it. If I can edit photos on a machine hundreds, if not over a thousand times slower than modern machines, what are we doing with these modern machines? Instead of having 16 cores and 32Gb to run Slack we could've built low power modular e-ink systems with month-long battery lifetimes and shared grids instead of walled off clouds. STOP DOING MODERN COMPUTING - JAVASCRIPT WAS NEVER MEANT FOR ANYTHING MORE COMPLEX THAN ANIMATING WEB PAGES - RIDICULOUS AMOUNTS OF CORES yet NO REAL-WORLD USE FOUND for having WINDOWS 11 CANDY CRUSH ADVERTS IN YOUR START MENU - Want to play addictive puzzle games anyway? We had a tool for that: A SNES WITH TWO CONTROLLERS AND TETRIS ATTACKS - "Yes, please let me rent Pantone colours as part of my subscription so I can do my job" - Statements dreamed up by the utterly deranged. THIS is what hides behind modern computing: - 500-2000 milliseconds of input lag - DRM Says no you can't save your work, it's our work now - Please train our AI on where the fire hydrants are in this photo "Yes I would like to buy a new computer, buy software and keep paying for it while not being able to use it for general purpose computation" They have played us for absolute fools. *I realise this is a subjective term for some. Workbench 1.3 wasn't exactly the prettiest OS - System 6 definitely had the better GUI. But Workbench 1.3's pre-emptive multitasking was a whole decade ahead of the competition, and I use it extensively. @{" Day 5 " Link "Day5"} @Node "Day5" "Old Computer Challenge 2023 - Day 5" Articles ============================================================================ Old Computer Challenge - Day 5 - by: Steve Lord ============================================================================ Old Computer Challenge 2023, Day 5 14 Jul, 2023 I've found it quite hard with a busy week, a lot of curveballs and day job issues (for some value of $day_job), doing Amiga stuff, getting screenshots and writing about it for WhatIFF? magazine, then rewriting for Mastodon and for here. Unrelatedly I slept badly last night due to illness, so I took a sick day and spent it noodling with Imagine 3D. 3D Rendering on old computing involves a lot of waiting around doing nothing, which is great when you're ill. Anyhow, I'm feeling better this evening, so I thought I'd post up something to show what I've done. Relearning Imagine Most professional 3D people who had an Amiga on the western side of the Atlantic were big fans of the VideoToaster and LightWave. Don't get me wrong, LightWave is really good. I've spent some time with it and had some good results. For those of us who grew up in the UK with magazines like Amiga Format and CU Amiga, Imagine 3D versions were occasionally found on cover disks, along with tutorials inside the magazines. It's been a long time since I've used Imagine (maybe over a quarter of a century!) but I was determined to see what was possible with my MiSTer build running Workbench 1.3. Don't have a cow, man
I dug out some CU Amiga magazine archives and had a play using Imagine 3.3. The MiSTer lacks FPU support, so I had to use the integer-only version. Despite this drawback it was still quick, if occasionally a little unstable. Imagine's Detail Section
Imagine splits everything into projects. Different parts of the app control different things. For example, the Detail Editor is roughly analogous to LightWave's modeler. I started by adding the ground and a ground texture. I chose add a classic Red and White chequerboard pattern, changing a few settings here and there to make it bigger. I then added the classic Imagine cow model. If you've ever played with Imagine before you'll instantly recognise it as the Amiga equivalent of the Utah Teapot.
I gave the cow a camo texture and did a quick render. To speed things up I was able to run quarter-resolution renders using HAM colours to get an idea of how final renders would look.
Once I had the models I wanted configured and saved in my project folder, I was able to move on to the staging editor. The staging editor is where you set up your models, cameras and add lighting. I was happy with a single light approach for this render. Normally in LightWave I'd add a flood to offset the main spot light, but I didn't feel it was important here. I was just messing around passing the time till I got better.
I then went to the Action Editor. The Action Editor has a globals setting which controls things like the sky and so on but I couldn't actually edit it and didn't have enough documentation or spoons to figure out what I needed to do. Instead I moved on to the Project Editor, where I created a render sub-project. This let me play with various render qualities and so on. I did some test renders in standard resolutions and they were great, but I wanted to push it further. I wanted to do a full 1080p HD render in 9Mb of RAM on an OS from 1985 running the equivalent of an 68030 at 50mhz. I also wanted the render to run while I converted the 24-bit IFF images to JPEG and did any touch-up processing needed. I wanted to do all that and play chiptunes at the same time. I wanted fries and a shake with it too but my demands had to stop somewhere. Despite it's capabilities, an Amiga can't cook fast food (yet). Happy as a pig in the proverbial, I did my 24-bit render, loaded into ImageFX, converted it to JPEG and transferred it over to a more modern machine where I noticed something a little off:
Imagine was written at a time where people would use special effects in television or on video tapes. Most of this was 4:3 oriented. The Amiga actually has a slightly different aspect ratio in PAL modes but Imagine could handle that fine. What it couldn't quite handle was 16:9 - or rather it could, but not from a standard Amiga resolution preview screen. Moving back and forth between my setup and the PC was rather tedious, so I worked out the scale I needed and rendered at 1920x1536 so I could crop to 1920x1080p afterwards.
Imagine also has some cool tools for rendering both in wireframe and solid. I took advantage of this to make some renders that look different. Nostalgia-filled media are often defined by their rough edges - the imperfections of film, the hiss of audio cassettes, the crackle of vinyl. I've never believed it coincidence that colours featured in early vapourwave aesthetic correlate well with IBM's CGA palette 1. Granted, it's just a cow on a chequerboard, but if there was a cow in another Tron sequel, this could be it.
I find the solid render worse than the wireframe one, although that's probably based on me preferring lower poly solid-fills and more detailed wireframes. I had no problems rendering at 1080p, but full renders at higher resolution proved difficult. I also found I pushed up against ImageFX's limits. I had to use arcane virtual memory configurations just to load the 1080p images in, and most of the filters and adjustments didn't work. I think this is around the upper limit of a 16-bit Amiga, and it's nice to lean up against the boundary. My Amiga 4000 would chew these kinds of processes up in it's sleep. I eventually found the answer to the aspect ratio issue in Understanding Imagine 2.0 by Stephen Worley, but not where I expected it. He talks about resizing the camera to set focal length in an Appendix featuring discussion on widescreen, but the real gem is that Imagine's 3D rendered doesn't really care about aspect ratios. I resized the camera twice but I'm not sure if it made a bigger difference than setting the X ans Y aspect ratios to 1. Unfortunately the render still crashes in scanline mode. I might try another render tomorrow and look into it further. I'm more tempted to try Imagine on something with a floating point like my A4000. https://thedorkweb.bearblog.dev/old-computer-challenge-2023-day-1/ https://thedorkweb.bearblog.dev/old-computer-challenge-2023-day-2/ https://thedorkweb.bearblog.dev/old-computer-challenge-2023-day-5/
TopThe Elements Of The Game
Articles ============================================================================ The Elements Of The Game - by: Roald Strauss ============================================================================ Anyone who has ever engaged themselves in a game-development project has learned two things: 1: It takes a huge amount of time to go through all the phases of such a project, from the initial brainstorm to the final release (if they ever got that far). Creating a game is a much bigger task than most people think. 2: Unless you really screwed everything up, there'll always be someone who likes your game. But there'll also always be someone who don't like your game, even if you did everything right. It's impossible to make everyone happy - even when only targeting a small group of people. So the only goal you can really have, is simply to receive more praise than critique. And to achieve this goal, it is of course vital that you listen to the input of your beta testers along the way. Secondly, it's also a good idea to read reviews of other games, to learn what worked and didn't work for other similar projects. And finally, you can read articles where some random old geezer shares his viewpoints on the subject - like the one you're reading right now. Just keep in mind, that despite the authors of such articles probably do have a lot of experience with the topic, in the end all they really have is an opinion and a preference. And that's no different for this particular article you're reading right now. I am a rather difficult man to please when it comes to games. Very few of them appeal to me. I've definitely never considered myself "a game", because the majority of games out there doesn't interest me at all. I do stumble across games I find interesting on rare occasions though. This happens when certain elements of the game appeal to me. And in this article, I will go through these various elements, with a brief explanation of how I believe each element typically affects people in general, followed by my own personal preference for each element. Keep in mind, this is not a guide on how to make a sure hit. Everyone has different preferences, and this article only describes one example of such preferences. Right, let's get started then. Graphics The first thing most people will notice about your game, is the graphics. When they discover your game on a random forum, or your itch.io page, or Steam etc, or even if it's a physical edition sitting on a shelf somewhere, it's the screenshots they will see first. If the graphics in these screenshots look "appealing and interesting", then people will get curious enough to read the short description of the game too. So that's your first goal. But creating graphics that are "appealing and interesting" is a rather abstract challenge, since we know everyone has different taste and preferences. No graphics style will be praised by everyone, so we can't say "always do this style in that resolution with this palette". We only know that the graphics is what gives people the first impression of the whole game. If it looks like a lot of effort and time was put into the graphics, then people will assume that this level of quality applies to all other elements of the game as well. The graphics will make people assume a lot about your game, and you of course want these assumptions to be whatever they need to be in order to make people take a closer look. But that doesn't mean you should always have impressive graphics. Maybe some simple low-res one-coloured sprites are exactly what your target group prefer. It's much more important to make sure all the graphics have the same style. It is absolutely crucial for a good first impression, that your graphics doesn't come from multiple different sources in various qualities and different styles. If you used temporary placeholder graphics in the beginning of your project, don't forget to replace all of those (as you originally intended) with some better graphics done by a dedicated graphics artist. I've seen examples of games that was labelled poor by people who didn't even try the game - simply because the graphics in the screenshots looked poor in their opinion. In other words: The graphics can determine whether all the other elements of your game are ever experienced or not. A bad first impression can make people reject your game without taking a further look. But first impressions - good or bad - can often be wrong. A game can be awesome and give a great game experience despite of poor graphics, and vice versa. And if someone rejected your game because the graphics didn't appeal to them at first, there's still a chance they might try out the game later. More about that in the "More advice" section. My own personal preference with graphics is somewhat broad. It can be as simple as on the first generation consoles. I'm rarely turned off by what other people might refer to as poor graphics. In fact, it's more the other way around. I had my first video game experiences as a kid with the Philips Videopac G7000, where it was common for all games to have very simple minimalistic graphics while still giving an intriguing game-experience - always with 50 smooth frames per second. The graphics weighed very little in regards of the game-experience. It was the gameplay and frame rate that mattered. As computers and consoles evolved and resolution and palettes got better, the graphics still didn't become a priority for me. I actually preferred simpler graphics instead. Since I often experienced lower frame rates on the Amstrad CPC and Amiga compared to the Videopac G7000, I got the impression that better graphics apparently made the games run slower, for whatever reason. My brain noticed this pattern and stored it among my many other flawed brain programmings. So today, since I absolutely favour frame rate over graphics, my brain automatically makes me assume that games with simple graphics are probably fun and has a high frame rate. Meanwhile I expect games with amazing graphics to be somewhat boring with a low frame rate. I know perfectly well that it's just a reflex of course, and I'm not that quick to dismiss a game simply because it has amazing graphics. ;-) It's just a silly example of how different our perspectives can be. If you'd like to read more about how I experienced the consoles and computers back in the day, go visit https://www.8bitmemoirs.com. It's an eBook I wrote from 2012 to 2017, created as a Blu-ray project, so I could include 9 hours of supplemental video and 5 hours of background music. But a light-weight PDF and ePub3 version was also made later - without the video and audio. All versions of the book are free to download. Frame rate and animation The graphics alone doesn't really tell much about the game experience, but some people (like myself) might make initial assumptions about that anyway - good or bad - especially if they have nothing else to go on. For this reason, it is always a good idea to also provide a preview video of the game. That way, the graphics become the appetiser that makes people curious to watch the video. And with video, you then get to present the much more important elements to the preview of your game: Frame rate, animation and music. For me personally, a high frame rate is an absolute must. As soon as I see anything below 25 fps, I simply lose interest. It doesn't matter how great the graphics are. A low frame rate just kills the interest for me right away. There is of course a chance the game does have a great gameplay despite of a low frame rate, and there is a chance people will find that out later, and thus play your game despite rejecting it at first due to a low frame rate. But in order to catch the attention of the high frame rate addicts like myself, you gotta aim for some smooth 50 fps movement, and definitely no less than 25 fps. So try your best to write code optimised for optimal performance. Forget all about this silly modern phenomena called "readable code". We don't need that. We need optimised code! The only entity that needs to be able to read your code is the CPU! Adding some life to the sprites by animating them, usually lifts up the feel of quality too. The more frames per animation, the higher the quality impression. If you are unable to achieve a high frame rate and animation with many frames, for whatever reason, then you should consider putting more effort into some of the other elements of the game. And one of the powerful options we have available to add more value to the game, is with the next element that your potential customers will notice: The music. Music If someone asked what the most important element of game-development is, most people would probably say gameplay. But I wouldn't hesitate to say that it might actually be the music. In the past there has been many examples of games that became popular solely because people loved the music. Think about that for a moment. Games that didn't actually give the gamer a particular good game experience, became popular anyway - because of the music. And I don't mean they just loaded the game to listen to the music. No, they loaded the game and played it, which they wouldn't have done if it wasn't for the music. That literally speaks volumes of how much the music weighs. Music matters. A lot. So you absolutely want to invest in a good soundtrack album for your game. But what exactly constitutes "a good soundtrack album"? Well, for me, a good soundtrack album consists of tracks that - has a high audio quality - has catchy melodies with well-chosen instruments - matches the graphics of the game - matches the game itself in general High quality obviously means high-res samples - without noise or clicks'n'pops or harmonic artefacts / distortion / overtones. (You can find an article about noise-reduction in issue 2.11 of WhatIFF? Magazine, and a follow-up to that article in this issue). But high sample rates require more memory that we don't always have available on Amiga, so sometimes a lower quality version of the tracks has to be used in the actual game instead. That doesn't mean that the tracks can't exist in a higher quality elsewhere though. For example, it would be good advertisement for the game to have a high quality version of the soundtrack album available on YouTube (possibly while showing screenshots or video footage from the game), so everyone can easily share the playlist link among friends. That's a great way of boosting interest in the game. Or maybe the game-developer decides to create a CD32 version of the game later, where MODs are often replaced with CD audio to save memory. The game-developer might also decide to include a CD with the soundtrack for the physical release of the game. So it's good to have the tracks available in different versions and qualities. The music must match the graphics, because while the music is the element that sets the mood for the gamer, the graphics is the element that enhances it. It is also the graphics that determine which of two possible moods the music will give the gamer. For example, if a track gives off a vibe of uplifting thrilling happy adventure - but also gives off a vibe of scary dark evil horror, then the graphics will decide which of those two moods the listener will perceive. Alright, so far so good. At this point, your video preview has demonstrated the graphics, framerate and animations, along with the soundtrack to go with it. Hopefully the viewers found everything absolutely awesome and impressive, so now they're intrigued and curious to try out the game. Gameplay We have now reached the gameplay element, and it'll probably seem odd to some people that this element is so far down the list. Because gameplay has a lot to do with the genre of the game, and we often already know which genres we like and which genres we find boring and uninteresting. So regardless of all the previously listed elements, we often reject a game based on genre before even looking at graphics, frame rate, animation and music. But we're also often more inclined to like a game regardless of graphics, frame rate, animation and music - if the genre appeals to us. For example, I know I am quite fond of 2D platformer exploration games (when they make sense anyway) and arcade games. Which means, if you made a game in that genre, then there's a bigger chance I might like it - even if it has poor graphics, low frame rate and no music at all. On the flip side, I'm not really into puzzle games or strategy games. They just never appealed to me. So if you made one of those, I may skip your game completely despite it having stunning graphics, 50 fps animation and awesome music. This is all about individual preference. But as already mentioned, there are still ways to make this group of people cave and give it a go anyway. More about that in the "More advice" section. Genre aside, gameplay also consists of many other factors, such as controls, mechanics and reaction time. I've seen this little detail often overlooked for some reason. We all know about the platformer game where you can only go up/down the ladders if you manage to position your character precisely at the right pixel and press straight up on the gamepad without touching any other directional buttons at the same time. That's an example of absolutely terrible controls. Everyone will grow tired of that after about 3 seconds. And it's a shame, because it could easily be fixed simply by making it possible to go up/down by pressing left/right + up/down instead of only up/down. Small simple code adjustments can save the whole game like that. Listen to your beta testers! They will let you know. For me personally, the game has to have good responsive controls. No matter how good all other elements are, I will never play the game is it has poor unresponsive controls. I'm too old and too grumpy to put myself through the misery. I recently made a simple 2-player Tron lightcycle game for the Amstrad CPC called "https://www.cpc-power.com/index.php?page=detail&num=19065". Everyone considers such a Snake-like game to be one of the most simple games in existence, right? No doubt most people will assume that the code for the controls must be as simple as this: if (getJoystick()==JOYSTICK_UP) {goUp();} if (getJoystick()==JOYSTICK_DOWN) {goDown();} if (getJoystick()==JOYSTICK_LEFT) {goLeft();} if (getJoystick()==JOYSTICK_RIGHT) {goRight();} But that's actually completely wrong, and if done like that, the game will be extremely annoying to play. We have to consider all the various scenarios in the game in order to make the controls respond right. What happens if the player is already pressing RIGHT and then press UP at the same time? Well according to the code above, he'll just continue to go right - until the player release the RIGHT button. But if he's already pressing UP and then press RIGHT - he'll also go right - despite still holding the UP button. Lack of consistency is confusing and annoying. The real source code for the controls of such a Tron light cycle game is a bit more complicated than most people think. It has to be. And the same will most likely apply for your game too. As an example, you can take a peek at the actual controls (pseudo) code in my "Light Grid" game here. Another sub element of gameplay is the level of difficulty. Here you have to find the exact right amount of challenge. If the game is too easy, it'll be boring. But too difficult makes it frustrating. Again listen to your beta testers, and remember: When you as the developer of the game play the game again and again and again - it will eventually seem incredibly easy to you. For this reason you'll probably end up increasing the difficulty, to match your own skills. So when/if the beta testers tell you it's a bit too difficult, don't ignore them thinking they just need practise. Keep this in mind also when working on level design. If possible, consider adding a difficulty settings that the player can set himself. That way people can use the easiest difficulty to get to know the game first, and then adjust to match their skills. Thus making the game not too boring and not too frustrating. Consider adding layers to the game. The arcade game "Bomb Jack" did an awesome job in this regard, making the game playable for everyone. Collect the bombs to complete the screen. Or collect the bombs in the right order to get a bonus. Grab the Power-Ball to kill the enemies. Or grab the Power-Ball when it's a certain colour to maximise bonus points. Adding these layers will add entertainment for a bigger target group. And more customers is always nice. More advice On rare occasions, a game comes along in a genre that I'm not really into at first, but I end up trying out anyway later. This typically happens when the game has received a lot of praise in the community, which makes me curious to check it out despite previously having had no interest in the game at all. And sometimes I do actually end up liking the game - despite it being a genre I'm not usually into, or it having an unappealing frame rate. In my opinion, this is one of the highest honours you can achieve as a game developer: To have your game played enthusiastically by people who doesn't favour the genre. If you can accomplish that, then you absolutely did something right. The way you achieve the kind of praise that's necessary for something like that to happen, is by impressing everyone else (in your target group) with graphics that looks "appealing and interesting", a high frame rate, awesome music and an addictive gameplay. Then give free copies of your game to various Twitch streamers and YouTubers, so they can present your game enthusiastically to their viewers. You want everyone who plays your game to express their positive impression about it to everyone they know. And with those words, we have reached my final advice: Be patient. Everything takes (more) time (than we think). If you initially thought the project would take a year to complete, you should probably expect it to take 3-4 years instead - and that is fine. Let the project take the time it takes. Because anything rushed will sacrifice the quality. Do not let yourself be discouraged because of the extended time it takes. That's normal. Happens to everyone. Maybe you won't be able to complete the project before the deadline. That's also fine. Complete it after then. For the next deadline.TopExample of control code
Articles ============================================================================ Example of Control Code - by: Roald Strauss ============================================================================ Actual controls (pseudo) code from my Amstrad CPC "Light Grid" game, as an example of how complicated the control code for a simple Snake-like game can be. // First get the current state of the joystick and store it in joy0 variable if (getJoystick()==JOYSTICK_UP) {joy0|=1;} if (getJoystick()==JOYSTICK_DOWN) {joy0|=2;} if (getJoystick()==JOYSTICK_LEFT) {joy0|=4;} if (getJoystick()==JOYSTICK_RIGHT) {joy0|=8;} if (getJoystick()==JOYSTICK_FIRE1) {joy0|=16;} else {joy0&=~16;} if (getJoystick()==JOYSTICK_FIRE2) {joy0|=32;} else {joy0&=~32;} // Now determine which direction to go in. // I use if/else because it's a priority to pick the first states first - if // they're there // First check conditions where the player is holding the button for one // direction, and then presses another direction. // First: If currentDirection is LEFT or RIGHT, // and we're pressing UP (plus maybe LEFT/RIGHT), // and UP wasn't pressed at the previous frame // then go UP if (currentDirection>=2 && (joy0&1) && prevFrameUP==0) { currentDirection=0; } // Else, if currentDirection is LEFT or RIGHT, // and we're pressing DOWN (plus maybe LEFT/RIGHT), // and DOWN wasn't pressed at the previous frame // then go DOWN else if (currentDirection>=2 && (joy0&2) && prevFrameDOWN==0) { currentDirection=1; } // Else, if currentDirection is UP or DOWN, // and we're pressing LEFT (plus maybe UP/DOWN), // and LEFT wasn't pressed at the previous frame // then go LEFT else if (currentDirection<2 && (joy0&4) && prevFrameLEFT==0) { currentDirection=2; } // Else, if currentDirection is UP or DOWN, // and we're pressing RIGHT (plus maybe UP/DOWN), // and RIGHT wasn't pressed at the previous frame // then go RIGHT else if (currentDirection<2 && (joy0&8) && prevFrameRIGHT==0) { currentDirection=3; } // If none of the above conditions exists, then check for conditions where // player is holding two directions, and now letting go of one of them. // This happens if for example the player pressed UP, then LEFT, and then // released LEFT again. // Else, if currentDirection is LEFT or RIGHT, // and we're pressing UP, but not LEFT and not RIGHT, // then go UP (again) else if (currentDirection>=2 && (joy0&1) && (joy0&4)==0 && (joy0&8)==0) { currentDirection=0; } // Else, if currentDirection is LEFT or RIGHT, // and we're pressing DOWN, but not LEFT and not RIGHT, // then go DOWN else if (currentDirection>=2 && (joy0&2) && (joy0&4)==0 && (joy0&8)==0) { currentDirection=1; } // Else, if currentDirection is LEFT or RIGHT, // and we're pressing DOWN, but not LEFT and not RIGHT, // then go DOWN else if (currentDirection<2 && (joy0&4) && (joy0&1)==0 && (joy0&2)==0) { currentDirection=2; } // Else, if currentDirection is LEFT or RIGHT, // and we're pressing DOWN, but not LEFT and not RIGHT, // then go DOWN else if (currentDirection<2 && (joy0&8) && (joy0&1)==0 && (joy0&2)==0) { currentDirection=3; } // Now get gamepad states from this frame, // to check for in the next frame if ((joy0&1)==0) prevFrameUP=0; else prevFrameUP=1; if ((joy0&2)==0) prevFrameDOWN=0; else prevFrameDOWN=1; if ((joy0&4)==0) prevFrameLEFT=0; else prevFrameLEFT=1; if ((joy0&8)==0) prevFrameRIGHT=0; else prevFrameRIGHT=1; Not as simple as you probably thought, right? But it's absolutely worth the effort. The above pseudo code makes sure "Light Grid" is enjoyable - if you're into that genre. The controls are very responsive, and when you crash you can't blame anyone but yourself. ;-)Top060 ... To FPU or NOT
Articles ============================================================================ The 060 to FPU or Not - by: Timo Paul ============================================================================ When the TF1260 came out, it completely changed the Amiga landscape, finally the average Amiga user could have an 060 machine without breaking the bank or bringing down the fury of the misses. While the card brought a whole new generation of Amiga users into the 060 fold there were a few issues raised. The main complaint being that the card came with an LC060 or an 060 without an FPU. There was a good reason for this, the cost of the rev 4 060 is drastically cheaper than the rev 6 060 with full FPU and MMU. It is in part due to this fact that the cards were so affordable. As many users found out though, the Amiga was fast, in fact you could get up to some pretty insane speeds. But it also came at a cost of stability. Why? Most 060 specific software was written for the CPUs that had the MMU and the FPU, putting a certain percentage of software that takes advantage of the 060 still out of reach of the LC060 users. Obviously you could purchase a rev6 060 but with the prices now equivolent to buying a second hand car it is not a solution that is suitable for everyone. A Compromise ... There is another option though, one that is in essence a compromise and that is the rev 5 060. This chip has the MMU and vitally an FPU, it however cannot be run at the speeds of the rev 6 060, topping out, if you are lucky, at 60 Mhz. Saying that it is much, much cheaper than a rev 6, where as you can spend 40 GBP for a rev 4 LC the rev 5 will cost you around 100 GBP, only 60 GBP more. It was with this in mind that I decided to buy a rev 5 060 to see how much of a difference it would make. Prior to the rev 5 I was using a rev 4 LC 060 and the Amiga was very fast but it was also quite unstable. There were at times software that I wanted to run that just refused due to the lack of an FPU and other software that would run but were unstable. All versions of Lightwave after 3.5 require an FPU, there are certain plugins for ImageFX that also require an FPU, VistaPro while does not require an FPU renders much faster with the FPU. So, for me who does a lot of work in the listed programmes an 060 that included an FPU seemed like a good idea. I found a rev5 060 easily on eBay for 110 USD, not bad at all, and quickly purchased it. Fast forward to a two weeks later and I had the chip in my TF1260 ready to go. Of course I did not notice any big difference at first but once I started to re-install software I was able to run the installer for the 060 versions and this is where the story takes a new turn. A lot of software that was unstable such as IBrowse which requires the latest version of AmiSSL suddenly became a very capable and most important stable browser. Websights that would cause the browers to choke and freeze would load up properly. Finally I could use Lighwave 4 and 5, ChaoPro became a bit smoother to use and fast to render. Overall the entire Workbench and software experience was much smoother with less gurus and errors. Now due to the chip being an rev5 I was not able to run at the speeds of the rev 4 or rev 6 060s but to be honest even running at 57 or 60 Mhz was more than enough for my needs. When I had the rev 4 rarely I ran the chip at more than 50 Mhz due to the lack of an active cooler. The rev 5 offers a great way to access more 060 specific Amiga software without needing to pay in excess. Since installing the rev 5 060 my Amiga computing experience has become more fun and stable.Topfullcircle
Articles ============================================================================ Full Circle - by: Timo Paul ============================================================================ In the last issue I talked about the "Amiga Paradox of Choice" perhaps a ostentetious title for a situation that affects only a small part of the world population and most likely less Amiga users than more. However, that aside I have been exploring this more since the last issue and have done some pretty drastic changes since then. To give you a bit more context, let me explain my previous Amiga setup, at the beginning of 2024 I had more Amigas than I could handle. My trusty A1200/TF1260, A600, A500, A500 Mini and the recently acquired Amiga compatible FPGA computer, the V4+ Standalone. In addition to the Amigas I also own a MacBook Air M1, MacMini, Super Famicom, MegaDrive, and PC Engine. In our home there is only my wife and I, no children so at the beginning of this year I started to feel that for one man this was a bit of overkill. Like many of you reading this I was growing up in the 80s and raving the nights away in the 90s. It is nice to have stuff from my youth, I still enjoy and prefer the games from the 80s and 90s, you can't beat them for gameplay and the beautiful 2D artwork. But, as I get older I am starting to feel that it is not so necessary to own so much stuff. To begin with I pared down my consoles, the Super Famicom, Megadrive and PC Engine were sold off quickly enough. While I enjoy playing those systems I do not have to the time to do dedicate to them and they sit most of the time in TV stand, it just seems a waste. Next was a bit harder, I do online teaching three days a week, for this I have been using my MacMini connected to a 27" SonicVision monitor. My monitor originally had been 21" but after I got the V4 Standalone it took me a while to find a compatible monitor, so in the end it was the 27" SonicVision which worked best. So to recap, I have my MacMini for teaching connected, the V4 Standalone as it is the only monitor that I could afford that works properly and under my desk on a sliding tray the A1200. The SonicVision has internal speakers but the are not that good so I had to invest in an HDMI audio splitter to get audio out to my external speakers. To be honest, it was a really messy cluster of cables going this way and that. So what got me to on the reduction horse? As I mentioned previously I was teaching online three days a week, two of these days were 5-7 hours of English teaching. However, last month I decided to quick my job as my SEN (Special Education Needs) students have been increasing and I was able to leave the English teaching job. This also will require me to work more outside instead of online teaching. With the greatly reduced online lessons I thought I could use my MacBook Air M1 for the rest of my online lessons that were 90 minutes at most and twice a week only. This would allow me to get rid of the MacMini and in turn the 27" monitor dominating my desk. However this also meant that the V4 Standalone would have to be put away, not necessarily a bad thing as I have my A1200 still. It took me a while to weigh up if I wanted to keep the V4SA or use just the A1200. In the end it was the A1200, for these simple reasons: 1. Compatibility: While the V4 is improving all the time, it is still not 100% compatible with Amiga software. 2. Overkill: The high resolution graphics and super fast speed are great to brag about about but I am not a power user. I spend most of my time in Brilliance, Lightwave, ImageFX and OctaMED all using the standard screen modes and audio. 3. Hardware Compatibility: I like to sample in audio into my Amiga using a real sampler and the V4 Standalone does not have a parallel port plus there are a multitude of new hardware expansions that are coming out that I would miss out if I used only the V4. With the MacMini and V4 Standalone out of the way I could use a smaller monitor again. I went to my local Hard Off (A chain of second hand shops in Japan) and bought a 17" NEC LCD monitor for the princely sum of 2 GBP. I was a bit concerned that going from a 27" monitor to a 17" would be difficult transition but it turned out easier than I expected. The native Amiga screen modes look much better on a smaller monitor. With the A1200 being the only computer on my desk I was able to release it from under the desk. It is funny how a small thing as moving the placement of something can make a big difference. Using the A1200 has become a much more visceral experience, it brings back strong memories of sitting in front of my A500 and A1200 with the smaller monitor close-by. I find it has become almost cozy to be working on the Amiga. Where as the V4 Standalone has a modern crisp resolutions, the A1200 displays are chunky, nice! At the end of the day it is the Amiga experience that I remember and enjoyed. Each time I turn on the A1200 I am now transported to another time, when computing was simple and fun. What am I going to do with the V4 Standalone? As much as I enjoy the machine for the moment it is not what I am looking for from my Amiga experience. It is the limitations of the A1200 that give me that warm feeling that I do not get with new computers. In comparison the V4SA is so powerful that it does not feel like an Amiga anymore. When a game comes out for the V4, I think it looks good thinking wow those are nice graphics, but always in the back of mind is the thought that it should due since it has the SAGA chipset, it reduces some of the wonder. But when a new game comes out that pushes the classic Amiga it feels much more xciting, GRIND is an example in point. What was once thought impossible is now possible. For the moment I do not feel that with the V4SA, though who knows in the future, things may change. Saying all that, the V4 Standalone is an amazing computer and one that deserves to do well, for me I have decided to put it under the TV since it has HDMI and the TV has good speakers. It will work well as a A500 Mini replacement - once it can run all the games properly - fingers crossed that will be a possibility and not an impossibility. So here I am full circle again, back to my A1200 with a simple setup and I for one am happier for it. The old saying that simple is best, probably makes most sense here. I got caught up in wanting to have the best and fastest Amiga but when it comes down it to all, I am happy to have something that can take me back to my youth and provide a fun and simple computer experience that is different from modern day computing. How will I feel 6 months from here ... haha, well time will only tell, who knows perhaps I will get the high-end Amiga fever again. The Amiga is a tough mistress! This is Timo, signing off from his humble Amiga 1200/TF1260, editor of WhatIFF?TopWelcome to voices of the people behind Amiga hardware and software.
CONTENTS ============================================================================ -= T A L K I N G * A M I G A =--------------------------------------------- ---------------------------------------------------------------------------- -= Karri-Pekka Koljonen: HippoPlayer =- Rob O'Malley talks with the developer behind HippoPlayer. -= Cameron Armstrong: Developer of AmigaGPT =- We talk to developer behind bringing modern AI technology to the Amiga and about it's development. -= Wayne Ashworth: Scourge Of The Underkind =- Gods, Alien Breed, and Chaos Engine are all what come to mind when you think of Scourge of the Underkind. We talk to the developer beind this exciting new game. -= Michael Rupp: TAWS =- The Amiga Workbench Simulator is one of the best things about the internet we sit down with Michael Rupp, the mastermind behind TAWS. -= Badgerpunch: Henning and Ricki - Roguecraft =- Roguecraft, one of the most anticipated games of 2024, we have a chat to guys behind the game. ---------------------------------------------------------------------------- #Talking Amiga - WhatIFF? Issue 3.14 - August 2024#TopKarri-Pekka Koljonen Interview
Talkingamiga ============================================================================ Interview - Karri-Pekka Koljonen: HippoPlayer by Rob O'Malley ============================================================================ Kari-Pekka Koljonen is the author of HippoPlayer, a lightweight, yet powerful multi-format music-module player for ALL models of Classic Amiga. This versatile module player has provided years of audio enjoyment for Amiga enthusiasts and tracked music fans. After a lengthy period of quiet, HippoPlayer has seen a resurgence in recent years, receiving updates that keep it thriving in the modern Amiga community. He has been kind enough to agree to an interview with WhatIFF? Magazine, which, surprisingly enough, follows this brief introduction ;) Hi Kari-Pekka, thankyou for taking the time to do an interview for WhatIFF? Magazine. Hi, it's cool (and weird) to be interviewed about a software I wrote during my teens almost 30 years ago! What was the original inspiration behind the HippoPlayer software? I liked listening to mods on the Amiga, I ripped these from demos and also swapped with friends. I had a lot of them on the floppies. I also discovered mod players, such as MultiPlayer and some others I don't remember anymore. Those allowed me to do stuff while listening to music, which was cool and impressive due to how well the multitasking worked on the A500. Then a friend, Guru, coded PS3M for multichannel mod playback. This led me to start developing my own mod player which would be better than anything else (from my point of view), and also provide a good GUI for PS3M. What, if anything, was the catalyst to inspire you to resume work on HippoPlayer decades later? I don't think Amiga ever properly left me, it was always there in the background. At some point things started bothering me. Some demo effects I didn't understand as a teenager for example. I suddenly needed to figure those out and so I tried my hand at Amiga coding again after many years. To my big surprise it was easy to get back into it, also it was fun. This was around 2010 I think. Some years later I noticed some bug reports and feature requests on the EaB forum while randomly browsing the net. Then I remembered some other stuff from the Hippo development days which also started bothering me. One was that there was no proper data protection from the point of view of multithreading. I basically had implemented a multithreaded application without really knowing some of the basics of threaded programming. A thought of learning more about AmigaOS thread programming suddenly seemed interesting. Finally in the spring of 2021 I dove in. The very large and not super organized main source file (450 kB size) suddenly felt familiar again. After some work the v2.46 beta was ready. The news was first published on www.amigalove.com. Around this time Spot/UpRough contacted me with improvement ideas for a possible next version. After this things started rolling and here we are now, many new versions later. Some excerpts from the early changelog: - Mon May 17 17:11:35 2021 +0300: Added some semaphore access checks for module list and module data. This may help with random crashes, especially when switching modules and scopes are running. The threads used to basically run by pure luck. - Mon May 17 20:44:05 2021 +0300: Add initial support for huge module lists that will consume all your memory - Fri Jun 4 17:35:02 2021 +0300: Add selected state visual for right button activated buttons. Cool! - Sun Jun 6 12:00:37 2021 +0300: Add tooltips for the main window button gadgets :-p What features of Hippoplayer are you most proud of? And which features were most challenging to implement? Both with the original back in the 90's and with the updated version. Original: I think one would be the scope display. This is able to run at full speed (50 fps) on a plain A500. I don't think any scope display on any other mod player did this. Of course there are some limitations, the size is fixed and there is just one color. The idea was to "demo code" everything into an offscreen bitmap using optimized plotting and drawing code and then with one graphics library operation move it to the visible window. A challenging one was probably the sample player (for IFF, WAV, MP3, etc files), which should read in a lot of different format variations and convert them into Paula 8-bit or 14-bit output. There were a lot of combinations that all needed to be handled. MP3 decoding was of course handled by Stephane Tavenard's mpega.library. Updated: Nice features for the user which I personally like are the favourite modules feature, it wasn't complicated but works quite well, and "Keep list on exit" which makes Hippo open to the previous state when it was last closed. I was sceptical about any networking features but then some discussions later with Patrik (of the UHC fame) and Spot/UpRough it seemed that using the aget-tool would make it possible. This ended up ballooning quite a bit, eventually including search and download and for example MP3 streaming support, which uses the PIPE-device in new and unconventional ways for data transfers. There is a backend that is used by Hippo and also the TAWS-Hippo (at https://hippoplayer.se, by Michael Rupp). All in all the networking stuff was quite complicated. It is completely based on the great UHCTools package by Patrik Axelsson and David Eriksson. The backend is also part of UHC. Later I realised that many of the streaming mechanics could be used for other kinds of playback too, so adding support for MIDI and VGM files using external tools was quite easy. I'm also quite happy about the upgraded playsid.library where I was able to add the reSID SID emulation engine which provides a better SID sound than anything before on Amiga. I ported the reSID from C++ to Amiga assembler while in COVID, which is a pretty silly stunt in itself. I had no idea whether reSID (even in optimised assembler) would be fast enough for the classic Amiga, but it turned out the 68060 can run it fine. A 40MHz 68040 can also handle it, though just barely. An obscure and complicated new feature was the STIL database support. This will show additional info when playing SID files, which is nice and generally supported by all modern SID players. As a challenge for myself I decided that this must also work on the A500 with 1M memory. The STIL database is a 3 megabyte text file which needs to be searched in the blink of an eye to be usable. Not super straight forward! Probably nobody has tried to use this feature (with the exception of me :-). Looking back, are there any design or functionality choices you made that you would have done differently with the knowledge you have today? Compared to DeliTracker or EaglePlayer, HippoPlayer was not very elegant. Instead of nicely designed interfaces for plugins, it was just a single exe with a lot of mashed up code that happened to work. The working-by-luck threading code was eventually addressed in 2021. The original idea was to have a mod player which is small and agile and runs on all Amigas. In this HippoPlayer succeeded, it only needed one executable file to work with Protracker mods, which are the most common music files. The "group-file" was needed for supporting additional music formats. It works fine on kickstart 1.3. Back in the 90's Hippoplayer was shareware, did you register many users? Did you find any pirate keyfiles in the wild? I think there were something like 60-80 registered users. I've kept all the letters in a box. One thing to note is that there were no functional differences between the registered and unregistered versions, only some different texts at places. I hated crippled software so I didn't want Hippo to be one. I don't know if a keyfile generator was ever released, but a cracked executable was. This was sent to me by the cracker in an email, I remember being slightly annoyed at him :-) I don't remember how the cracked exe worked. I also don't remember finding pirated keyfiles. What are some of your other coding projects for Amiga? Or even for other systems? I seem to recall a game similar to the Combat Cartridge on the Atari VCS called Tankkkkkk or something like that, which appeared on an Amiga Power coverdisk. Indeed I see an updated version of that game has also been added to the Aminet archive recently under the name TankX. Tankkk/TankX is another project which was restarted recently. I originally did this in 1993 as a port of the MS-DOS Tankkk which was cool but not very nicely implemented. I was contacted by Ztronzo/AmigaLive in 2023 when he noticed I had fixed a small bug in the original Tankkk which made it crash on the 68000. To my great surprise people were still playing Tankkk on AmigaLive! We ended up improving Tankkk/TankX in collaboration with the AmigaLive community. Recently it received single player support (or AI in current terms) and support for the upcoming Alinea Computer "octadapter" joystick adapter, so you can connect 10 joysticks to the Amiga and have a proper TankX mayhem. There's also a small intro project active with some old friends from back in the day. The Amiga community is known for its passionate software developers and other artistic creators. Who are some Amiga figures who inspire you, or whose work has left a lasting impression? I remember being very impressed by some demos I saw: Mental Hangover by Scoopex, Red Sector Megademo, and many Sanity demos. These made me want to learn coding in the first place. For the most part though I was a mod music fan, so the most important people were my favourite mod composers. Does the animal hippopotamus hold any particular personal significance to you? It just seemed to be silly and fun to use the word hippopotamus in some way. Later I learned that they are actually quite deadly and not at all friendly animals. Also they are not fat even if they look like it, it's all muscle! I think I got some pictures of hippos in letters, too. What is involved in a day in the life of Kari-Pekka Koljonen? Work? Family? Hobbies outside of Amiga? I try to keep the family running and the house maintained. I also try to exercise regularly. I guess my hobbies would be physical exercise and occasional retro computing activities. At the time of writing this I've been playing Giana Sisters on the C64, I've made it to level 24 just a few days ago which is my new record :-) My favourite joystick is the Terminator, by the way. What are some of your favourite music modules, and who might your favourite music module creators be? You can actually go check my favourites list using the TAWS-Hippo on http://hippoplayer.se, in the Playlists folder there should be "koobo- favs". The same can be found using a network connected Amiga with HippoPlayer from the Search View > Shared Playlists. My all time fav mods are probably "occ-san-geen" by Uncle Tom and the Turrican 2 Title by Chris Huelsbeck. Other mentions could be Jogeir Liljedahl's "Out Of Silence" and "Attributed Horror" and Walkman's "Klisje paa klisje". Finally, is there anyone in the Amiga and or Demoscene you would like to give a shout out to? Here goes some: Spot/UpRough, Patrik/UHCTeam, Erique/TBL/Numpties, Top-Azz/ Amaze/Arise/Decept/Parallax, Debug/Parallax, Guru/S2/Parallax/Decept, Intric8/AmigaLove, AmigaBill, Ztronzo/AmigaLive, aZtOcKdOg/AmigaLive, Michael Rupp, Marec Hac I, and the rest of the staff at WhatIFF? Magazine would like to thank Kari-Pekka Koljonen for taking the time to do this interview. If you have yet to experience the HippoPlayer software Please follow these instructions to download and install it on your Amiga.TopDownload and Install HippolPlayer
Talkingamiga Download and Install HippoPlayer If you wish to obtain the latest version of HippoPlayer... ...first download and install the last original version from the 90's which can be found at: https://aminet.net/package/mus/play/hippoplayer ...and then download and install the update which can be found at: https://aminet.net/package/mus/play/hippoplayerupdate in both of these archives, detailed installation instructions can be found in the accompanying documentation oh, and if you are interested in Amiga coding you can also find the latest source code at: https://aminet.net/package/mus/play/hippoplayerSourceTopCameron Armstrong Interview
Talkingamiga ============================================================================ Interview - Cameron Armstrong: AmigaGPT by Timo Paul ============================================================================ 1. Thank you for agreeing to do this interview Cameron, to begin with can you tell us a little about yourself. Hey, thanks for the opportunity to be a part of your fantastic diskmag! I'm Cameron, a 36 year old software developer from Perth, Western Australia. I currently work as a Full Stack Developer and Scrum Master at a company called FTP Solutions which makes software for the mining and agriculture sectors. In my spare time I enjoy retro gaming on my Amigas and MiSTer. I also make iOS apps (you can find them in the AppStore by searching for Cameron Armstrong). I also plan to get back into making music. 2. How you got started with the Amiga? I grew up in a small town in the hilly forest called Roleystone. My father had purchased an Amiga 500 and we had a large collection of (*cough* pirated *cough*) games. This was our only computer at this house for a few years although my grandpa had a 486 MS-DOS/Windows 3.11 PC which me and my cousins used when we were at his house in Mandurah. When we aquired a Windows 95 PC later on I started to use that, however the Amiga was still used for many more years, even as the years went on with me getting a PlayStation and then later a PlayStation 2. One day dad decided to sell the Amiga and so I eventually purchased another A500 and then wanting more power, I got myself an A1200 which I am using right now to type in my interview answers! It is currently fitted with an Apollo V4 IceDrake accelerator card and I am still getting used to the incredible power this provides. 3. You are the developer of AmigaGPT, is this your first Amiga application? It is the first Amiga application that I have completed and released. I had done some small experiments in 68k assembly and later on I started making a diskmag engine in C which was going to be called DF0. Unfortunately that project got abandoned and I started AmigaGPT a couple of years later. 4. How do you find the Amiga as a platform to develop on, compared to comtemporary systems? Modern devs don't know how good they have it these days. With all the vast debugging tools and development online resources available.. we are truly spoiled these days. With Amiga dev and its lack of memory protection, one bad line of code can corrupt the entire operating system leading to a complete system crash. However, using modern development tools for Amiga dev has helped a great deal such as using the powerful Visual Studio Code as an IDE, paired with a 68k and PPC Amiga cross-compilation environment inside Docker allows me to quickly start Amiga coding, even on a brand new machine. 5. Why did you decide to create AmigaGPT? When ChatGPT first launched it took the world by storm. Soon, everyone in the office at work was using it to make our coding lives easier. When I read OpenAI's documentation on their API, I saw that it was easy to use and then wondered how feasible it would be to bring to the Amiga. AmigaGPT really only started as a fun little experiment, and a way for me to get back into Amiga dev again. I never actually expected it to be released to the public! 6. What was the development process? What a long, painful and stressful journey! Yet, also a fun rewarding one. When I started I had knowledge of the C language and very limited knowledge of the Amiga libraries. I have all the large thick Commodore reference manuals and they were in my lap for most of my time in the initial development. The first month was spent creating a screen with a test window and a test button that didn't do anything when clicked. At that point I decided to tackle the hard part -- talking to OpenAI! Since I didn't have an HTTP library available, I had to do everything in AmiSSL which means setting up the SSL connection manually along with processing all request and response headers yourself. As everyone that knows C is aware, dealing with strings in C is a headache, so I eventually gave up on it and tried to find a library that will help with processing JSON strings (OpenAI uses JSON format for its requests and responses). I found a library called json-c but it was not available for Amiga. So I spent a weekend porting json-c to compile for Amiga. This port has now been released and I have made it available on Aminet. With all this done, I hooked up that test button to make a simple request to ChatGPT "Tell me an interesting fact". It then spat out a text response in a separate window with the text being drawn by console.device. It is there that it told me that the shortest war in human history was between Great Britain and Zanzibar which lasted only 38 minutes. Already AmigaGPT had taught a brand new fact to someone! I needed to replace the console.device output to a more sophisticated text field so I learnt about BOOPSI and then about the ReAction GUI framework. So I read about ReAction in the newly released AmigaOS 3.2 documentation and found it to be simple to use and quite powerful. When AmigaGPT 1.0 first launched I still knew there was plenty more to be done, so I have been updating it ever since. I even found it surprisingly easy to port it to PowerPC AmigaOS 4.1. When OpenAI added image creation to its API, I added that too. 7. At the moment AmigaGPT requires Amiga OS 3.9 or higher, will this change in the future? Oh yes, the infamous AmigaGPT doesn't work on AmigaOS 3.1 controversy of 2023-2024 haha. As soon as I released AmigaGPT I got posts complaining that it requires AmigaOS 3.2 to work. It was explained that AmigaGPT relies on ReAction for its GUI. I was hoping that it would encourage more people to get AmigaOS 3.2 but alas, that was not the case. There were some people who defended me though. To quote Dan Wood, who made a video showcasing AmigaGPT, he said "Why bother making new versions of the operating system if no software is going to take advantage of the new features?". I was informed that AmigaOS 3.9 could be made to work with very little changes and also AmigaOS 3.X (a special version by Cloanto). So I backported AmigaGPT to work with those. However this demand is still around and I also want to have AmigaGPT working on operating systems such as ApolloOS and MorphOS, so a more universal GUI framework needs to be used instead.. so I guess a MUI rewrite is in order. 8. Are there any features that you still wish to add in future updates? Yep. As I just mentioned, AmigaGPT will receive a full rewrite of its GUI engine to use MUI instead which is going to run on a lot more operating systems. Also, you heard it here first, now that OpenAI has added text to speech into its API, I'm adding support for having AmigaGPT speak with the high quality 16-bit speech, which can be played as-is for 16-bit sound cards such as Arne in the Apollo cards or even let AHI downscale it for you to 8-bit to listen to it with the standard Amiga Paula chip. Of course whenever OpenAI updates their chat models, I always make sure AmigaGPT is updated to be able to use them. Who knows what other exciting things OpenAI will add to their API. Anything they add that is feasible for Amiga, I'll be sure to add! 9. Looking past AmigaGPT, do you have plans to create other Amiga software? Yes. How does Amiga sofware running a text adventure (plus graphics) which was all dynamically generated from OpenAI sound? I'm experimenting on an adventure game engine that lets you tell ChatGPT what the game is about and it will go ahead and create the game files for you and drawing static images for the scenes. The game will be compatible with not only Amiga, but also runnable on any modern machine too using Python. 10. What do you find most exciting about the current Amiga scene? The constant development. Not only is AmigaOS still in development, but new exciting operating systems too like ApolloOS and all these new hardware accelerators coming out like the Apollo V4 series and the PiStorm are taking the Amiga to new heights. The community is just as alive today as it was back in the 80's and 90's. The community members in forums and in Discord are also very supportive and there is a friendly vibe which I really dig. It's all so fire, I love it. 11. Thank you for your answers, before we finish, are there any final words you would like to say? AMIGAAAAAAAAAAAAAAAAAAAAAAA! Haha nah seriously thanks for considering me for an interview. If any of your readers want to follow me, I am sacredbanana on GitHub, Twitter and YouTube and I am Nightfox on EAB. You may also see me floating around various Discord servers. Peace <3TopWayne Ashworth Interview
Talkingamiga ============================================================================ Interview - Wayne Ashworth: Scourge Of The Underkind by Timo Paul ============================================================================ 1. Hi Wayne, thank you for taking the time for this interview. To start with, can you tell us a little bit about yourself? Hello! :) My name is Wayne Ashworth, I was born in Preston in Lancashire, England in 1974.I have always loved art and creating art in various ways. I got into computers very early on and loved my C16. I moved onto a spectrum and then on to an Atari ST where I taught myself how to pixel using Degas Elite. I then went on to the Amiga and that's pretty much where I have been since. 2. How did you get started with the Amiga? In 1991 I bought my first Amiga 500 and was blown away by how much better it was than the Atari ST (and lighter!). As soon as I got one I loaded up Dpaint and started pixeling. 3. What defines the Amiga experience to you? Great question! For me back then, it was the way that Amiga allows anyone to do anything. Music, art, writing. Games are a real bonus. Nowadays I think the Amiga experience is one of community, it doesn't always get along though, which is a shame, but we're all connected by our undying love for the Amiga. 4. You are currently working on Scourge of the Underkind. Did you work on or release any games before this? I worked on several games back in the early 90's that were programmed by my friend Kevin Darbyshire. Our first game was Pong '93, unreleased (and unfortunately lost to time)...it was a modern remake of the simple bat and ball game but had Bitmap Brother's style graphics. We made a couple of others that I don't remember but then we worked on a game called Renegades which did get released. We even went back to it in 2010 (I think) to make it graphically better which other various tweaks, this became known as Renegades Deluxe and can be found on my itch.io page => (https://captainnow2.itch.io/). 5. How did the idea for Scourge of the Underkind come about? I had been watching a video of a programmer's maze routine on Youtube, it was programmed on Amiga and it was generating a whole maze all on it's own, it was mezmerising. I decided to reach out to the programmer, Magnus Tegstrom, and asked if he'd like to work on a game...he said yes. I guess I have always wanted to make a game like S.O.T.U, ever since I saw the unfinished Team 17 game called 'king Of Thieves', that game looked so good! It always stayed in my mind and I guess this is somehow a little tribute to that memory. 6. The game looks like a mix of Gods, Chaos Engine and Alien Breed. Were these big influences for you? Oh yes!! Renegades was a direct result of playing Alien Breed '92 non-stop with my friend! we wanted to make our own version! I adore the Bitmap Brothers games, Speedball II's graphics were a direct influence, as was Gods and Chaos Engine. My idol is Dan Malone, I have been obsessed with his work ever since I first saw it. His pixels are superb. For S.O.T.U I decided to combine Alien Breed's gameplay with Chaos Engine's viewpoint and throw some of Gods gameplay in there too. S.O.T.U is a direct homage to those games. 7. The game has been in development for a while, and the graphics have taken a noticeable change. Why was this done? The graphics have evolved naturally over time. The early mock-ups were only there to show my rough Ideas and as I worked I found that certain things worked and other things didn't. The level that has undergone the most work has been Underworld, which is the last level. I changed the tileset completely as I felt I could do better than the original tileset. I think the hard work has paid off as so far it's graphically my favourite level. I needed to look back on this one day and say 'this is the best work I have ever done' and I feel I have achieved that. 8. How is the game being developed? Is it done on the Amiga, PC/Mac, or both? The game is written in C by Magnus. It is all programmed via emulation for ease as working with real hardware can be a pain (sorry!). 9. What hurdles have you encountered during the development? Everything has been a hurdle at some point haha! Magnus re-wrote the engine around 2 years in (if I remember correctly). My main hurdle has been creating a suitable 16-colour palette and keeping that exact palette throughout the entire game. I could have changed it between levels but I actually really loved the challenge of creating 4 very different worlds using the same 16 colours. The Shopkeeper and loading screens use that palette too. At the time, this was Magnus' first game, so he was learning as he went as he had only programmed demos up until that point. Magnus has since worked on several other games (including a port of Flying Shark). 10. How has the public reaction been to the game so far? The public reaction has been mostly positive! A lot of people have spotted the obvious influences and have become very excited about the game which is something I am extremely pleased about. There have been some negative comments but no matter what you do in life there will always be someone with something nasty to say. Mostly people are just excited that they're getting a game like this, whether or not people like it or not remains to be seen. 11. Do you have a rough idea of when the game will be released? It is looking like August, 2024 at the earliest. 12. Are there plans to release a boxed version of the game? I have created the artwork for a big-box version of the game and written a manual so yes, I am very optimistic I will be able to make a bog box version. Brexit has made posting things out to Europe a lot more expensive than it used to be so I am still working on postage solutions. I am optimistic one can be found and I look forward to putting an order in for my first batch of big boxes. 13. Beyond Scourge of the Underkind, do you have plans for other games? I do indeed! I know Magnus and I have talked about a platform game at some point and maybe a shoot 'em up. Fingers crossed we will be able to make those! 14. With the PiStorm and Vampire equipped Amigas becoming the standard, do you have plans to create games that support the higher-end Amigas? Unfortunately no. For me the Amiga experience is OCS (I love my A1200 and CD32 but 16 colours is where my heart lies). I admire what the community has done with the available tech and look forward to seeing what eventually comes out but game dev takes so long, developing for superior hardware, such as the Vampire, will take even longer to do it justice and I am nearly 50 now! ;) 15. Thank you for your answers. Before we finish, do you have any final words? Thank you so much for taking an interest in S.O.T.U and wanting to ask me questions about it, I am very grateful that people are still passionate about it! I would very much like to thank everyone who is waiting for this game for their patience. The game has been in development now for around 10 years and has suffered many stalls due to my ill-health or other life -hurdles (too numerous to go in to). My passion for Amiga has never faded nor has my determination to finish this game. I hope that S.O.T.U finds it's audience and I hope those that enjoy it can find space in their hearts to place it alongside classic Amiga games of the 90's.TopMichael Rupp Interview
Talkingamiga ============================================================================ Interview - Michael Rupp: TAWS by Timo Paul ============================================================================ 1. Hi Michael, thank you for agreeing to this interview. To start, could you tell us a bit about yourself? My name is Michael Rupp (all together now: HELLOOOUUUH MICHAEL), I am 49 years old which is the ideal age to have witnessed the golden age of Amiga computers. I'm living in St.Gallen, Switzerland with my wife Mirjam and my two boys Jaron and Nael, both being in the probably-soon-to-be-very-challenging age (11 and 13), and I made it a point in their upbringing to show them some of the best games the glorious past (read "Amiga gaming") had to offer. For a living I'm a professional coder, mostly in C#, Angular and MS-SQL. Besides the Amiga hobby, I do improv theater (theatersports and the like, see https://tiltanic.ch) and am producing EDM/IDM with a good friend of mine using Ableton Live (we call ourselves Double*R, please keep checking your favourite streaming platform for our upcoming 1st album sometime later this year). I also like to write, and at the end of last year a 6-year-project finally came to a conclusion: a crime novel called Wege eines Verbrechens (sorry, german only) I wrote together with 4 other authors (and an illustrator) with the speciality of being interactive in the sense, that after each chapter, the dear reader can choose where to read on (see https://textklexer.ch). I apologize if this sounded a bit like a commercial, that was not intended (but go on, buy all my stuff). 2. How did you first become involved with the Amiga? I guess that's probably one of the most classic stories of coming-of-being- an-Amiga-fan: 1. my best friend got an Amiga when we were about 13, I guess. 2. we played the first bunch of games... a lot. Then we played some more... (I remember some of them being The Great Giana Sisters, Super Hang On and... oh yes... North & South) 3. Of course, I immediately started saving all my pocket money to get one, too. Thanks to a job at the city theater (I was singing in the childres choir and even made it to perform in Die Zauberfl te until puberty vocal change cut me off), it didn't even take that long to get my hands on a second hand Amiga 500 with 1084S monitor and Star LC-10 9 pin color printer (a very popular setup I think, and I'll never forget the screetches that printer made, WOW). I couldn't believe my luck that my parents actually agreed to this. I'm pretty sure they didn't really have a clue about what they were getting themselves into (lots of discussions about gaming time, who do I see nodding right now?), but on the other hand, this sure was the first step that led me to be a professional programmer later. 3. Which models of Amiga do you own? I'm a collector and always have been. As a kid I collected rubber erasers and at some point even pencils, and my collection of key rings from all over the world was impressive. I got better in not-collecting-stuff while growing up and nowadays (with the help of my wife who's not very fond of that trait and herself is a role model in getting rid of unnecessary stuff), I'm doing very well in concentrating myself on "really important stuff", and my Amiga collection makes top on that list, needless to say. Here we go: - A1000 with Parceiro (what an excellent extension and dearly needed to make the thing useable, nowadays. And the Parceiro II is even better, I hear.) - A500 with a Vampire V2+ (this is actually the original machine I bought as a teenager, it spent many years in my parents' attic, but I'm so happy I kept it) - A500+ with ACA500plus (one of the best extensions to get for any A500) - A600 with 2MB chip ram extension - A1200 with Blizzard 1230 III (unfortunately not the original machine I got after the A500 back then, but it's a recreation of the same setup) - A3000 (Superkickstart) with a ZZ9000 and ZZ9000AX and a ZuluSCSI - A4000/040 desktop - A4000/060 in a Micronik 2000 tower with too many extension cards to list - CD32 with TerribleFire 330 - Vampire 4 SA in a beautiful plexilaser case - Sam440Flex (my first OS4 machine) - AmigaOne X1000 (makes me forgetting mostly about owning the Sam440Flex) - Apple PowerBook G4 running MorphOS - some old PC running AROS x86 - A500 Mini Not all of them are hooked up all the time, of course. But... well... my main priority when buying a new monitor is how many video inputs it features. Do I need to say more? Ah yes, my two D520 (Amiga video to HDMI converters) play key roles in my setup. 4. Which model is your favourite and why? Piuh... that's hard one. Playing around with all of them is great fun. If it's just for a quick game, the A500 Mini is easiest (and it's so TINY and looking so SWEEEEET). If I want it to be on real hardware, I use the A500+ for ECS or A1200 for AGA. And the X1000 I love because it's blazingly fast and a wonder in itself that it even exists in the first place. And the V4 is impressive in its own way and the old AAA dream coming true. Sorry, I simply can't pick just one... ;-) 5. You are the creator of the impressive TAWS project. Before TAWS, what other Amiga projects did you work on? Not much, really. As a teenager I did some music adaptations with ProTracker and I liked to do animations with DeluxePaint, Brilliance and Cinema 4D. Back then, coding was totally beyond me, unfortunately. I did assemble a music disk called Music Space using existing tools but didn't know what to with it. I did send it to the holy Amiga Joker magazine, though, but got a negative answer (I still have that letter from Michael Labiner himself , mind you, did I already mention collecting?). 6. What was the inspiration behind TAWS? It was the year 2001 and I noticed more and more homepages concerning Amiga to mimic a Workbench look. One of them was from Cloanto advertising Personal Paint. It's actually still out there (https://www.amigaforever.com/classic) but there were others, too. On one hand, I liked them a lot but on the other was also a bit disappointed by their limitations. I thought that with modern (hehe) browsers it shouldn't be so hard to produce a better user experience, like windows and icons that can be dragged around the Workbench and even a pulldown menu, maybe. Back then, Netscape Navigator was the browser par excellance and Microsoft was struggling hard for market shares and when they released their brand new Internet Explorer Version 5, they implemented some very intriguing JavaScript extensions concerning drag'n'drop events. Of course, these were proprietary and didn't follow any standards from some W3C (not sure if that even existed back then and if they did, MS apparently didn't bother). But they had stirred my curiosity about what might be possible using them, so I started to experiment a bit and then some more and this is how the very first version of TAWS finally emerged. 7. Did it take a long time to develop the initial version of TAWS? I can't really say, but the functionality was quite limited with the very first release: some icons that could be dragged around and when double clicking, its window would open. Windows could be dragged around and resized. The window's gadgets (closer, size changer, z-indexer) worked, but not yet the scrollbars or arrows. Well, that was about it. More like a proof of concept, really. But it must have been fun or I wouldn't have continued, I'm sure. 8. What were some of the initial challenges you had to overcome? There's a gap of almost 8 years between v0.8 in 2001 and v0.9 in 2009. Did I say the initial version was fun? Maybe not that much fun, then. Or the Amiga spirit faded slowly away, while various companies preferred to rather pay lawers than developers, I'm not sure anymore. But I remember the spirit coming back when I bought the Sam440Flex around 2008/9 and marveled at the new OS4 and that pushed me to continue on this long abandoned project. Because all had been IE-only so far, I had to rewrite a lot of code to finally get Firefox compatibility. Browser compatibility in general was a real pain back then and lots of code switches where needed. 9. How does the current version of TAWS differ from the original? TAWS just grew and grew, I never rewrote the code base and sometimes this shows. Of course, I'm a different coder today than I was back then and some things I would do differently now. That's also a reason why I am a bit hesitant to open up the code to the public. Things that where added after "the big break" are done in a more object-oriented way, such as the AmigaGuide parser, the Shell, the Lemmings tribute or HippoPlayer. On the other hand, the old code is not that bad that it couldn't be handled anymore and absolutely needed to be replaced. It's just done in a more procedural way and not object-oriented and probably not that nice to look at, that's all. 10. Which browser works best with TAWS? All major browsers work very well with TAWS. Browser compatibility is much better now, and with the current v0.37 I had decided to quit supporting good old (no, let's just settle on "old") Internet Explorer and could remove a lot of these formentioned switches. I still make it a point to get it to run on OS 4.1 Odyssey, but more demanding features like HippoPlayer need a more recent WebKit engine and are disabled if the needed JavaScript classes are not available. I'm hoping to see the day when the excellent Wayfarer browser gets ported to AmigaOS 4.x, fingers crossed. There is a bit of a special if you try IBrowse or Netsurf, just a joke, really, so it won't be just an empty window. :-) 11. What are your future plans for TAWS? Good question. Just going on, I guess? TAWS is and has always been a just- for-fun project. Even after 23 years I consider it still beta, that's why versioning is still in 0.xx format. Version 1.0 would be once all menu commands are supported - or to be more precise - simulated. But then, other stuff that's more fun to implement tends to get in the way, like it was with HippoPlayer. I have quite a few ideas that are definitely more fun to implement than - say - a list view for the windows (booooring, just say it!): - server side PHP scripts to dynamically load the contents of a server directory. In admin mode, disk operations are carried out for real on the server files (copy, move, makedir, delete (!), snapshot). Current state: already implemented and used for the WhatIFF? issues. I just mention this because it's probably not widely known that TAWS can do this. ;-) - IBrowse - a browser in your browser Current state: almost finished - vAmigaWeb integration to run 68k games in TAWS for real and not just as simulation - imagine just double clicking an ADF file and the game fires up in a simulated RunInUAE window, ha! Current state: started experimenting and looking good - your personal workspace using IndexedDB (a DB provided by the browser, no files on my server, all stay on the client's side) - drag'n'drop your favourite (ADF or other) files onto that drive and next time they're still there. Current state: started just a bit of experimenting 12. Apart from TAWS, do you create software for other platforms? Yes, as a C# coder it's just too easy to simply write some tool one is in need of, sometimes easier than searching the net for already existing solutions, even. That's how iTunes2Spotify (a tool to transfer playlists from iTunes to - surprise - Spotify) and SonoSaver (a tool to export, backup and restore Sonos playlists) emerged. In 2021, I had a week of overtime to compensate and decided that it's the time to learn Hollywood, finally, something a wanted to do for quite some time already. Because of SonoSaver I was already into the Sonos API and that's how SonosController for all AmigaOS variants came into existence. If you're interested in these projects, please check them out at https://mrupp.ch. 13. Why did you choose the Amiga for TAWS instead of other platforms? For me, there never were other platforms to really... well... bond to. I used AmigaOS for daily computing far longer than most people I know. YAM, IBrowse, Final Writer and Art Effect for quite some time did cover all my needs. It was a sad day when I was finally buying a Windows-PC to do these tasks. But still, AmigaOS has always been my only true love (concerning OSes). I always know what it's doing and there's no secret stuff going on behind the scene. I appreciate that. 14. Thank you for your responses. Before we conclude, do you have any final remarks or comments? I'd like to say huge thanks to everyone who donated to support TAWS development and also the guys who did the translations. Ah, yes, if you find your language to be missing and would like to contribute, don't hesitate to contact me at . Also, I would like to thank everyone that's keeping the Amiga spirit alive (such as all of you from the WhatIFF? magazine). I marvel at all these amazing projects that have been going on in the past years, especially since the 30 anniversary events, I got the impression. And to those parties that (still or again) are fighting lawsuits: Take a step back and think of this: Nobody, really, NOBODY is getting rich with Amiga projects nowadays, or even making enough money that it would be worth mentioning. So please, stop standing in each others ways, opensource as much as possible and let people just use it and create new things from it. For me, this has always been the main power of Amiga computing: to fuel creativity! So, in short: KEEP ON GOING AND ENJOY DOING IT!TopCONTENTSBadgerpunch: Henning and Ricki Interview
Talkingamiga ============================================================================ Interview - Badgerpunch Henning and Ricki: Roguecraft by Timo Paul ============================================================================ 1. Ricki and Henning thank you for agreeing to this interview, to begin can you tell us a little about yourselves? Ricki: I'm an English-born geek who lives in Norway. I've been living in Norway since I was 10 y/o, back in the mid 80s. I got a C64 for Christmas in 1986, and that kickstarted my love for computers, games and programming. I ended up getting a computer science degree unsurprisingly, and now work as an IT consultant after a 10 year stint as a professional game developer in Greece, among other things. Henning: I'm a Norwegian 75-model geek refusing to grow up. I've been working with computer games since the late 1990s, but a few years ago I transitioned into working full time on my own creating art for board games for some really amazing clients and projects. I really love being able to work from home, and controlling my days to my own liking. My girlfriend also works in the games industry and also works from home in our shared office. I'm a retro game computer and console collector, I have a few arcade machines, and also build arcade machine replicas in my workshop whenever I have time, which is not as often as I would have liked. 2. How did you both get started with the Amiga? Ricki: I got started with the Amiga in 1989 after spending all my savings, and even selling my C64 to pay for it. I regret that I sold my old C64, but I still have my Amiga luckily. The reason why I bought the Amiga was that a couple of neighbors got an Amiga, and I saw Test Drive on it. That was when I knew I had to get an Amiga. Henning: My first encounter with the Amiga was using my big brother's Amiga 1000 without permission. One of my friends would keep a lookout while the rest of us were playing, but when he returned home he would check if the computer was warm and I would end up in trouble. My very first Amiga of my own was a CDTV, but soon later I replaced it with an Amiga 1200 where I started creating pixel art and music for real and attended demo scene parties and competitions. 3. Before Roguecraft what other games did you create/publish? In the late 1990's both of us were part of starting a game studio creating an MMORPG called Darkfall Online. We eventually moved from Norway to Greece to merge with another company and finally release the game in 2009 after living many years in Athens. When Ricki moved back to Norway, Henning was still living in Greece and we were chatting daily and started making smaller games together just for fun, and that's basically what started Badger Punch Games. Since then we've made a few smaller titles; Ubergridder for xbox indie live We started a game called Gravity Run that we never finished. Dragon Dipper for iOS and Android. Showdown for Commodore 64 which is a cowboy themed 1-2 player action shooter inspired by games like Gun Fight from 1975. We also made a Christmas themed version of the very same game called Snowdown. We also ported Showdown for the Mega 65, and it was the 2nd game ever released on the console. Rogue 4K for Commodore 64, which is a rogue-ish game in under 4000 bytes, which Ricki made for the Cassette 50 Charity Competition. Rogue 64 for Commodore 64 was a scaled up version of Rogue4K with more monsters, graphics, awesome music and released both as a beautiful physical big box release by Bitmap Soft on cartridge, and as a digital download. This game has performed unbelievably well. And finally; Roguecraft, which is the next evolution of the rogue-style games we worked on previously. This time with isometric graphics, more monsters, and 3 classes/difficulty levels to play as. 4. Can you tell us a bit more about Roguecraft? Ricki: Roguecraft is a roguelike dungeon crawler. Roguelike is a genre of computer games that have a few special traits. Most roguelikes have procedural content that is randomized each time you start a new game. That means each playthrough is unique. The dungeons are different every time you start the game, and potions and monsters are different too. That means you don't memorize where everything is, but each time you play the game you learn more of how the game systems work, and in the end you know enough to be able to beat the game. There are also other unique aspects to roguelikes, such as permadeath, which means you only have one life, and no save states. So the stakes are pretty high, and that makes playing the game more exciting. Roguelikes also tend to be turn-based, which means that nothing happens until you take a turn, and then the monsters will take their turn. This makes roguelikes a little more strategic and less twitch-based. You can think for as long as you want between each move you do. All in all, this makes these kinds of games a learning experience, and there is a lot of variation in the way you can play them and beat the game. That makes it very satisfying to beat a roguelike. 5. How did the idea for Roguecraft come about? Ricki: Roguecraft is based on a game we made for the C64, called Rogue64. That again is based on a game we made called Rogue4k, which was made for a contest where you had to make a game in 4 thousand bytes. We made a rogue- like because then we could make a fun and replayable game within the limits. The game ended up doing well in the contest, so we decided to expand on the concept and make Rogue64, which was a fully fleshed game for the C64. With Roguecraft we wanted to explore the possibilities of the Amiga hardware, so we changed the graphics into isometric, and added quite a few new things, while keeping the same gameplay as Rogue64. Using the isometric style we were able to add a lot more detail to the dungeons and the monsters. Also, using an isometric view gives more depth to the graphics. 6. What has the development process been for the game? Ricki: The coding was done in Visual Code, with the Amiga Assembly plugin by Paul Raingeard. That is a great plugin that makes programming and debugging Amiga games a lot easier. We also used Tiled to create the rooms. There are over 100 room variations, to make sure things do not look too samey when playing. So even though the dungeon layouts are randomly generated, we custom-built rooms to make sure we got the look and feel we wanted. Henning did a lovely job there. We also have a few Python scripts that convert the rooms into assembly data, and to convert images to the Amiga image format. Henning: For the graphics, I'm using Photoshop for creating all the art. I found a YouTube tutorial called HD Index Painting in Photoshop by Dan Fessler which really helped me establish a pipeline that worked for me. I tweaked this process a bit to our use, so that we can work with an OSC Amiga palette in Photoshop, and still work pretty much non destructively within Photohop with most of the available tools, which is great. We also run some of the art assets through some additional tools before it goes into the game. 7. Do you develop on the Amiga, emulation on the PC/Mac? Ricki: As stated above, we used Visual Code with a special Amiga plugin. Most of the coding has been done on Windows, but when traveling I have also done some coding on a Mac. 8. How are the tasks divided between the two of you? Ricki is doing all the programming and technical tasks, and Henning is taking care of the graphics and visuals. We're using different musicians for the audio aspects of our games. We seem to have a very well functioning dynamic between the two of us that compliments each other really well and efficiently. We also figure out gameplay related stuff together as well. 9. Do you find working in a team easier or more challenging? Ever since we met in the demo-scene back in the early 1990s, we simply discovered that we're a great team and work really well together. We have the same expectations of what we're creating, and both of us are self motivated, which might be the most important thing to have projects move ahead and not stagnate. The fact that we've been doing it for this long speaks for itself and proves that we have something good going on! We don't really want to introduce anyone else into the mix, as we don't want to disturb the dynamis that we've got going on. It's all about having fun together, and making games that we both want to make, and hopefully other people want to play. 10. What has been the most challenging aspect of development? Ricki: The most challenging aspect is trying to cram all the assets we want in the game into chip RAM. We ended up having to compromise a bit on both ends. We dropped some features, but the game still needs at least 1MB chip RAM. All the data is compressed, and uncompressed when we need it, and we are using quite a few tricks to make the game run smoothly. Feature creep is a thing, and it has been hard deciding what to cut to make sure we are able to finish the game in a reasonable amount of time. We still ended up spending 2 years developing the game. Henning: To me it was figuring out the pipeline on creating the art assets, and figuring out the final color palette. It had to be 32 colors only, and still flexible enough to cover all the different level variations, all player characters, all monsters, all UI, pickups and effects. Also, finding the time to do all this during a hectic time. 11. What are you most proud of in the game? Ricki: I am proud of seeing it all come together into a game that people actually like. There are multiple systems in the game that have to be balanced and tweaked, and somehow we got to a point where most people really like the way it plays. I also really like the Chickenizer potion! Henning: I'm just proud of being a part of something that we've created from scratch all the way up until release. Also, the fact that the game is being published by Thalamus Digital is something I'm very excited about, being a huge fan of their games when I was a kid. But, lastly and most importantly; the fact that people seem to really love the game and that it seems to harvest really great reviews in magazines is THE reason we want to keep doing this. If no one was playing our games, it wouldn't have been much of an incentive. 12. The graphics look stunning, was it difficult to work within the ECS graphics chip constraints? Our main goal was to make the game work on Ricki's own Amiga 500, and we initially wanted to target OSC machines. We eventually had to go with ECS as we needed a little bit more memory. The game only uses 32 colors, which cover all the different visually different environments, all playable characters, all monsters, UI, items, and special effects. It was a challenge developing a 32 color palette that was flexible enough to cover all of these elements, but Henning eventually managed to figure it out after many, many revisions. 13. Do you have plans beyond Roguecraft? Yes, our next plan is to port it to modern platforms like Nintendo Switch and Steam (for starters). This version will feel like an upscaled Amiga game, and will look and feel very similar but have slightly upscaled graphics, more monsters, better animations and better looking environments. 14. What aspect do you enjoy most about developing for the Amiga? Ricki: I think it is great that the platform is so capable. The different co-processors in the Amiga (Copper, Blitter) make it a fun challenge to see how you can get the machine working optimally and still have a good game. It is also a lot of fun seeing how good the game can look when Henning adds his pixel magic. Henning: I personally love the palette available to you on the Amiga OCS. Coming from the Commodore 64 with its limitations in regards to graphics (which at the same time is lovely and charming and nostalgic), it was an amazing feeling suddenly not having to think about color clashing and not having enough colors. We still kept Roguecraft limited, taking advantage of only 32 OCS colors for the entire game, which took a while to work out, but worked really well once the palette was established. 15. Thank you for your time, do either of you have any final words or wish to say something to the Amiga community? This is our very first game made for the Amiga, and we have been overwhelmed with how welcoming and supporting everyone in the Amiga community has been. We've traveled to events like Kickstart in Nottingham and Amiga Ireland, among other places, and it's just awesome to meet up with someone with common interests that understands our passion and also supports it. We've also gotten tons of help from different people in the Amiga community with different aspects of Roguecraft from testing to solving technical issues as well. The game probably wouldn't have made it without all the help and support. We would like to say a huge THANK YOU to the entire Amiga community for making us feel welcome and included, and to all the social media and media outlets that spread the word on new retro games!Topadvertisements
CONTENTS ============================================================================ -= A D V E R T I S E M E N T S =-------------------------------------------- ============================================================================ ****************************************************** | * | Retro8Bit Heaven! * | =========================================== * | All you need for your beloved 8 and 16 bit * | machines. * | * | Cartridges, badges, wearables, full systems * | media, merchandise, boxes, joysticks, games * | and much more! * | * | Check us out at: * | * | * ******************************************************TopWelcome to the links section!
CONTENTS ============================================================================ -= L I N K S =-------------------------------------------------------------- ============================================================================ https://www.amiganews.net/en/ One of the most up to date and comprehensive sources for Amiga news from around the globe. English Amiga Board, the majority of the users are from Europe, a very friendly and helpful Amiga forum. https://www.exxoshost.co.uk The resource if you need help or information about the new Terrible Fire cards. https://www.amibay.com A great place for buying and selling Amiga hardware, they also have some very nice people to give advice about. Of recent it has become very hard to register on the website since their server migration. https://www.amiga.org Probably the longest running Amiga forum on the world wide web, most American Amiga users are on this board. https://www.amigaworld.net Another large Amiga website covering all Amigas, includes news, discussions and classifieds. https://www.amigans.net English Amiga website covering next generation, emulation and classic Amigas. https://www.amigafuture.de The longest running Amiga print magazine, issues are available in English and German. https://www.amiga-addict.com Newest English Amiga print magazine, if you are missing the likes of Amiga Power and Amiga Format, then this is the magazine for you. Commodore and Amiga print magazine avilable in English and Polish. Lots of games content. https://mancave-ramblings.blogspot.com Our own John Scolieri's personal website. ================================================================== If you have a link that you would like added to list contact: submissions@whatiff.info ---------------------------------------------------------------------------- #Links - WhatIFF? Issue 3.14 - August 2024#TopWelcome to the Amiga vendors section!
CONTENTS ============================================================================ -= A M I G A * V E N D O R * L I N K S =------------------------------------ ============================================================================ Alinea https://www.amiga-shop.net openurl Amedia Computers http://amiga68k.com Amiga 68k https://amigakit.amiga.store Amigakit http://amiga1.com Amiga MC1 https://www.amigashop.org Amiga Shop https://amigastore.eu AmigastoreEU http://amigaonthelake.com Amiga on the Lake https://www.arananet.net/pedidos Arananet Retro Products https://www.arcadeshopper.com Arcade Shopper http://buy.elbox.com BuyElbox https://electronicsisfun.com Electronics Is Fun http://www.ggsdata.se GGS Data https://shop.myamigashop.com My Amiga Shop http://www.relec.ch/fr Relec https://retroami.com.pl RetroAMI https://www.retropassion.co.uk Retro Passion https://retroready.one Retro Ready https://www.sellmyretro.com Sell My Retro https://retrorewind.ca Retro Rewind https://sordan.ie Sordan https://www.tindie.com Tindie https://www.vesalia.de Vesalia ---------------------------------------------------------------------------- #Amiga Vendor Links - WhatIFF? Issue 3.14 - August 2024#TopWelcome to the Amiga Groups section!
CONTENTS ============================================================================ -= A M I G A * G R O U P * L I N K S =-------------------------------------- ============================================================================ ******************************************************************* * * United Kingdom United States Canada Germany Sweden * * France Belgium Czech Republic Denmark Finland * * Australia Russia Ireland Scotland Malta Japan * * ******************************************************************* ---------------------------------------------------------------------------- #Amiga Group Links - WhatIFF?#Topuk
Amigagroups ============================================================================ Amiga Group Links ============================================================================ United Kingdom Amiga North Thame http://www.amiganorththames.co.uk/ Birmingham Amiga Group https://www.facebook.com/groups/BhamAmigaGroup/ LINCS Amiga Group (LAG) http://lincsamiga.org.uk/ Norwich Amiga Group https://norwichamigagroup.co.uk/ North West Amiga User Group http://www.bambi-amiga.co.uk/spudmiga/nwag/index.html South West Amiga Group http://www.southwestamiga.org.uk/ ---------------------------------------------------------------------------- #Amiga Group Links - WhatIFF?#Topusa
Amigagroups ============================================================================ Amiga Group Links ============================================================================ USA Sacramento Amiga Computer Club http://www.sacc.org/ Central Texas Amiga Computer Society http://main.org/ctacs Central New York Amiga Computing Enthusiasts https://www.meetup.com/CNY-Amiga-Computing-Enthusiasts Central Texas Commodore Users Group https://www.meetup.com/Central-Texas-Commodore-Users-Group/ Metroplex Commodore Computer Club http://www.amigamccc.org/ Southern California Commodore and Amiga Network http://www.portcommodore.com/dokuwiki/doku.php?id=sccan:start Fresno Commodore User Group http://www.dickestel.com/fcug.htm Westchester Amiga User Group http://www.westchesteramigausergroup.org/ Amiga Computer Users Long Island https://www.facebook.com/groups/202303702519 Southeast Amiga User Group https://www.facebook.com/groups/SoutheastAmigaUserGroup/ Stamford Peterborough Amiga Group https://www.facebook.com/groups/spaguk The Other Group of Amigoids http://togausergroup.org/ ---------------------------------------------------------------------------- #Amiga Group Links - WhatIFF?#Topcanada
Amigagroups ============================================================================ Amiga Group Links ============================================================================ Canada Amiga Computer Users of Edmonton http://www.amicue.org Amiga Users of Calgary http://www.amuc.ab.ca Toronto PET Users Group (TPUG) http://www.tpug.ca * Started in 1979, TPUG is also the operator of the annual World of Commodore computer show. ---------------------------------------------------------------------------- #Amiga Group Links - WhatIFF?#Topgermany
Usergroups Amigagroups ============================================================================ Amiga Group Links ============================================================================ Germany AUCB Treffen http://www.amigaclub-bautzen.de/ Amiga Club Munster http://acmuenster.de/ ---------------------------------------------------------------------------- #Amiga Group Links - WhatIFF?#Topsweden
Amigagroups ============================================================================ Amiga Group Links ============================================================================ Sweden Swedish User Group of Amiga http://suga.se/ Amiga Computer Group http://www.amiga-cg.se/ Syntax Society http://www.syntaxsociety.se/ ---------------------------------------------------------------------------- #Amiga Group Links - WhatIFF?#Topfrance
Amigagroups ============================================================================ Amiga Group Links ============================================================================ France Triple http://www.triplea.fr/ AFLE http://afle.free.fr/ AmigaPower http://www.amigapower.net/ ---------------------------------------------------------------------------- #Amiga Group Links - WhatIFF?#Topbelgium
Amigagroups ============================================================================ Amiga Group Links ============================================================================ Belgium Belgian Amiga Club http://www.amigaclub.be/ ---------------------------------------------------------------------------- #Amiga Group Links - WhatIFF?#Topczech
Amigagroups ============================================================================ Amiga Group Links ============================================================================ Czech Republic Luky & Amiga Klub Forever + Czech PowerPC User Group http://powerpc.lukysoft.cz ---------------------------------------------------------------------------- #Amiga Group Links - WhatIFF?#Topdenmark
Amigagroups ============================================================================ Amiga Group Links ============================================================================ Denmark Amiga Club Denmark http://www.amigaclubdanmark.dk/ Danish Amiga User Group https://www.facebook.com/groups/101927439851660 ---------------------------------------------------------------------------- #Amiga Group Links - WhatIFF?#Topfinland
Amigagroups ============================================================================ Amiga Group Links ============================================================================ Finland Finnish Amiga Users Group http://saku.amigafin.org/ ---------------------------------------------------------------------------- #Amiga Group Links - WhatIFF?#Topaustralia
Amigagroups ============================================================================ Amiga Group Links ============================================================================ Australia Sydney Amiga Users Group http://www.saug.org.au Amiga Users Group https://www.amiga.net.au/ MAUG https://www.facebook.com/groups/MAUGr/ Perth Amiga User Group (PAUG) https://www.facebook.com/groups/perthamigausergroup/ ---------------------------------------------------------------------------- #Amiga Group Links - WhatIFF?#Toprussia
Amigagroups ============================================================================ Amiga Group Links ============================================================================ Russia Amiga Information Center (AIC) http://amiga.org.ru ---------------------------------------------------------------------------- #Amiga Group Links - WhatIFF?#Topireland
Amigagroups ============================================================================ Amiga Group Links ============================================================================ Ireland Amiga Ireland Meetup https://www.facebook.com/groups/amigaireland ---------------------------------------------------------------------------- #Amiga Group Links - WhatIFF?#Topscotland
Amigagroups ============================================================================ Amiga Group Links ============================================================================ Scotland Scottish Amiga User Group https://www.facebook.com/groups/626138110921245 ---------------------------------------------------------------------------- #Amiga Group Links - WhatIFF?#Topmalta
Amigagroups ============================================================================ Amiga Group Links ============================================================================ Malta Amiga Malta https://www.facebook.com/groups/amigamalta ---------------------------------------------------------------------------- #Amiga Group Links - WhatIFF?#Top---------------------------------------------------------------------------- #Amiga Group Links - WhatIFF? Issue 3.14 - August 2024#japan
Amigagroups ============================================================================ Amiga Group Links ============================================================================ Japan Commodore / Amiga Fan Club Japan http://cfc.amiga.co.jp/ ---------------------------------------------------------------------------- #Amiga Group Links - WhatIFF?#TopInvents Corner
CONTENTS ============================================================================ August 2024 * I N V E N T S / C O R N E R =- by Kevin Saunders ============================================================================ Greeting Amigans, For those that follow my Twitter or Patreon, you may have seen a few updates and below is a quick summary of the last few months. As will all projects some get moved around, some shelved and some refocused. Boss Machine I have created two new levels for Boss Machine as well as quite a few Big Boss enemies. Right now my focus is creating various effects for each level such as rain, cloud. Also more Enemies. HamburgerShop - LCD game conversion The very first game I have ever played was way back when I was around 6 years old, the LCD game - Hamburgershop from Bandai. I highly recommend visiting my blogs to see the progress. The design of the handheld is completed (redrawn in vector), all the game sprites are done. Now I just need to focus on the main game GUI, and creating as clean as possible LCD type sprites. I am also considering a 320x256 OCS Vampire/Apollo version. Both assets will be available for free. I will also be selling all the vector files very cheaply in case someone outside our community wants to create the game. I have thought about creating a few more classics for such games so if you have any ideas or games that you might like converted please let me know. I might convert "Earth Invaders" next time. Donkey Kong could be an option depending on the reception. KillaWatt - C64 game port to Amiga 95% completed assets, which includes, Title, all game sprites, maps. This will be released for any coder to tackle. I will release all the assets very soon for any coder to play with and the intention afterwards is to create a sequel to the game, exclusive to the Amiga. (Ok we may have a possible C64 port afterwards) NeonWorld - Completed Proud to see the completion of this game. We did consider creating more levels, but after some conversation decided to keep this one level. The concept was to create a game with only the art work including any menus, title screen game sprites into one 320x256 graphic that is the entire game. Download https://github.com/cobour/neon-world/?tab=readme-ov-file Other Projects: Possible Simple puzzle game and Tech Demo - Vampire Amiga (more info coming soon) Till next time.. AmigaForever, Kev | Invent http://www.patreon.com/KevinSaunders} https://x.com/invent71TopCover Disk Number 4
CONTENTS ============================================================================ -= August 2024 Cover Disk Contents =-------------------------------------- ============================================================================ For this issue we have a lot of audio content, mods from our resident musicians Roald Strauss and Rob O'Malley. In addition there is the latest WHDLoad torrent file, some M1 audio samples for making chilled breaks and finally after many requests a disk label in PDF format that you can print out and write on. Finally, we have a playlist of music for your listening pleasure with tracks by the following: Rockbagen by DJ METUNE Dexroll and Grovhakkepostej by Sidwave Sunshine by MisthaLuTopWhat's coming up in the next issue?
CONTENTS ============================================================================ -= N E X T * I S S U E - 3.15 - D E C E M B E R 2024 =------------------ ============================================================================ Thank you for reading the August issue of WhatIFF?, the next one will be out in December. As of writing there will be a continuation of the basic programming series from Andy Vaisey, more audio tips from Roald Strauss and reviews of hardware and software from Martyn Bampton. Plus the usual reviews, we will have a talk with the team behind Metro Siege and a continuation of the creative graphics tutorials. See you in Decemeber! Until then enjoy the current issue and see you in issue 14! ---------------------------------------------------------------------------- #Next Issue - WhatIFF? Issue 3.14 - August 2024#TopMeet the writing staff of WhatIFF?
CONTENTS ============================================================================= -= W R I T I N G * S T A F F =----------------------------------------------- ============================================================================= WhatIFF? is an independent magazine created by Amiga enthusiasts from around the world looking for a more serious magazine. The main writers at the moment are a small group but hope to grow in coming issues. * Main Writing Staff * Andy Vaisey Ivan Sorensen John Scolieri Kevin Saunders Kristian GK Martyn Bampton Roald Strauss Rob O'Malley Steve Lord Timo Paul Tristan Shiflett We are always interested in new articles, guides or stories, if you have something you wish to submit please send it to: submissions@whatiff.info ---------------------------------------------------------------------------- #Writing Staff - WhatIFF? Issue 3.14 - August 2024#Topandyvaisey
Writers ============================================================================ Name: Andy Vaisey ============================================================================ Aliases: aNdy/AL/COS (EAB) Contact info: andyvaisey@whatiff.info Websites: www.cosine.org.uk www.arkanixlabs.com ============================================================================= Bio:Toptimopaul
Writers ============================================================================ Name: Timo Paul ============================================================================ Aliases: amifan (EAB) Contact info: timopaul@whatiff.info Websites: www.whatiff.info www.binarybeats.xyz ============================================================================= Bio: My journey with the Amiga started in either '87/'88 when the family got an A500 (Back then it was a computer for the whole family), I remember the monitor and A500 boxes almost being as high as myself. Before this time I had only been exposed to the ZX Spectrum and C64, using the blue Workbench for the first time was an amazing experience. When I saw DigiPaint in action I could not believe my eyes. From that moment I was a devoted Amiga user going through various Amigas, A500+A570, A600, A3000 and A1200. Over the years my Amiga has been used to creating digital artwork and for making or shall I say trying to make music. Then in the year 2021 I decided for some crazy reason that the Amiga scene needed a digital magazine similar to Amiga Report. It was my intention to have something that picked up where the great Amiga magazines such as Amiga World and Amazing Computing left off, providing a more serious look at Amiga usage through tutorials and reviews.Topstevelord
Writers ============================================================================ Name: Steve Lord ============================================================================ Aliases: stevelord (EAB) Contact info: stevelord@whatiff.info Websites: www.thedorkweb.substack.com ============================================================================ Bio: Steve enjoys doing impossible things on his Amiga 4000 and CDTV. Whether it's using his CDTV for email, playing Internet radio through his bluetooth speakers from his Amiga 4000, or talking to the world via the ISS from either. If people say the Amiga couldn't do it, he's probably looking for a way to do it. Steve writes his WhatIFF articles mostly using Arnor ProText.Topjohnscolieri
Writers ========================================================================== Name: John Scolieri ========================================================================== Aliases: klx300r (EAB) 328gts (amigans.net) aGS@C64_AMIGA (Twitter) Contact info: johnscolieri@whatiff.info Websites: mancave-ramblings.blogspot.com ========================================================================== Bio: Like many Amiga users my first computer addiction was the mighty Commodore 64! One day close to Christmas of 1986 I drove to my local Commodore store called Comspec...I was in high school and played rep hockey at the time and didn't have the time I used to when I was in grade school to visit Comspec each weekend to check out the latest magazine and games. Imagine my surprise when I stepped into the store and immediately in front of me was THE AMIGA! It was looping the Defender of The Crown intro and I fell in love instantly! From that day on it was my mission to buy that Amiga but I had just worked a few part time jobs to help pay for my first ever used car and didn't have a hundred bucks to my name lol. The Amiga was close to $2,000 Canadian dollars (after taxes) and unlike my C64 my parents didn't fall for the 'I need it for school' rant again. To (try) to make a very long story short I didn't save up to buy my Amiga until I started University in 1989. In the mean time I saw another Amiga called the Amiga 500 at Comspec and it was a lot cheaper than THE AMIGA but my eyes and heart and soul were only set on THE AMIGA! When I finally bought it that was the proudest/happiest moment I've ever felt and I jumped straight into University with Excellence! word processor and Logistix spreadsheet/ database. In my 2nd year I bought my first ever hard drive, a whopping 33MB which had its own case which sat atop my Amiga 1000 case. Later fast ram side cars showed up and I mingled with Manx Aztec C compiler in computer science class. Of course all the great games with awesome music/sound effects made my Apple/PC friends envious! By my 3rd year we had a small Amiga computer club and a few of us got our first accelerator boards for our Amiga which was called LUCAS and was based on a design in a Transactor magazine. It had a 68020 at 16 MHz with FPU on it and it really helped out with the more complicated spreadsheets and compiling programs. Life was good, the internet was just starting up, I graduated University and got my first full time job and then the bad news of Commodore going bankrupt hit the newspapers, magazines, and BBS boards! There was so much activity going on still in user groups and computer stores so us Amiga users just figured that it would sort itself out. At work there were only PC's running AutoCAD and I despised using the early Windows systems and couldn't wait to get back home to my Amiga. Over the years busy with work and 'adult life' many of my Amiga friends moved on to PCs and I ended up getting my first Amiga 1200 and later Amiga 4000 for great prices. I was still amazed how the Amiga community was still active and so helpful up to the early 2000's. By then I was married and working harder than ever to save up to buy a home instead of renting an apartment and my Amiga's were left at my parents house until around 2010 or so I read about a brand new Amiga which was coming out based on PPC CPU called the AmigaONE X1000 running a new AmigaOS4. I was skeptical at first after hearing about the technical issues with the earlier SE, XE boards with the initisal AmigaOS4 release but after consulting with some friends I joined the beta test team to get one of the first X1000 boards and I immediately felt at home with AmigaOS4.1 and have used it as my home Amiga ever since. Once I got some space set up in my house I got my Amiga's out of my parents house finally and eventually my original Amiga 1000 sits next to my AmigaONE X1000 and original C64 and of course my Amiga 1200 and 4000 came along too and with new accelerator cards and ram boards and spare motherboards and parts etc etc etc. Here I am today grateful to the Amiga computer and especially to the amazing Amiga community who back then and today has always been resilient, creative and helpful !Topkevinsaunders
Writers ============================================================================ Name: Kevin Saunders ============================================================================ Aliases: Invent (EAB) Contact info: kevinsaunders@whatiff.info Websites: www.patreon.com/KevinSaunders www.youtube.com/KevinSaunders www.twitter.com/invent71 www.instagram.com/invent71/ www.ko-fi.com/kevinsaunders ============================================================================ Bio: My journey with the Amiga started around 1988, The first time seeing the Amiga 1000 in the shop window playing animations such as the Amiga Juggler I fondly remember. My Brother and I saved up for an A500, and eventually bought an A4000 (cybervision 64 card) and then an A1200 with an 030 accelerator. I loved collecting every Amiga Magazine with demo disks. My interest in game designing for the Amiga started with deluxe paint and I did dabble with The Miracle Keyboard but that skill in music didn't last. It is because of the Amiga that I now work in video animation and game design.Topivansorensen
Writers ============================================================================ Name: Ivan Sorensen ============================================================================ Aliases: Weasel Fierce Contact info: ivansorensen@whatiff.info Websites: everydayamiga.posthaven.com ============================================================================ Bio: Danish Amiga fan since the 90s. Started with a 1200 and a 1200 is my machine today. I am interested in the casual and the philosophical aspects of the Amiga computer. My cats enjoy Turrican.Toprobomalley
Writers ============================================================================ Name: Rob O'Malley ============================================================================ Aliases: anaki rob Mr.Roboto Contact info: anakirob@whatiff.info Websites: systemofsound.org ============================================================================ Bio: Rob has been making music on Amiga ever since in the mid to late 90's his guitar teacher suggested that he get a drum machine to practice along to, and he instead opted to use OctaMED on his Amiga 500+ with A590 to craft beats and basslines Favourite quote: '...all she wanted to do was play with my ears all night' :PToproaldstrauss
Writers ============================================================================ Name: Roald Strauss ============================================================================ Aliases: MisthaLu, Mr.Lou Contact info: E-mail: mr_lou@dewfall.dk Discord: MisthaLu IRC: MisthaLu or mr_lou Websites: www.8bitMemoirs.com www.IndieGameMusic.com ============================================================================ Bio: I was introduced to the Amstrad CPC464 at age 10, and had a great childhood because of all the BASIC coding I could do. I am also a musician. And when I discovered I could program my Amstrad to play music, by inputting tons and tons of DATA lines, things became even more interesting. When everyone left the Amstrad CPC in favour of either the PC or Amiga, I stayed with my trusty CPC464 - until a couple of mates lured me over to the Amiga many years later. Since no one ever introduced me to options like AMOS or Blitz Basic, it sadly meant that my coding days were over - for a period of time anyway. Instead, I used my Amiga 600 for lots and lots of Protracker MOD creations. From 2012 to 2017 I wrote "8-bit Memoirs", which is a semi biography about those good old days. Download from www.8bitMemoirs.com (Use a download tool so you can resume).Topjman
Writers ============================================================================ Name: Contributing writer Jman ============================================================================ Aliases: Jman Contact info: Websites: ============================================================================ Bio: Article submission metadata: Date: 20240309 Author: Jman License: CC BY-SA 4.0TopTristanshiflett
Writers ============================================================================ Name: Tristan Shiflett ============================================================================ Aliases: Manical Contact info: Discord: Manical#1992 / manical90 Websites: manical.neocities.org ============================================================================ Bio: Manical started making music for the Amiga in early 2021 (August) and has released at some demoparties, and is planning to go to more along the way. He's in the demogroups MoonShine and Hokuto Force as a musician, and soon to be a coder or graphician. He started out with Protracker for his first 3 mods, then moved to FastTracker primarily, and then he started exploring Impulse Tracker and started making tracks with Furnace. His songs have gotten good reviews by many famous people in the demoscene, such as Jammer, Purple Motion, Skaven, and cTrix (Most known for his gAtari). Since his music journey, he's entered Syntax 2021, Mysdata 2022, Boozedrome VI (Which his track that he entered ended up on the official Boozedrome tape which was limited to 50 copies). Favorite quote: 'You see, we are here, as far as I can tell, to help each other; our brothers, our sisters, our friends, our enemies. That is to help each other and not hurt each other.'Topmartynbampton
Writers ============================================================================ Name: Martyn Bampton ============================================================================ Aliases: Contact info: mbampton@whatiff.info Websites: ============================================================================ Bio: Like a lot of us I got my first computers during the late 80s and 90s, an exciting time for home computer owners. It seemed like every week brought something new and there were loads of computers and accessories to choose from. If you had the budget ;) My family had a Spectrum and then a BBC Micro but *my* first computer was an Amiga 500, all generous hand-me-downs from my uncle. I did play games of course - Lemmings, Pinball Dreams and Stunt Car Racer spring to mind but I also loved messing about in Deluxe Paint, eventually becoming half decently productive. I never had a console and I was never interested in truth, actually I don't think I really played on a console until my friend got a Playstation. An A500 Plus came next and then in March 93 I upgraded to an A1200 with a "huge" 80 MB harddisk! It was with the A1200 and its harddisk that I was really able to get into productive computing as well as enjoying the new AGA specific games. I loved Animating with Deluxe Paint 4, I knew Wordworth inside and out got into generating fractal landscapes with VistaPro and 3D rendering with Real 3D. I would spend countless hours in Workbench, setting it up just the way I liked, I made my own icons very much inspired by MagicWB. Soon enough I need more performance and added a Blizzard IV, Squirrel SCSI and CDROM and I figured out how to make an RGB cable for my specific telly. Still... After Commodore went bankrupt and the chances of a successor to the A1200 evaporated I saved up and was able to buy a secondhand A4000 complete with 1942 monitor. The A4000 was amazing, even more so when I loaded it with a Cyberstorm Mk-III and a Cybervision 64/3D (with scandoubler) and maxed out the RAM. I had a eventually got a 17" monitor and ran Workbench in an unimaginably spacious resolution - compared to 640 x 512 anyway. By this time I was a long time loyal Amiga fan and enjoyed simply upgrading and pushing the limits, way beyond anything my younger self could have imagined. My A1200 was rehoused in an Infinitiv tower case and even ran Linux, launched from within Workbench. My A4000 spent some time as a Mac thanks to ShapeShifter and was my first computer to go online with a 56K modem! I knew I was fortunate to have these computers and upgrades and it was hard to leave them behind when I left the country. It's funny. Years pass, you forget things - you don't even realise you miss things and then someone releases a Mini A500 thingum and you start watching retro channels. Soon you end up on eBay and a week or two later you boot up an A500 for the first time in... Let's say a while. I kept nearly all of my Amiga gear, all apart from the very first A500 and A500 Plus. I was able to collect everything from my childhood home where it had been mostly stored safely all this time and bring it back with me. Now I have them again I hope to share my experiences with repairing, restoring and upgrading them with modern stuff over the coming months and years, maybe my trusty A4000 will boot once more! It was an amazing time to experience and I'm glad I can do so again with a fresh perspective.Topkristiangk
Writers ============================================================================ Name: Kristian GK ============================================================================ Aliases: Contact info: kristian@whatiff.info Websites: ============================================================================ Bio: