WhatIFF Issue 1.01 WhatIFF Issue 1.02 WhatIFF Issue 1.03 WhatIFF Issue 1.04 WhatIFF Issue 1.05 WhatIFF Issue 1.06 WhatIFF Issue 1.07 WhatIFF Issue 1.08 WhatIFF Issue 2.09 WhatIFF Issue 2.10 WhatIFF Issue 2.11 WhatIFF Issue 2.12 WhatIFF Issue 3.13 WhatIFF Issue 3.14 WhatIFF Issue 3.15 WhatIFF Issue 4.16 WhatIFF Issue 4.17 WhatIFF Issue 4.18 WhatIFF Issue 5.19 WhatIFF Issue 5.20 WhatIFF Issue 5.21
Download PDFWhatIFF? Issue 4.16
TopWhatIFF? For The Creative Amiga User
CONTENTS +#### #### ###%## +####+########+########+ +####+ `#+ `## #' ## `## `##+ +#+ `##+ +#+ +##+ +#+ ## ## # +#+ +#+ +#+ #' +#+ #' +#' ## ## ## +# ## # ## ## + ## + +#+ +#+ +## #+ ## %#. ## ## +# ## +# ## ## ###+ # ##+#+ +#.## #### ## ##### ##### ##' ## #+## # #####+ ##+### +# ## ## +# ## +# +#' +#+# ##+# ##'+## +#+ ## ## ## ## + ## + #+ ..:###.###+.+#+ ## ## #+ +#+ +#+ +#+ +#+ +' ::::##+:###::##::+##:##+:+#..##..##'..##'......##'............. :::::+#::+#+::##::##+%+##:###%##:;##:::##:::::::##:::::::::::##::::.. `::::#:::#:::#+::+##::+##+ #:+######+####+:::+####+:::::::::##::aNdy; ..;::::::::::::::::::::::::::::::::::::::::::::::::::::::::::::::;' .::::::::::::::::::::::::::::::::::::::::::::::::::::::::::::;' `:::::::::; ,:::::::::::::::::;'`.::::::::::::::::::::;' `:::::; :::::::::::::::;' `::::;' For The Creative Amiga User! `:::::::::;' >> ENTER MAGAZINE <<TopWelcome to WhatIFF?
CONTENTS============================================================================= -# WhatIFF? - Issue 4.16 - April 2025 #- Music ----------------------------------------------------------------------------- --EDITORS DESK-- -MEET THE WRITERS-- A few words from the editor and meet the writers of WhatIFF? ---SHELL TALK--- -----TALK BACK----- Amiga soapbox and readers letters. -----REVIEWS---- ---GAME REVIEWS---- Reviews of hardware and software, old and new. -----GUIDES----- -----ARTICLES------ Guides and support for all things Amiga. -TALKING AMIGA-- Interviews with people making a difference in the Amiga community. -----LINKS------ ---AMIGA VENDORS--- ---AMIGA GROUPS---- Amiga related links and Amiga vendor websites. -ADVERTISEMENTS- Vendor advertisements and more. ---COVER DISK--- -----A FEW WORDS FROM THE NEW EDITOR------ --------===============================================================------ NEXT ISSUE *All content copyright of the respective authors 2025* --------===============================================================------
TopFrom The Editor's Desk
CONTENTS ============================================================================= From The Editor's Desk - by: Timo Paul ============================================================================= Welcome to the April issue, our first issue of 2025, of WhatIFF?, since our last issue in December 2024 the Amiga scene has moved quickly such as the the announcement of the Amiga 1200NG by AmigaKit and more new games and updates to big sellers such as RogueCraft. In this issue though we concentrate on the hardware and software reviews such as the Tikus USB adapater, AKUA Amiga keyboard adapter, OpenPSX2Amiga adapter, the updated TechnoSound Turbo sampler and the English edition of the AmigaOS3.2 reference manual. We are also privileged to have interviews with Paul Vince of AGS, who has also kindly included all the back issues of WhatIFF? with the latest update of AGS. SOLAS creator Rob Cranley also talks to us about hit project and Timothy Deters gives us a quick update on FinalWriter. We have the usual guides for using graphics software such as the DigiPaint basics and how to connect to BBS in 2025 without a modem. Roald Strauss has written a fascinating piece about pixel art and Martyn Bampton writes about his experience with DELL monitors. John Scolieri continues his excellent series on the PiStorm with another guide on upgrading a PiStorm 32 to a Pi-CM4 model. Also this will sadly be my last issue as editor, due to an increase in work, lack of time and funds I am handing the reigns over to Bill Panagouleas. It has been an incredible experience working on WhatIFF?. When I started the magazine back in 2021, I was not sure how long it would last, there was much I still had to learn and as you can see from the first issues it was quite barebone compared to now. Communicating with all the writers and contacting people for interviewing has given me a new appreciation for the hard work that each person puts into this "hobby" computer. It is also incredibly humbling to have them share their knowledge and experience in the magazine. I have made some amazing friendships along the way and aim to keep in contact even though I will not be managing the magazine anymore. Thank you Steve, John, Andy, Martyn, Ivan, Roald, and Rob, you guys have done an amazing job each issue and have put up with my badgering for a new article as each issue nears release. I am looking forward to magazine continuing its growth under the leadership of Bill and hope to still contribute when I can. Finally, thank you to all who have taken the time to download and read WhatIFF?, it has been a pleasure reading your e-mails and hearing your comments. Amiga forever! Timo PaulTopA Few Words From The New Editor
CONTENTS ============================================================================= A Few Words From The New Editor - by: Bill Panagouleas ============================================================================= I still remember the first announcement of WhatIFF? four years ago. I was excited to see a new online Amiga focused magazine and one unique thing about it was that it was available in the AmigaGuide format. I read each issue that came out after the launch with interest on what products were covered and what news was discussed. I always found WhatIFF? to be a well designed and exciting fan based online publication. I have had a keen interest in reading and enjoying Amiga publications for many years and was a regular published reviewer in Amazing Computing Magazine. Since I'm in the industry, I see and appreciate the hard work Timo has put into WhatIFF? with his team. WhatIFF? has grown and matured with each fun issue. Also, it's awesome that Timo lives in Japan! I'm stuck living in the Chicago Suburbs, Japan sounds way more exciting. I'm honored to continue guiding the direction WhatIFF? takes and publishing each issue four times per year. Timo is currently busy with life and other projects. We can continue to build WhatIFF? into something he will still enjoy and contribute to sometimes. I look forward to work with the great writing/creative team Timo has put together so we can release more exciting quarterly issues of WhatIFF? for Amiga fans. It's an honor to work on this project. Best regards Bill Panagouleas Founder of DiscreetFXTopLetters From WhatIFF? Readers
CONTENTS ============================================================================= Talk Back: Letters From WhatIFF? Readers January-April 2025 ============================================================================= Welcome to Talk Back, the section of the magazine where we publish a select few of the letters that we receive. Thank you to everyone who has written in and those who have gone on to write articles for the magazine. We always welcome any written contributions to the magazine. Everyone has a unique perspective and Amiga story to tell. If you wish to write to the magazine or contribute then please contact us at: submissions@whatiff.info ----------------------------------------------------------------------------- -----------------------------------------------------------------------------TopFree For All About Anything
CONTENTS ============================================================================= Shell Talk - by: Timo Paul ============================================================================= Do we need a better system to keep Amiga sellers to account? The Amiga has grown in popularity over the years and along with newer users has come higher prices, more demand and new resellers. However as a consequence of that the quality of the Amiga merchants has been ... wanting, for lack of a nicer word. It seems quite common now to see people posting on forums about delays, undelivered items, lack of communication, and badly built products. Then the hoops we have to jump through just to get a refund. Sadly this has seemed to affected some of the bigger and more established Amiga shops. This was not an issue in the earlier days when the Amiga was still just a faded memory for most people. There are more ways to buy Amiga gear but less reputable sellers, I recently paid for a set of OS3.2.2 roms from RetroFletch, after no communication I contacted PayPal and then got a response from the guy. After some back and forth I thought I would give him another chance and reversed the claim. Well after that came silence, excuses such as having a migraine and then needing to check the office. Suffice to say nothing was sent and no communication was forthcoming afterwards. It was my fault for having given him a second chance but I always want to believe the best in people and the Amiga. Unfortunately this is not the exception, in today's Amiga market, you have to be very careful when you buy Amiga gear. So, this brings up my orginal thought. Is it time to have a registered and reviewed list of Amiga shops where all shops can be listed and customers can give their ratings and experiences, instead of having every experience spread across various forums and websites. It is a shame that the Amiga scene has come to this as it also affects those Amiga shops that provide fantastic service and communication. And communication is probably the key, as most complaints I see are from a lack of simple back and forth between the seller and buyer. I hate to call out companies and perhaps it was not best of me to name one Amiga seller out of so many but it is also good to warn people to be careful when spending their hard earned cash. The Amiga is an expensive hobby and only getting more so. Not all of us have jobs that pay well but still want to enjoy the orginal Amiga experience. So, be careful out there, the Amiga has become a more unsecure place to buy goods but also thank you to the Amiga shops that are providing quality service and communication.TopWelcome to the reviews section!
CONTENTS ============================================================================= -= R E V I E W S =----------------------------------------------------------- ----------------------------------------------------------------------------- -= Hardware Review: AKUA - Amiga Keyboard (to) USB Adapter =- Want to use your orginal Amiga keyboard on with a modern computer then Martyn has you covered with a review of this interesting adapter. -= Hardware Review: OpenPSX2Amiga Pad Adapter =- Use the classic Playstation controllers on your Amiga, Martyn does a deep dive into this unique adapter. -= Hardware Review: AMI-RGB2VGA Ultimate =- This RGB to VGA adapter does more than just allow you to connect a VGA monitor, find out inside else it can do. -= Hardware Review: Tikus USB Mouse/Joystick Adapter =- There are a number of USB adapters available for the Amiga, we continue the ever lasting quest to review them all. -= Hardware Review: TechnoSound Turbo Re-release =- In 2024 a new version of the TechnoSound Turbo appeared on eBay, we have a look to see if there have been any improvements to the hardware and software in the latest iteration. -= Book Review: Amiga OS3.2 Reference Manual =- Originally only available in German, it has now been translated into English, we take a look to see what it offers to new and old users. ----------------------------------------------------------------------------- #Reviews - WhatIFF? Issue 4.16 - April 2025#TopHardware review: Amiga Keyboard to USB-C HID
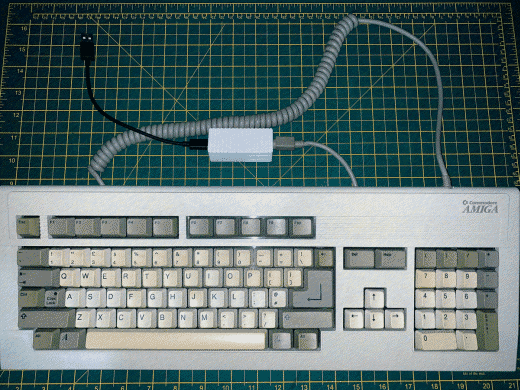
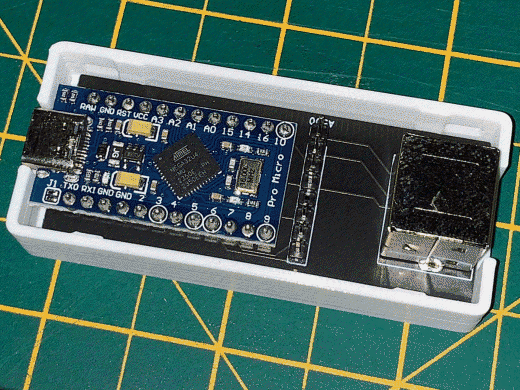
Reviews ============================================================================= Hardware Review:Amiga Keyboard to USB-C HID - by Martyn Bampton ============================================================================= Product Name AKUA - Amiga Keyboard (to) USB Adapter Developed By Alinea Computer tkoecker Available From Alinea Computer https://www.amiga-shop.net Price Currently 33 USD/30 EUR Hardware Requirements An Amiga keyboard and a USB device to use it with. Adapters are available for: * A1000 external keyboard (4P4C). * A2000/A3000 external keyboard (5 pin DIN). * A4000/CD32 external keyboard (6 pin mini DIN). * CDTV external keyboard (5 pin mini DIN). * A500 internal keyboard (8 pin internal header). Test Keyboards and Devices * Amiga 2000 external keyboard * Amiga 4000 external keyboard * Linux desktop * TheA500 Mini * Raspberry Pi AKUA Keyboard Image 1Introduction While I was in the middle of restoring my A2000 and A4000 I noticed the cable was pinched on my A4000's keyboard. It would probably be fine but I wanted to test it first before causing any damage, a multimeter showed it was okay but you never know! I had a look around the various Amiga Websites to see if there was something to interface an external Amiga keyboard to USB. While I saw a lot of adapters to achieve the opposite (USB keyboard to Amiga) I did also find this adapter. It's made and sold by Alinea Computer using firmware from tkoecker. Admittedly it would be a bit expensive to buy the AKUA simply for one test so I thought it would be great to use my Amiga 4000 keyboard with my workstation or A500 Mini afterwards. It's another really interesting use of an Arduino ("Pro Micro" Arduino clone), taking the Amiga keyboard signals and converting them to the USB HID standard. One point is the keyboard must have it's own onboard controller so A1200 and A600 keyboards won't work as their controllers are on the motherboard. You should be able to use the AKUA with any USB HID compatible computer or OS, Raspberry Pi, FPGA (V4SA/MiniMig/MiSTer), or emulator. AKUA Keyboard Image 2
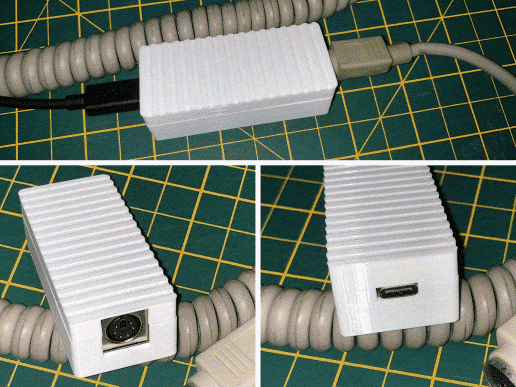
Impressions and Use I chose the version for the A4000 keyboard and it arrived in a labelled antistatic bag as part of a larger order. Included is a short (20 cm) USB C cable and a white 3D printed case in which the AKUA is installed - black is also available if you prefer. I was pleased to see the cable was USB C and detachable so you can use one of appropriate length for your needs. The 6.5 CM (L) x 2.8 CM (W) x 2 CM (H) case is a higher quality two piece print, there's no give or rattling with everything fitting neatly. Using the adapter is as easy as using any other USB keyboard, just plug your keyboard in and then plug the adapter into your chosen device. A bright LED illuminates the interior of the case making the most of the unit glow, I find this is common with these cases and it's up to personal taste if that's good or not. The main keys are mapped directly key to key and the rest in a way that makes sense, for instance the Help key is mapped to Page Up and the Amiga keys are mapped to the Windows or Command keys. For the most part it all works as expected, the only niggle I had was the the caps lock responsiveness with it needing an on/off toggle sometimes. Both of my keyboards worked without issues so I was happy about that. Included on all adapter versions is a pin header for A500 internal keyboards. You could use the bare adapter inside an original or A1200.net case to connect a real Amiga 500 keyboard to a Raspberry Pi or FPGA board. This is a welcome inclusion. AKUA Keyboard Image 3
I chose the A4000 version of the adapter because I expect the A2000 to be more repairable and its keyboard cable is undamaged - but also because I have a female DIN to male mini DIN adapter and the A2000 keyboard should work using that. For me it did which is another plus, the reverse may also be true if you wanted to use an A4000 keyboard on the A2000 AKUA via an adapter but I was unable to test that. Summary If you want to connect an Amiga keyboard to a device over USB then this is an excellent option. It's well built, looks tidy and simply works. The inclusion of the A500 keyboard header is more than a bonus, it could be the reason for buying the adapter in the first place - even if the AKUA is intended for external keyboards. Both of my keyboards worked including the A2000 via a DIN adapter, a relief given how original Amiga external keyboards are stupidly expensive - nice one indeed! Pros and Cons + Well designed and simple to use. + Several versions. + Possible to use one adapter for multiple keyboard types (A500 or using DIN to mini DIN). + Price competitive with other adapters. - None really, the LED glow if you don't like it? Other Key Points: * A1200 and A600 keyboards are not supported as they lack a controller, however the main focus of the AKUA is external keyboards. Scores Ease of use: 100% Documentation/Packaging: 80% Value for money: 90% Overall: 90% - WhatIFF Gold Sources and Credits Sold and built by Alinea Computer https://www.amiga-shop.net Base on work by tkoecker https://github.com/tkoecker/amigak Case by Alinea Computer https://www.thingiverse.com/thing:6701517
TopHardware review: OpenPSX2Amiga Pad Adapter
Reviews ============================================================================= Hardware Review:OpenPSX2Amiga Pad Adapter - by Martyn Bampton ============================================================================= Product Name OpenPSX2AmigaPadAdapter - PlayStation Controller to Amiga Developed By SukkoPera Available From * eBay (search OpenPSX2Amiga) * https://www.sordan.ie Price Varies but typical best prices are 30 USD/28 EUR/50 AUD Hardware Requirements A PlayStation 1 or 2 Controller such as: * PlayStation Controller (SCPH-1080) * Analogue Joystick (SCPH-1110) * Dual Analogue Controller (Europe, SCPH-1180e) * DualShock Analogue Controller (SCPH-1200). * DualShock 2 Analogue Controller (SCPH-10010). Wireless controllers may work, the full list is here: https://github.com/SukkoPera/PsxNewLib Test Machines * Amiga 500 * Amiga 600 (see note) * Amiga 1200 * CD32 Note: You'll need a joystick extension if you have an Amiga 600 but it works! PSX2Amiga Adapter Image 1Introduction I've often heard that a) the best controllers made were the earlier PlayStation controllers - and b) that the CD32 controllers weren't all that great to use. I never found them that bad in truth but I'm probably more used to my Competition Pro joysticks and "Honey Bee" CD32 controllers. Perhaps that says something. However, when I saw this open source project I absolutely wanted to see if PlayStation controllers are any good when used with a CD32. The appropriately named OpenPSX2Amiga lets you use a PS1 or PS2 controller with an Amiga as well as other Commodore computers. I found a seller on eBay and ordered a few adapters based on the project and waited for them to arrive. Not very patiently... PSX2Amiga Adapter Image 2
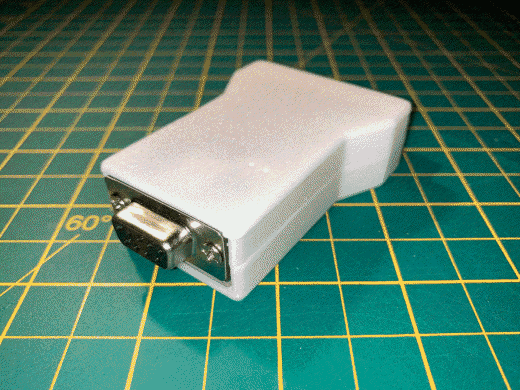
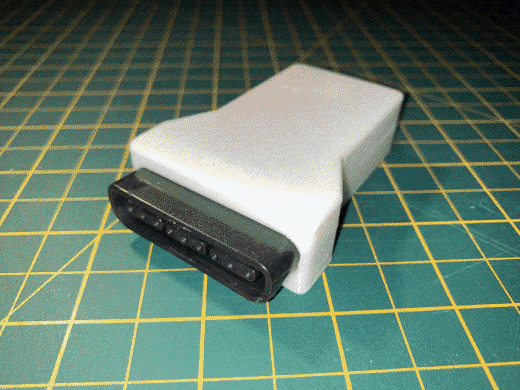
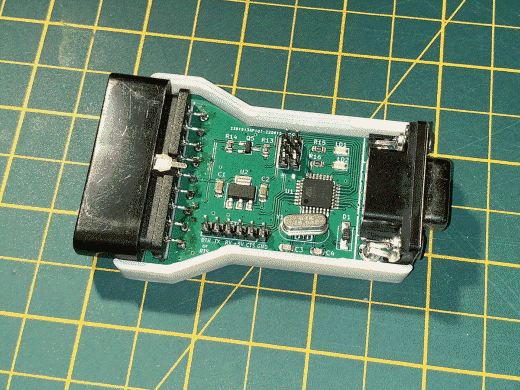
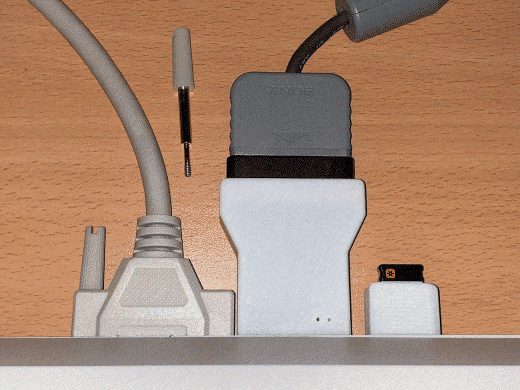
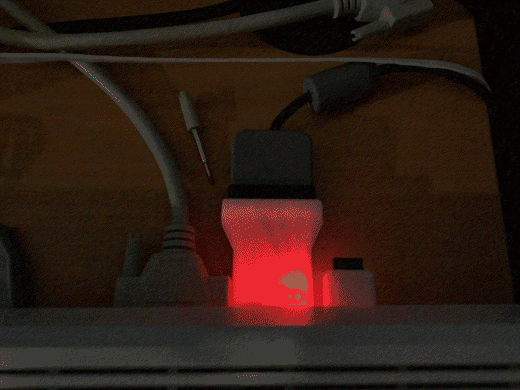
Impressions and Use The adapters eventually arrived, packaged securely in a box with bubble wrap and inside an antistatic bag. The PCBs are mounted inside nice 3D printed enclosures. There's certainly a theme here, open source adapter project using an Arduino or similar microcontroller, PCB, 3D printed case, it's a great time to be a builder. It's a chunky feeling adapter at 8 CM (L) x 4.8 CM (W) x 2 CM (H) but the PlayStation controller connector is quite wide. It's been designed to accommodate the connector without putting it on a short cable which I think is neater and feels more solid and secure. The adapter did take up a fair amount of room at the back of my Amiga and I had to remove one of the retaining thumb screws from my floppy drive connector to get everything to fit. It has been designed with a bit of clearance for floppy connectors but watch out for that if you're using the floppy port. If you want to use two of these then you will need an extension cable for at least one of them, two won't fit side by side directly. The adapter has two LEDs to indicate power and operating mode, mine are red and green respectively. PSX2Amiga Adapter Image 3
PSX2Amiga Adapter Image 4
It really is plug and play, after powering on the adapter glowed bright red and the analogue button on the PS controller was lit. I enjoyed a few games and found I could use the D-pad and left analogue stick interchangeably, or turn off the sticks using the Analogue button as expected. In the standard mapping button 1 (fire) is mapped to square and button 2 is mapped to X, however you can access other mappings with the adapter's second LED blinking to confirm your selection: Standard Mapping (accessed with Select + Square, 1 blink): * D-pad and Left Analogue work as direction buttons. * Square is Button 1 and X is Button 2. Racing Mapping 1 (accessed with Select + Triangle, 2 blinks): * Accelerate and brake mapped to Square and X. * Left Analogue used to steer, vertical axis is ignored. * Triangle is Button 1 and Circle is Button 2. Racing Mapping 2 (accessed with Select + Circle, 3 blinks): * R2 (or R1) to accelerate and L2 (or L1) to brake. * Button 1 is mapped to Square. * Steering and the D-pad work as in Racing Mode 1. Platform Mapping (accessed with Select + X, 4 blinks): * D-pad and Left Analogue work as direction buttons. * X is Button 1 (jump), Triangle is Button 2 You can add custom mappings if you like (details on the project page) and there are more modes. Mouse Mode: Use the right stick for mouse mode, it'll activate automatically to provide a basic mouse if you needed one, the second LED will blink continuously when mouse mode is active. Cancel by pressing any D-pad button. It's useful to have and saves quickly plugging in a mouse while the computer is on (we used to do that? Yikes!) but I've often activated it by accident which can be annoying. C64 Mode: Swaps some signal levels around for button 2, toggle by pressing Select + Start. The second LED will flash once when activated and twice when deactivated. CD32 Mode: This is activated automatically when the adapter is plugged into a CD32. It maps all 7 buttons of the original CD32 controller and the D-pad and Left Analogue work for direction. The second LED will light up steadily. Buttons are mapped as follows: * Square to Red. * X to Blue. * Circle to Yellow. * Triangle to Green. * L1/L2/L3 to Left. * R1/R2/R3: Right. * Start to Start/Pause. Pressing Select will rotate the 4 main buttons: * X to Red. * Circle to Blue. * Triangle to Yellow. * Square to Green. Full details and compatibility information is listed on the project page: https://github.com/SukkoPera/OpenPSX2AmigaPadAdapter Also useful is this list of two button Amiga games on an EAB thread started by SunChild: https://eab.abime.net/showthread.php?t=57540 PSX2Amiga Adapter Image 5
PSX2Amiga Adapter Image 6
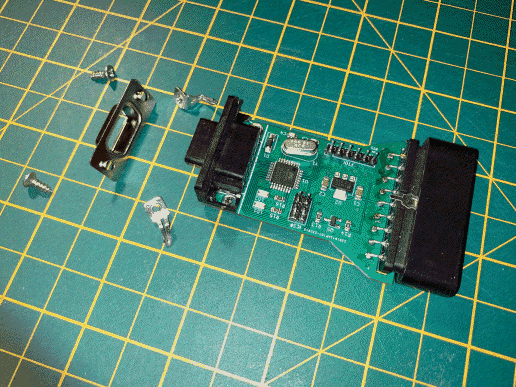
Summary If you have a PS 1 or 2 controller and an Amiga then this is worth it. I successfully used a SCPH-1200 controller with Xenon 2, Seek and Destroy, Alien Breed: Tower Assault, Wing Commander, Zeewolf and Zool to name a few games. Is it any good? Yes! It works very well indeed and felt very smooth and comfortable. However there's no rumble (it would need power and game support), the left analogue stick is mapped to work as the D-pad (digital) and you could have issues physically attaching the adapter in some situations. As a side note - it seems it's common practice to use screws to keep the DB9 shield in place. This put too much stress on the ground connectors, twisting them out of the PCB and preventing the case from closing properly. I understand this was probably for clearance reasons so I'm going to repair them using nuts and countersunk bolts. I'm very happy with the OpenPSX2AmigaPad and I'll be using it often, it was worth taking a look. Pros and Cons + No configuration needed, it works out of the box. + Lots of modes plus add your own custom mappings! + Mouse mode to avoid hot swapping mice/joypads. + Nicely designed with integrated PS controller connector and some consideration given to neighbouring connectors. + Project page provides good documentation. + CD32 automapping. - Won't fit the A600 as-is, you'll need a joystick extension cord for either port. - Like other adapters you may not like how brightly the LED glows. Other Key Points: * Most PlayStation 1 and 2 controllers seem to be supported including wireless but do check the compatibility list. * External floppy drive connectors and the adapter may not fit properly together. * Two adapters won't fit at the same time. Scores Ease of use: 100% Documentation/Packaging: 80% Value for money: 100% Overall: 95% - WhatIFF Gold Sources and Credits Sold by melbourneconsolerepros: eBay Created by SukkoPera: https://github.com/SukkoPera/OpenPSX2AmigaPadAdapter 3D case model by Lemaru: https://www.thingiverse.com/thing:4620027
TopHardware review: AMI-RGB2VGA Ultimate
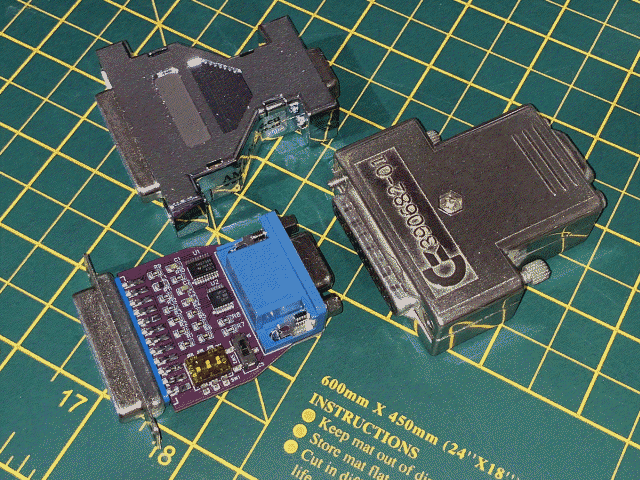
Reviews ============================================================================= Hardware Review:AMI-RGB2VGA Ultimate - by Martyn Bampton ============================================================================= Product Name AMI-RGB2VGA Ultimate (RGB to VGA with selectable filtering) Developed By EmberHeavyIndustries (sampedenawa) Available From AmiBay (sampedenawa) Price 35 EUR plus postage (plus the cost to print your own case if you choose). Hardware Requirements * An Amiga (A500/A500+/A600/A1200/A4000/CD32 with expansion/riser RGB port). Test Machines * Amiga 1200 * Amiga 600 * Amiga 500 Introduction AMI RGB2VGA Ultimate Image 1AMI RGB2VGA Ultimate Image 2
The Amiga was designed when bandwidth limited analogue CRT displays were the norm. Any harmonic frequencies generated by the Amiga's circuitry which were present in the RGB output couldn't be displayed by those monitors. Essentially the troublesome frequencies were "filtered" by hardware limitations. Newer LCD monitors are not so limited and can accept much higher bandwidths - they can indeed display these frequencies on their analogue inputs when using an RGB to VGA adapter. This is seen as vertical banding or lines on the screen, often called "jail bars". This is perhaps another reason to use an upscaler or flickerfixer but if you have a 15 kHz capable monitor and just want to use RGB on the VGA port then the output will need filtering to reduce the vertical lines. Thankfully such filters or "Vertical Line Removers" (VLR) do exist, such as the configurable AMI-RGB2VGA Ultimate. I thought I'd compare this adapter to a cheaper buffered RGB to VGA adapter from AMIGAStore.eu as well as my original Commodore 390682-01 Sync Dongle included with my A4000. Impressions and Use AMI RGB2VGA Ultimate Image 3
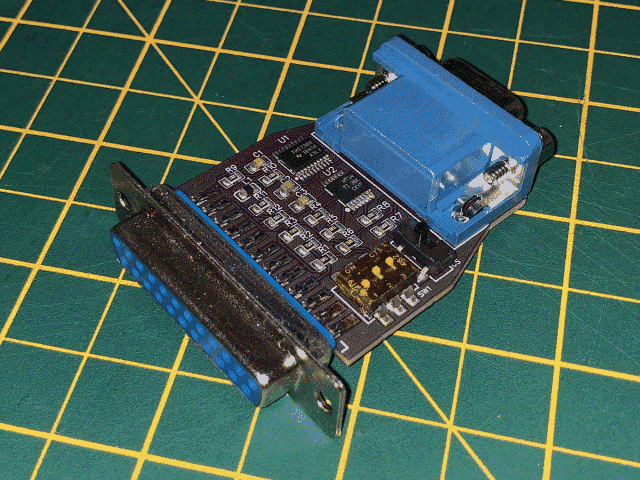
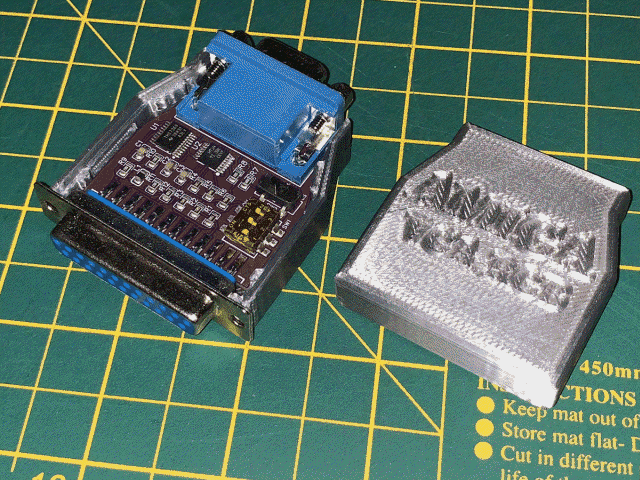
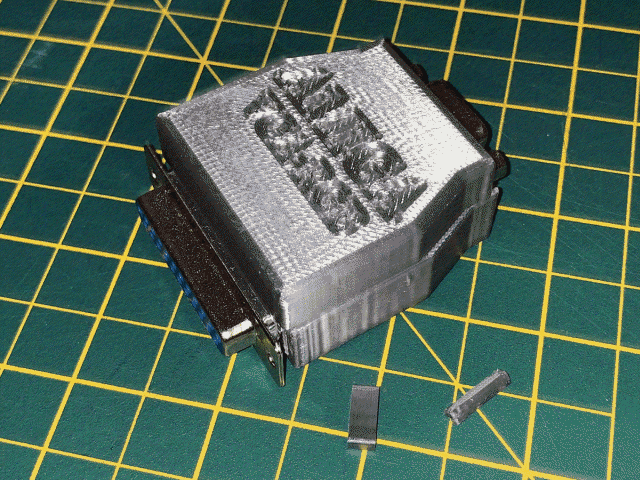
The adapter was packaged in an antistatic bag, everything was soldered correctly and it felt sturdy. There was no case included but there are 3D files available so I had some printed. There may be slight sizing variations as they almost but didn't quite fit correctly causing the clips to break - a bit of tape and they'll work for now. Perhaps the case was designed for a previous version of the adapter and not this version (3.1). Its dimensions with the case are: 6 CM (L) x 4.5 CM (W) x 2.2 CM (H) and it looks great in purple as most PCBs do but that's purely down to taste. AMI RGB2VGA Ultimate Image 4
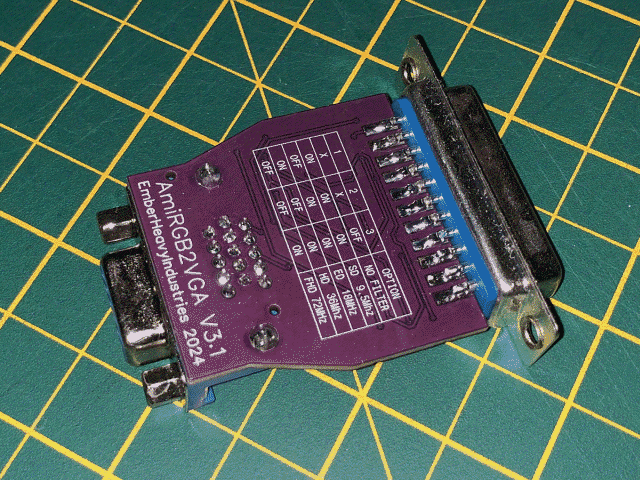
The adapter plugged snugly between the RGB port and the VGA cable, the DB23 connector is placed with the PCB between its pins while VGA port is soldered on top. This was a bonus for me as it meant the VGA connector cleared my monitor stand base thanks to the added height. The project page is very comprehensive and explains the vertical line problem and the solution in detail and how the adapter filters the troublesome frequencies. A table is included on the bottom of the PCB to detail the DIP switch positions for frequency filter selection: +-----+-----+-----+------------+ | 1 | 2 | 3 | Option | +-----+-----+-----+------------+ | x | x | OFF | No Filter | +-----+-----+-----+------------+ | ON | ON | ON | SD 9.5 MHz | +-----+-----+-----+------------+ | OFF | ON | ON | ED 18 MHz | +-----+-----+-----+------------+ | ON | OFF | ON | HD 36 MHz | +-----+-----+-----+------------+ | OFF | OFF | ON | FHD 72 MHz | +-----+-----+-----+------------+ Switch 3 turns the filter on or off regardless of the positions of the switches 1 and 2. Switches 1 and 2 give you four filter options from 9.5 MHz to 72 MHz. There's also a separate switch for replacing the horizontal synchronisation signal with the composite synchronisation signal. More details can be found on the project page: https://github.com/EmberHeavyIndustries/AMI-RGB2VGAULTIMATE AMI RGB2VGA Ultimate Image 5
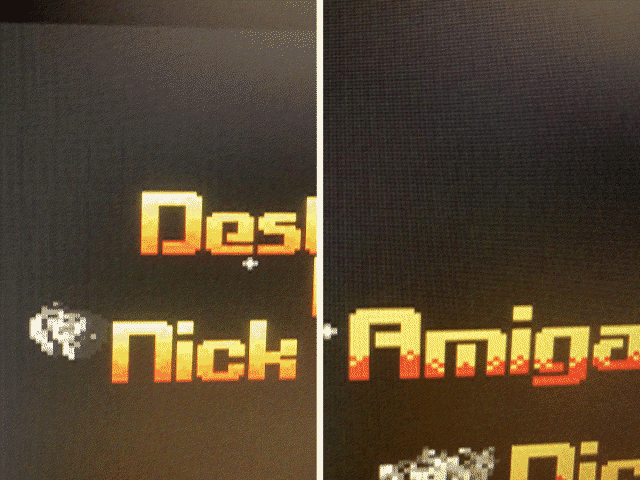
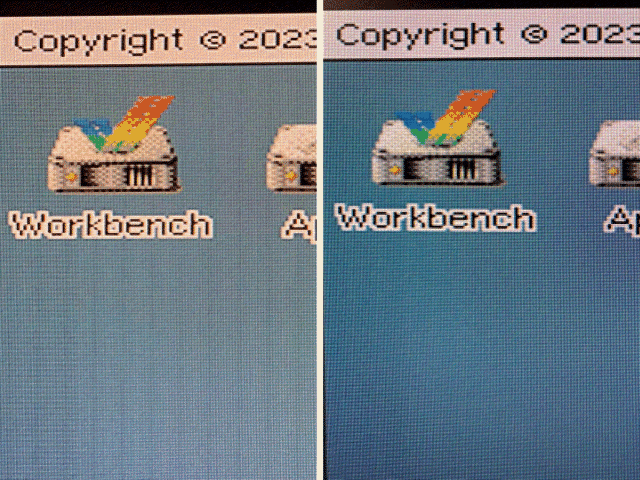
I tried each adapter in turn in 15 kHz game modes and on a DBLPAL 31 kHz Workbench screen, I also tested each filter setting of the AMI-RGB2VGA. I used a Dell P2414Hb monitor in an Amiga 1200 for these tests and noted the visibility/intensity of any vertical lines present. Please note these results are not very scientific and they're certainly specific to my set up, however they should provide a general indication of how these adapters perform. +--------------------------+----------------------+-----------------------+ | Adapter | 15 kHz Display | 31 kHz Display | +--------------------------+----------------------+-----------------------+ | AMIGAStore.eu RGB to VGA | Lines highly visible | Lines highly visible | +--------------------------+----------------------+-----------------------+ | Commodore 390682-01 | Lines reduced | Lines reduced, gone | | Sync Dongle | | with clock/phase | | | | adjustment | +--------------------------+----------------------+-----------------------+ | AMI-RGB2VGA Ultimate | Lines much reduced, | Moderate lines but | | 9.5 MHz Filter | narrower and fainter | blurry display | | | | output | +--------------------------+----------------------+-----------------------+ | AMI-RGB2VGA Ultimate | Lines much reduced, | Lines reduced, | | 18 MHz Filter | narrower and fainter | improvement with | | | | clock/phase | | | | adjustment | +--------------------------+----------------------+-----------------------+ | AMI-RGB2VGA Ultimate | Moderate lines | Lines reduced, | | 36 MHz Filter | | improvement with | | | | clock/phase | | | | adjustment | +--------------------------+----------------------+-----------------------+ | AMI-RGB2VGA Ultimate | Moderate lines | Moderate, some | | 72 MHz Filter | | improvement with | | | | clock/phase | | | | adjustment | +--------------------------+----------------------+-----------------------+ The cheaper adapter certainly showed the most vertical lines, however it's a simple cost effective buffered adapter and makes no claims of filtering. What surprised me was how well the original Commodore adapter performed. Then again it was intended for use with a multiscan or VGA monitor with 15 kHz and/or 31 kHz screenmodes and AGA output. The AMI-RGB2VGA Ultimate did very well at 15 kHz with the 9.5 MHz and 18 MHz filters, however it didn't completely eliminate the lines and the 9.5 MHz filtering resulted in blurry 31 kHz output. This is unavoidable as filtering 9.5 MHz at 31 kHz will cut sharp edges other than just bars. However, it is possible to achieve a line-reduced 31 kHz output with the 18 MHz filter and some settings, adjustments and patience. Using the adapter on an A500 and A600 for games and 15 kHz Workbench modes was straightforward and produced noticeably better results with the 9.5 MHz filter. I settled on the 18 MHz filter for acceptable results in 15 kHz and 31 kHz. AMI RGB2VGA Ultimate Image 6
AMI RGB2VGA Ultimate Image 7
Summary The AMI-RGB2VGA Ultimate might not completely remove vertical lines in all situations but it does noticeably reduce them. The adapter is compact and well built and while it doesn't come with a case there are files available to 3D print one which mostly fits the V3.1 PCB. The adapter works brilliantly at 15 kHz but was less effective for 31 kHz Workbench modes in my testing. Overall this is a capable and well designed RGB to VGA adapter and the price is reasonable when you consider the selectable vertical line filtering (and the price of a Commodore Sync Dongle). Very effective in a 15 kHz set up. Pros and Cons + Very nice build quality. + Reduces vertical lines considerably at 15 kHz. + Buffered. + Selectable frequency filtering. + Purple! - Less effective at frequencies higher than 15 kHz. - No case option as sold but you can print one. Other Key Points: * There's a huge variety in monitors, computers and cables, results may vary but are generally positive. Scores Ease of use: 90% Documentation/Packaging: 85% Value for money: 80% Overall: 85% - WhatIFF Silver Sources and Credits Sold by sampedenawa: https://www.amibay.com/threads/2445149 Created by EmberHeavyIndustries: https://github.com/EmberHeavyIndustries/AMI-RGB2VGAULTIMATE 3D case model by Slozka: https://webshare.cz/#/folder/7ynENiMNrY/vga-rgb-ultima
TopHardware review:Tikus USB Mouse/Joystick Adapter
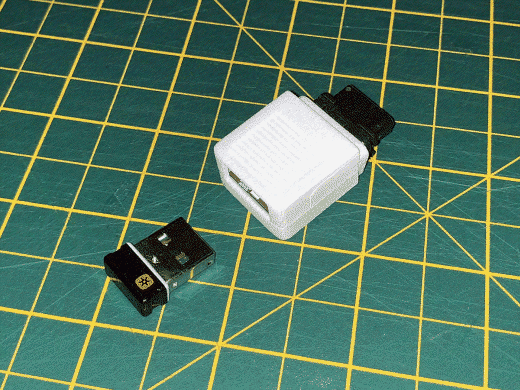
Reviews ============================================================================= Hardware Review: Tikus USB Mouse/Joystick Adapter - by Martyn Bampton ============================================================================= Product Name Tikus USB Adapter - USB Mouse/Joypad (to DB9) Adapter Developed By Lotharek Available From * https://www.amigastore.eu * https://www.amiga-shop.net * https://www.retrolemon.co.uk * https://wwww.sordan.ie * eBay Price Varies but typical best prices are 28 USD/25 EUR/35 UKP Hardware Requirement * An Amiga, Atari or Commodore (GEOS) computer with a free DB9 mouse/joystick port. Test Devices * Amiga 500 * Amiga 600 * Amiga 1200 TIKUS Image 1Introduction I'm glad I have some original Amiga mice, however I found the novelty of using them for any length of time wore off very quickly. While I do love the design and they bring back memories I'd rather not use wired ball mice when wireless optical mice are an option - as much as picking dirt and dust out of the rollers was fun. The Tikus (apparently it means mouse or rat) is a small adapter with a DB9 plug on one end and a USB port on the other. Like any other USB mouse/joypad to Amiga adapter just plug your device's USB cable (or wireless receiver) into the USB port and then plug the Tikus into your computer. With Amiga OS 3.2 and the Tank Mouse driver you can get scroll wheel (mouse wheel) support in Workbench which is brilliant! Earlier Amiga OS users can use the Freewheel app. As the name suggests you can also use "some" digital USB joypads with the Tikus although support is not as good as for USB HID mice. I thought this was a great feature so I wanted to try it with my joysticks and joypads. Note: There is a version of the Tikus included with the new wireless Tank Mouse, this version is for mice only and won't work with joypads. TIKUS Image 2
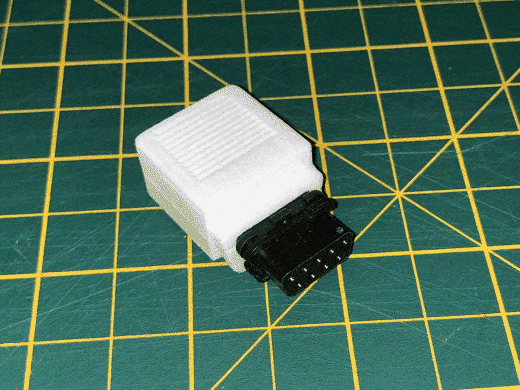
Impressions and Use The Tikus is tiny! It comes in a nice 3D printed case and measures about 3.6 CM (L) x 2.2 CM (W) x 1.5 CM (H) including the connectors. It felt a little loose and rattled slightly but it's nothing to worry about, it comes in white although the version bundled with the Tank Mouse can come in black if you order a black mouse. The USB port and DB9 connector are both a snug fit and I had no clearance issues plugging it into an A600's mouse port. When you first power on a green LED on the Tikus will blink rapidly for a moment. During this time you can configure the Tikus for your particular computer: - Green LED blinking, USB device detected, ready for configuration. - Red LED blinking, USB device not detected. - Press right mouse button while green LED blinking to enter configuration. - Press left mouse button to cycle through 1) Amiga, 2) Atari, 3) Commodore GEOS. - Red LED will blink 1, 2 or 3 times to indicate option selected. - Press right mouse button to save and exit. - Green LED steady, ready for use. There's a configuration video here: https://www.youtube.com/watch?v=7i_8K6Cj5mM USB joypads do not require any configuration options to be set and will work as-is - if they are supported by the Tikus. Configuring for my mice took a couple of tries which was more to do with timing than difficulty. Once saved the mice worked right away and I could swap them out as needed. I enabled the mouse scroll wheel in Workbench (Prefs/IPrefs) and installed the Tank Mouse driver. Add the tankmouse.driver file to C and call it from your S:User-Startup or use the provided installer which will do the same thing. You can get the driver here: https://aminet.net/package/driver/input/TankMouse Note: Many sites still suggest using the Cocolino driver from Elbox with the Tikus, this does work but a bug was found when using MUI. I experienced this when using MagicMenuPrefs on its own screen, it would switch back to the Workbench screen with any use of the scroll wheel. I replaced the Cocolino driver with the Tank Mouse driver and had no more problems. I didn't have as much success with joypads. First of all I tried my Competition Pro USB joystick which didn't work at all, I knew it was a long shot but worth a try as that would have been brilliant! Then I tried one of the cheap SNES style USB joypads you can find on Amazon and eBay. That showed some promise, however while I could use the D pad, the fire buttons didn't work. Lastly I tried my TheA500 Mini gamepad and that also gave me direction control but no fire. In fairness the project page recommends Buffalo branded SNES style USB joypads and does indicate that joypad support is not universal, my joypads almost worked. The mouse support is great and the main reason I needed an adapter but I was a little disappointed I couldn't get a joypad to work. Perhaps a future firmware update will improve joypad support but it's probably difficult to support everything. Summary There are lots of options for using a USB mouse with an Amiga and for that purpose it worked flawlessly for me. My Logitech wireless mice were supported as were a random selection of wired USB mice including an old Macally one I bought for my G3 iBook. Scroll wheel support is very useful and welcome - it's normal to want to scroll with the wheel and it's great to have that functionality in Workbench. The Tikus didn't work with my USB joypads so be aware of that and buy it for the good mouse and scroll wheel support -and- maybe your joypads will work too! Pros and Cons + Excellent USB mouse adapter, wireless mice work. + Compact, fits the A600. + Configuration is fairly straight forward. + Scroll wheel support. + Price competitive with other adapters. - Advertised as a Mouse/Joypad adapter which is true but joypad support can be hit or miss. Other Key Points: * The version of the Tikus included with the Tank Mouse does not support joypads. Scores Ease of use: 90% Documentation/Packaging: 80% Value for money: 70% Overall: 80% - WhatIFF Silver Sources and Credits Sold by Amigastore.eu: https://amigastore.eu/en/950-tikus-usb-mousejoypad-adapter.html Built by Lotharek: https://lotharek.pl/productdetail.php?id=244
TopHardware review: TechnoSound Turbo
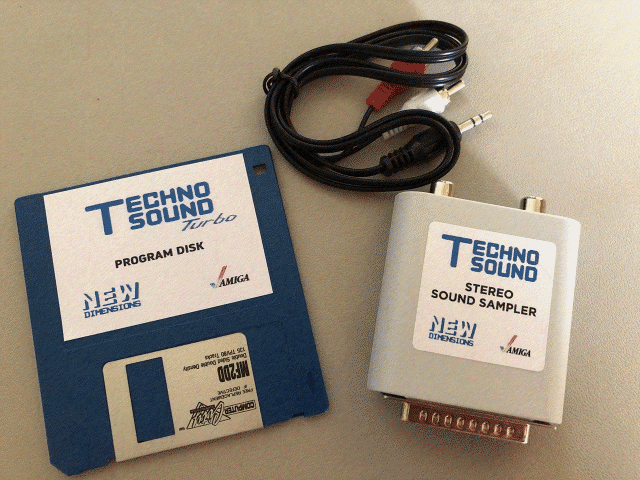
Reviews ============================================================================= Hardware Review:TechnoSound Turbo - by Timo Paul ============================================================================= Product Name TechnoSound Turbo (2023 Edition) Developed By New Dimensions Available From eBay https://www.ebay.com/str/anyretro Price 39 GBP Hardware Requirements Any Amiga Test Machines Amiga 1200/TF1260 TechnoSound Image 1As Amiga hardware ages and becomes less available existing hardware prices skyrocket. Audio samplers in particular have been susceptible as well. Looking at the eye watering prices of the DSS8 can make you give up on ever owning a decent Amiga audio sampler. With this in mind, I was curious when I came across the Techno SoundTurbo cart being sold on eBay. A quick read of the description confirmed this as being a new or re-release of the original card by the same developer Jon Wheatman. I had the original TechnoSound Turbo cart back in the day and DSS8, in the last few years Ihave been on the search for a new cart and dipped my feet into the AOS Amiga Open Sampler, with disappointing results, as can be read in my reviews in previous issues. Having used the TechnoSound Turbo in the past and been impressed with its sampling ability I quickly used the BuyItNow button and waited for it to arrive. When you receive the item it is in a simple card board box, if you paid extra you will get a printed manual, there is no official box so the rest of the items (sampler, audio cable and disks) are just wrapped in bubble wrap. The first thing that you will notice, if you had the orginal TechnoSound is the reduction in size. I would say it is over half the height and a little shorter which is a welcome update. TechnoSound Image 2
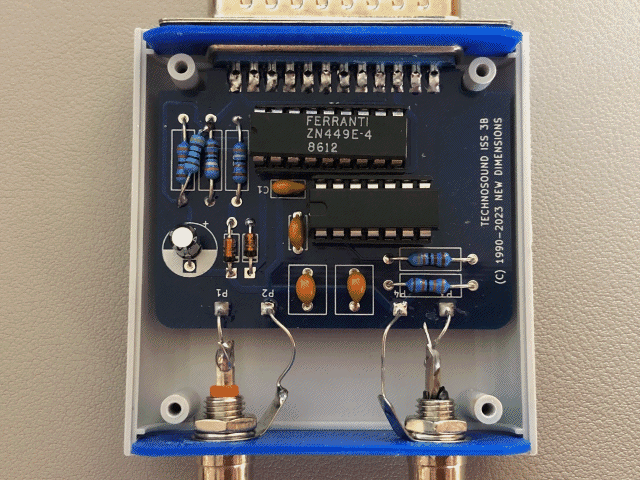
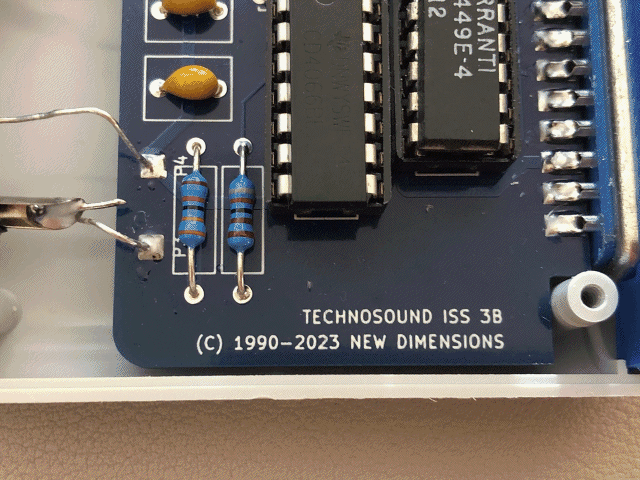
I wanted to see if the innards had changed and proceeded to open it up. Printed on the circuit board is TechnoSound ISS 3B, 1990-2023. There are the same amount of components (13), however two of the resisters are conntected together on one connection, which I did not see on my orginal circuit board. Two other components are missing, diods labeled S1J224K, they seem to be connected to the phono sockets. As far as my limited understanding of eletronics goes, diod is to limit the flow of a current in one direction. Perhaps this is to help with reducing sound feedback? They connect to the audio in P2 and P1. The heart of the sampler the A-D Convertor chip has a different number and brand name but looking them up on the internet shows it to be the same chip as the original board. TechnoSound Image3
So, now we have checked the innards of the board time to give the sampler a go and see how well it performs. It comes with a new version of the TechnoSound Turbo software, (I think!) at the bottom it says USA Version. Prior versions of the software would crash on my system which is an A1200 with a TF1260. The version supplied with new sampler runs okay. But there are stability issues. The interface is the same as before, this is a good thing if you liked the it or bad if you did not. I fall into the latter group, it is not very intuitive and I find SteroMaster IV a much better experience. Though I seem to get better samples with the TechnoSound software so I have to grind my teeth and bear with the interface. My main gripe is the difficulty in trimming a sample, in AudioMaster IV and other sampler software this was a simple case of selecting the area I want and cutting it out. TechnoSound does not give you any visual cues as to where you are selecting in the sound wave. So, when I save my sample, what should be a 45Kb sample ends up being 4MB since I was unable to trim it down to a more reasonable size. I can edit the sample in AudioMaster but it would have been nice to have modern implementation of the TechnoSound software. Like all Amiga samplers, when you sample the screen will go blank, you can monitor what you are sampling before clicking on record. I have included some samples that I took with the TechnoSound and you can hear how they sound. And this is where the TechnoSound really shines, as it should! I use the technique that was suggested by Tony Horgan of sampling in from my MacBook in Renoise, I use the built in compressor to boost the sample and this allows for a loud, crisp and relatively noise free sample. Much better than the OAS that I used the past. It is not quite at the level of the DSS8 sampler but it gets quite close. Final Thoughts If you are after a quality Amiga sampler and the TechnoSound Turbo is still being sold, then I highly recommend purchasing one. It has the benefit of a smaller footprint, but retains the high quality sampling ability. While it would have been welcome to have an updated version of the software there are other options out there so it is not such an issue. Be it tracking, game development or just simply having fun, the new TechnoSound Turbo is a great purchase. I suggest skipping the AOS samplers that are available and buy this great cart instead. Pros and Cons + A quality product that is better than the first edition. + Half the size of the original. + Better sampling quality than the AOS. + Reasonable price. + Software update is a compatible with upgraded Amigas. - TechnoSound software is still difficult to use. - Still has unstable. Other Key Points: * Included audio cable is not the best quality and it is recommended to use a shielded cable to for better results. Scores Ease of use: 90% Documentation/Packaging: 20% Value for money: 80% Overall: 63% Note: While the overall score is low, the quality of the hardware is very good but the software drags it down. If just reviewing the hardware alone I would be happy giving it score around 85%. Sources and Credits Sold by AnyRetro https://www.ebay.com/str/anyretro
TopBook review: OS3.2 Reference Manual
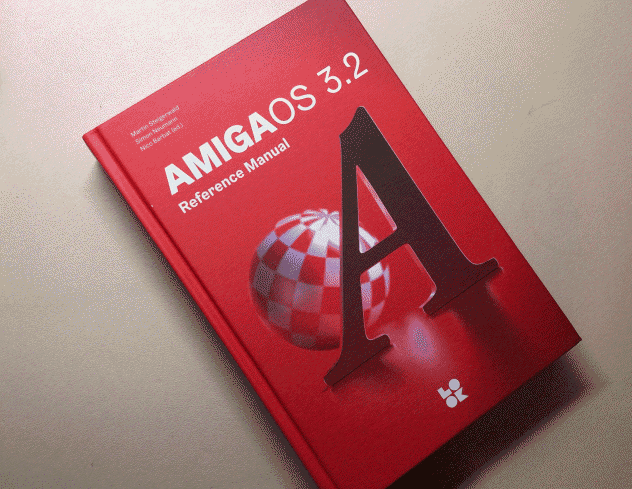
Reviews ============================================================================= Book Review:OS3.2 Reference Manual - by Timo Paul ============================================================================= Product Name OS3.2 Reference Manual Written By Martin Steigerwald Simon Neumann Nico Barbat (ed.) Published By LookBehindYou Available From https://www.lookbehindyou.de Price 35 EURO Hardware Requirements N/A Test Machines N/A AmigaOS 3.2 Book Image 1Introduction When I think back to heady days of the 80s and 90s, I remember my bookshelf heaving under the weight of so many manuals. While I still treasured those manuals they were also taking up a lot of room. Little did I know that thirty years later I would be looking back on those memories with fondness and envy. Here we are in 2025 and the physical manual is dead. It is not suprising when you read about the reports of literacy declining around the world and over half of adults not even reading one book a year. I have been buying up old boxed Amiga software just so I can get my manuals back as they are an essential source of information. As such it was a nice surprise when I saw the advertisement for AmigaOS 3.2 Reference Manual in an issue of Amiga Future. At the time though the manual was only available in German but LookBehindYou, the publisher had mentioned an English version was coming. In September of 2024 the English version went live on their website and I bought it right there and then. AmigaOS 3.2 Book Image 2
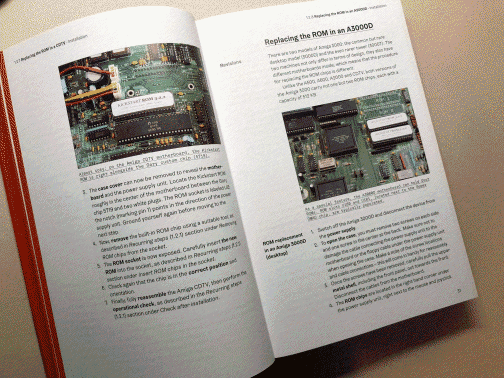
Shipping was unusually fast from Germany to Japan and came well packed in a hard cardboard shell and wrapped in plastic. First impressions of the book are it is a heavy hardback brimming full of Amiga information. Proudly printed on the front is the text, AMIGAOS 3.2 Reference Manual with the obligatory boing ball and Amiga A letter set against a strong red background. Included is a very useful reading tassle to keep your spot, a very thoughtful feature for such a large book. It comes in at 480 pages and is in gorgeous full colour. The book is split into 8 sections: Chapter 1: Installation Chapter 2: Basics Chapter 3: Preferences (Prefs) Chapter 4: Programs Chapter 5: The Shell Chapter 6: Power User Chapter 7: Next Steps Chapter 8: Quick Reference Chapters 1-4 are marked in orange to indicate basic knowledge, chapters 5 and 6 are in red and are aimed at experienced users. The final two chapters 7 to 8 are general knowledge i.e. frequently asked questions such as how to transfer data, setting up internet, recommended software and Amiga DOS error codes. All the content is laid out in an easy to read format with full colour photos spread throughout. It can be read by a complete new user or if you are a more experienced user the later chapers will be of use. There is an incredible amount of information from a listing of the Shell commands, to the most useful commands for creating AmigaGuide documents. Since buying the book I delved into it several times when editing an issue to confirm a formatting command that is only available with OS3.2. Beyond 3.2 What I particularly enjoy is how the authors have not restrained themselves to only Workbench 3.2. They also cover alternative file systems, hardware expansions, diffent software options for getting the Amiga online. There are sections that cover how to add a scandoubler, memory or accelerator and they cover all the Amiga models. AmigaOS 3.2 Book Image 3
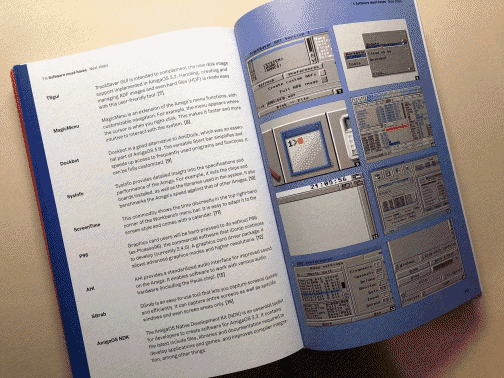
Finally there is a section named Software must-haves, and this is a great source of information especially for people new to the Amiga or even those coming back to the Amiga. If you are an experienced user there might be some information new to you. Final Thoughts With printed manuals few and far between nowadays, the release of the AmigaOS 3.2 Reference manual makes it special event. If you have even a little interest in the Amiga and want to get more out of it then this is a book you need. It takes many cues from the original Amiga manauls and updates them with modern users in mind. The fact that it caters to new and old users does not dimish its value in anyway. While the first half of book was not relevant to my Amiga knowledge I am glad that it is there, just in case I forget something. Finally, it is a gorgeous looking book and stands out with pride on my bookshelf shouting, Amiga! When we have guests over they often ask about the big red book on our bookshelf. Which is a great kick off point to talk about the Amiga, where by I say, "So, have you heard of the Amiga?". Snap up this book while it is still available and display it with pride and hopefully you will also find some real use out of it. Pros and Cons + Suitable for beginners and pro-users. + Full colour images. + Hardback cover. - Could have a bit more information regarding the Shell and AmigaGuide. Scores Overall: 98% - WhatIFF Gold - An essential purchase! Sources and Credits Sold by LookBehindYou.de: https://www.lookbehindyou.de
Topgamereviews
CONTENTS ============================================================================= -= G A M E R E V I E W S =-------------------------------------------------- ----------------------------------------------------------------------------- -= Game Review: Final bHangman =- Final Fight and hangman together ... sounds interesting, click to see if this unique game is worth your time. -= Game Review: Dungeonette =- Released Xmas last year we take a look at this new dungeon crawler and see what it gaming fun it offers. -----------------------------------------------------------------------------Topfbhangmanreview
Gamereviews ============================================================================= Game Review: Final bHangman - by Timo Paul ============================================================================= Product Name Final bHangman Developed By Fourseasons/A.Sgaggero Available From https://fourseasons.itch.io/final-bhangman-for-commodore-amiga-500 Price Name your own price Hardware/Software Requirements None Test Machine Amiga 1200 TF1260 Review Final Fight and Hangman, three words that I never thought I would see in the same sentence, but in December 2024 the Amiga world was introduced to this little gem of a game. Created in AMOS by the developer Fourseasons the game is available from their itch.io page and is listed at a name your own price. The game takes influence from the Final Fight "continue" screen and blends that with the classic Hangman game. It comes on an ADF, you need to make sure you can write to the disk though as it saves scores. I was able to copy it to my hard disk but it did not run and was only able to do it from the ADF, however that in turn did not allow me to save the scores. For the moment you will need to write the ADF to a physical disk and use it that way to save scores. Hopefully a way will be figured out for it to be run from the hard disk. The first screen you see when loading the game is a classic Capcom style disclaimer screen, very nice! Pressing any key will take you the title screen with a very well done screen with a great take on the Final Fight title screen. Pressing the SPACE bar will get the game going. From here on you have a Santa Clause crossed Mike Haggar character tied up with some dynamite burning down. There is a little animation with the character blowing on the spark. Underneath you have letter spaces, just like hang man, you need to press a letter on the keyboard to guess the words. You have several chances before poor Santa Haggar is blown up. The phrases are usually Amiga related so this game is really aimed at Amiga users. When I tried it with my students they enjoyed the game but were confused on some of the Amiga references, some more education is due I believe! Final Thoughts Final bHangman is an enjoyable little game that can be a nice way to pass the time or use even in classes. It would have been nice to have words that were not only Amiga related, perhaps in a future update? That aside the game is easy to pick up and is fun for a little while. Played alone or with another this is another nice game that us Amiga users should treat themselves to. Pros and Cons: + A nice twist on the hang man idea + Graphics are few but do a nice job - Only aimed at people knowledgeable about the Amiga Scores Gameplay: 85% Graphics: 80% Sound: 75% Overall: 80% - WhatIFF SilverTopdungeonettereview
Gamereviews ============================================================================= Game Review: Dungeonette - by Timo Paul ============================================================================= Product Name Dungeonette:The New Adventure Developed By Adrian Cummings Published By Mutation Software & Software Amusements Available From https://www.mutationsoftware.co.uk Price Approx. 13 GBP Hardware/Software Requirements AGA/CD32/2MB Chip RAM Test Machine Amiga 1200 TF1260 Review In issue 2.11 (September 2023) I reviewed the game CyberPunks 2, and found it to be a very enjoyable experience. December 2024 we were treated to another game by Adrian, just in time for Xmas, Dungeonette. The game had come out originally for the AppleWatch in 2015 and the ZX Spectrum Next in 2018. Adrian then rewrote the game for stock AGA Amigas, taking around 18 months to develop and was written completely in 68x0 assembly language. At its core, Dungeonette is a dungeon crawler but you are not restricted to dungeons and will also be able to explore forests and mountains. There are 16 stages in total with a boss at the end of each fourth stage. Gameplay is simple with the use of only one button to swipe your sword with, for switches you simpley walk into them to activate. At the end of each level you have the option to buy upgrades for armour, weapons, and spells. I found it a little difficult to get the handle of the gameplay mechanics as the your starter sword has a very short reach, so enemies have to come very close for you to be able to kill them. However, after a few aborted attempts I began get the handle of and was able to progress several stages. The game is a mix of hack and slash, exploration and figuring out simple puzzles. It makes for a very enjoyable game experience, I can feel influences from CyberPunks 2 with the coins, even the coin sound effect seems the same. Graphics wise they are very nicely done, while again like with CyberPunks 2 I would not be able to say right away this is an AGA game. They work very well and the limited view when in the dungeons makes for a nice effect and adds to the gameplay. Outside you have brighter and bolder colours all drawn skillfully. The animation is smooth and your character looks quite cute as he bobs along when in movement. Regarding audio, there is some catchy organ music for the title screen but during gameplay there is no BGM. But, we have something better, very effective sound effects, on the first stage you hear birds chirping in the background bringing the environment alive. In the dungeons there are creepy sounds that help increase the feeling of dread and isolation. Gameplay once you get the hang of the fighting system is done very nicely, it becomes second nature and you are able to get into the game experience without having to worry about what to do. If you die in the game you can go back to where you were before but start at the beginning of the stage. However, if you quit your game, all progress is gone, which is unfortunate as you will need to finish the game in one go or like we used to do back in the day, turn off your monitor and leave on the Amiga until you can return back to it. Saying all that though, the game is relatively easy and I am sure with some determination most people can finish the game, this does not diminish the game in anyway though as it is wholely entertaining experience. Final Thoughts Dungeonette is a fun game that should not be viewed as an RPG, but as pint sized RPG'ish game. It has all the right elements for an entertaining game has wonderful visuals and spot on audio. If can find the boxed version still buy it right away, if not then buy the download version and make sure you have a few hours free time prepared. Pros and Cons: + Graphics and audio are very well balanced and work well + Gameplay easy to pick up after initial learning curve + Not too hard - No saving progress Scores Gameplay: 93% Graphics: 89% Sound: 95% Overall: 92% - WhatIFF GoldTopWelcome to the guides section!
CONTENTS ============================================================================= -= T U T O R I A L S / G U I D E S =----------------------------------------- ----------------------------------------------------------------------------- -= Upgrade a PiStorm32 with Raspberry Pi3A+ to Pi-CM4 module =- John Scolieri shows youHow to upgrade a PiStorm32 with Raspberry Pi3A+ to a Raspberry Pi-CM4 module running OS3.2.2 -= Using OpenURL: WhatIFF? =- A short guide on setting up OpenURL to allow you to open up the web links included in each issue of WhatIFF? -= DigiPaint: Basics - Part 1 =- DigiPaint was a ground breaking art package, this series looks at how to take advantage of it's power. -= Accessing BBSs Without A Modem =- We look at how to access classic BBSs without the use of a modem. ----------------------------------------------------------------------------- #Tutorials/Guides - WhatIFF? Issue 4.16 - April 2025#TopUpgrade a PiStorm32 with Raspberry Pi3A+ to Pi-CM4 module
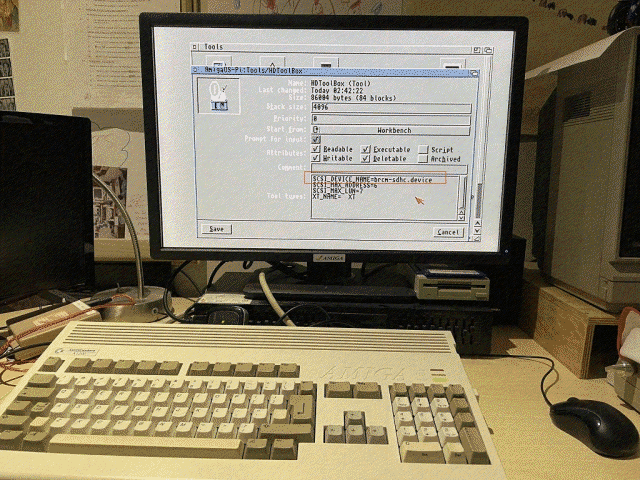
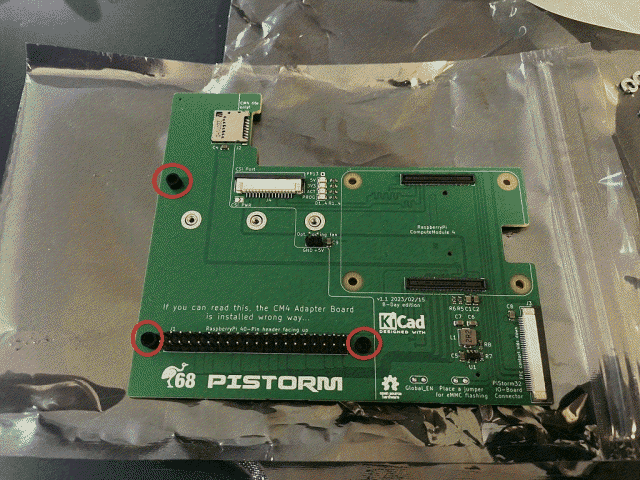
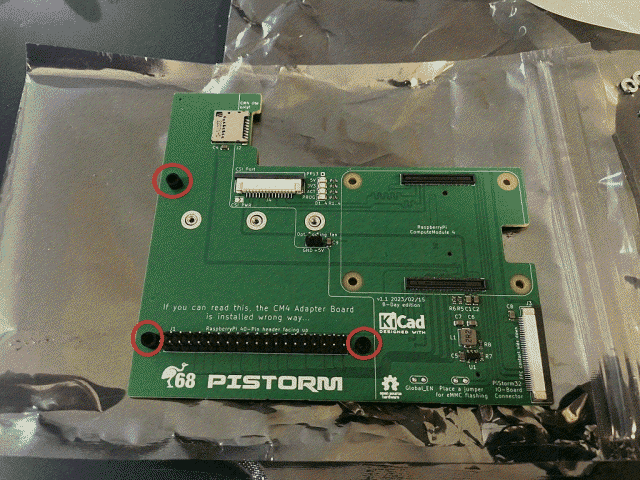
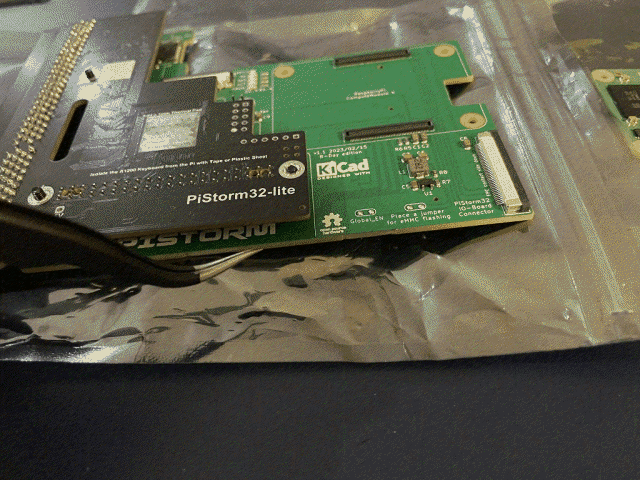
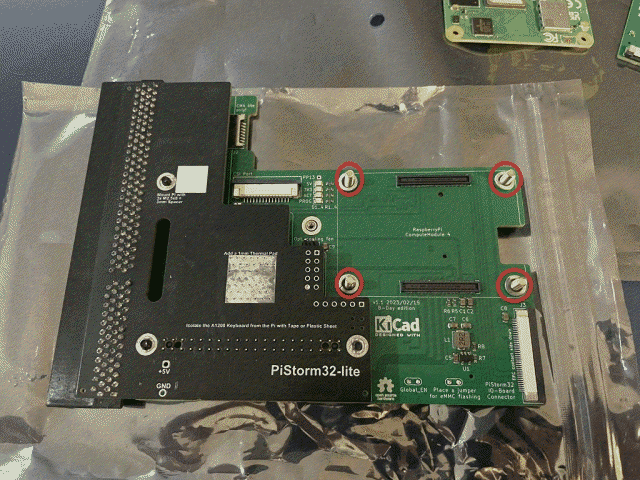
Guides ============================================================================= Upgrade a PiStorm32 with Raspberry Pi3A+ to Pi-CM4 module by: John Scolieri ============================================================================= If you haven't already guessed from my previous articles on the PiStorm32 accelerator board for the Amiga 1200 I'm a huge fan, so when a good friend of mine asked if I had any use for a Raspberry Pi CM4 module, which he had lying around in his shop that wasn't being used, I enthusiastically yelled YES! To be clear I've been loving my PiStrom32 with a Raspberry Pi 3A+ running OS3.2.2 installed but when this free CM4 module fell in my lap and me being a hardware tinkerer since the 80's I decided to upgrade my 3A+ to CM4 in my Pistorm32. Initially I was going to remove the 3A+ and install the CM4 along with expansion adapter board that cleans up the messy cables from the 3A+ to a clean back plate at the rear case of the Amiga 1200; however, I realized I wanted to keep my PiStorm32 with 3A+ as a backup just in case anything goes wrong with the CM4 install or to instantly plug into my 1200 Tower one day. Here's what you need to get started: - Pistorm32 - microSD card (that you were using with your 3A+ installed) - Raspberry Pi CM4 module (get module with wifi if you want to get online) - CM4 adaptor board - Breakout expansion board (accessories incl.) - heatsink for CM4 - CPU fan (optional if you're not overclocking the CM4) Now that we have all the parts we need follow the steps below: Step 1: First step is to boot up your PiStorm32-3A+ before removing it from your 1200. Go to HDToolBox and edit the SCSI_DEVICE_NAME after the = sign to read "brcm-sdhc.device"-don't enter quotes (See Pic 1). IMP: Don't forget to click Save and shut down your 1200. PIC 1Step Two: Remove your PiStorm32 from your 1200. Take your SD card out of your 3A+ and make a copy of your SD card on your computer as a backup as you really don't want to start the full setup again from scratch and it's always good to have a backup (I used Win32DiskImage on my PC which makes an exact clone of the SD card). Step Three: Put your SD card into your PC and add the following line into the cmdline.txt file: "sd.unit0=rw emmc.unit0=rw" (don't enter quotes) Step Four: Install the 3 plastic spacers to the CM4 adapter board and line up 3 screws through the spacers (See Pic 2). PIC 2
PIC 2-1
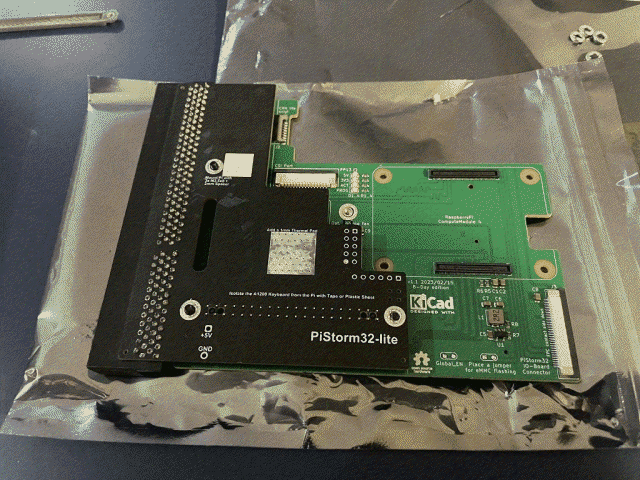
Step Five: Line up and press down to install the PiStorm with the CM4 adapter board connector and plastic spacers ensuring screw heads are fully through the PiStorm32 board (See Pics 3&4). PIC 3
PIC 4
Step Six: Insert 4 screws and washers to connect the CM4 module to the expansion board (See Pic 5). PIC 5
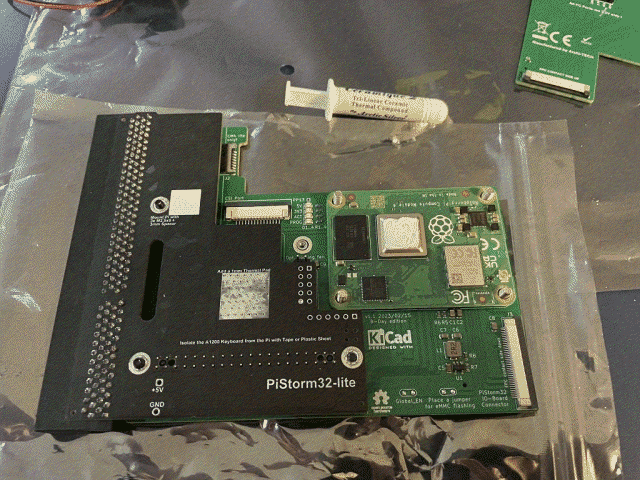
Step Seven: Install the CM4 module to the expansion board connector ensuring the screws are fully through the CM4 board & apply a thin coat of thermal paste to the top of the CM4 CPU (see Pic 6) PIC 6
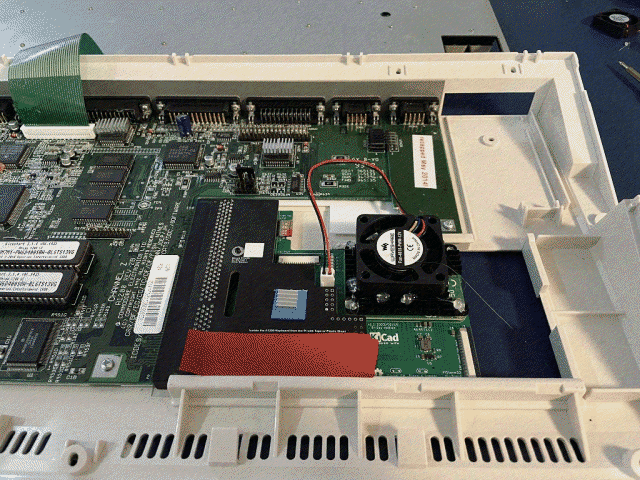
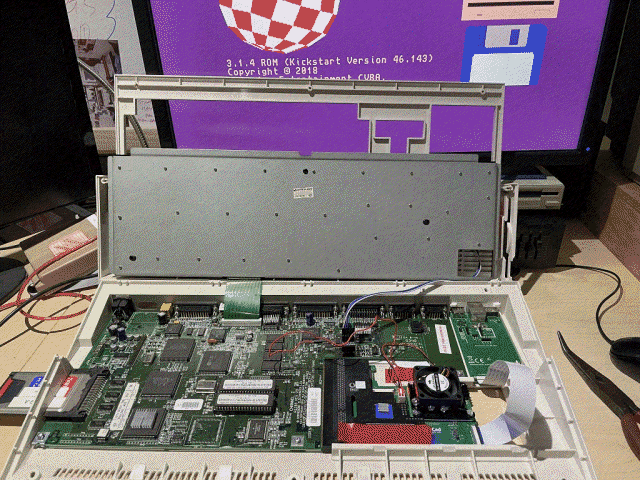
Step Nine: Install heatsink atop the CM4 with supplied nuts and add optional fan atop the heatsink ( I purchased a slighlty thicker fan so had to offset it a bit towards the back of the case to make sure it cleared the keyboard in my 1200 hence why I needed to use some hot glue to mount it on the heatsink. Make sure you connect the CPU fan to the pin header on the CM4 adapter board (See Pic 7) PIC 7
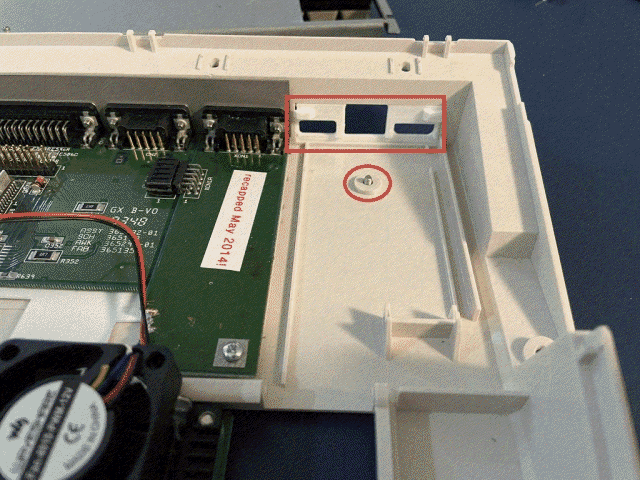
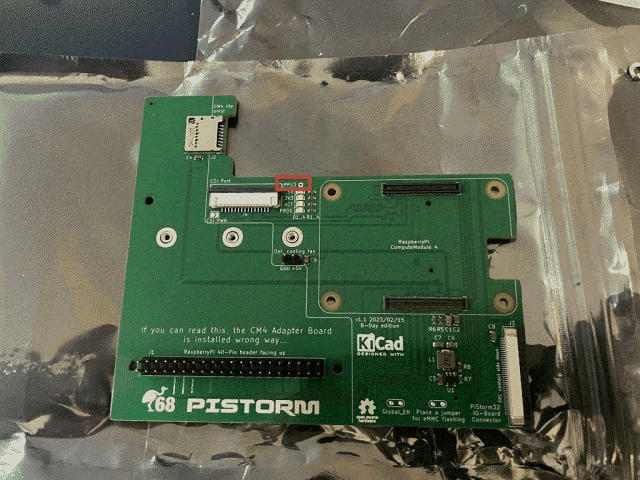
Step Ten: Install screw at base of case and install backplate (make sure it clicks in on both sides of the case) and Breakout expansion board, install screw and connect ribbon cable to both CM4 expansion board and Breakout board (See Pics 8 & 9). Lastly don't forget to connect your HD light wire to pin PP13 on your CM4 adaptor board (See Pic 10) PIC 8
PIC 9
PIC 10
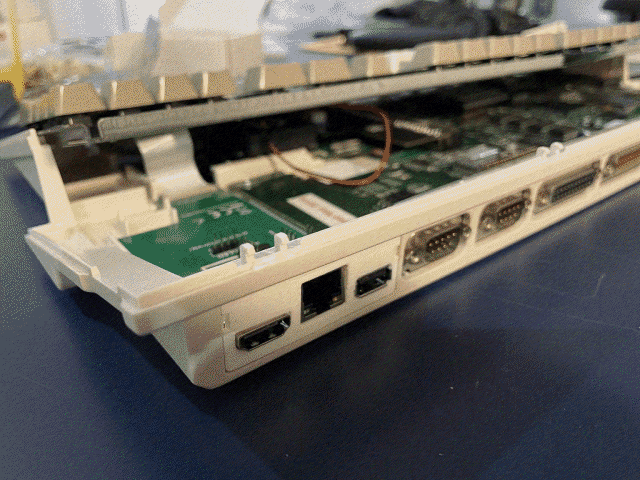
And you're done! Congratulations you now have the fastest PiStorm32 setup (well at least for now anyhow :-). Here's a clean view of the backside of my 1200 (See Pic 11) PIC 11
cheers, G. Scolieri
TopUsing OpenURL: WhatIFF?
Guides ============================================================================= Using OpenURL: WhatIFF? by: Timo Paul ============================================================================= In the last few issues of WhatIFF? we have started to include buttons with url links, these are using the OpenURL programme. For those of you have not installed it or are having some troubles getting the links to work from within the magazine, here is a short guide on setting it up. Step One First you want to download the OpenURL software, this can be found from Aminet at: http://www.aminet.net/package/comm/www/OpenURL-7.18 once you have it downloaded to your Amiga, extract it and run the installer. Make sure you choose the correct version according to your Amiga setup/OS version. Step Two Once it is installed, double check your Prefs directory to see if it has copied over the OpenURL prefs file. If not then copy it by hand to the Prefs directory. For some reason my installer did not copy over the icon as such the icons was not visible until using Show All. I ended up copying the the pref file by hand. OpenURL Image 1Step Three I will presume that you already have a brower installed by now, start the OpenURL Prefs file and you will be presented with a list of browers, and several tabs for Email and FTP programs. By default the browsers will not be activated, as indicated by red square. Double click on the square to activate your installed or prefered browser. As I just own IBrowse, I deleted the other browsers. OpenURL Image 2
Step Four Next click on Edit on the right panel, locate Path and click on the button, from here you will need to tell the programme where your browser is located. For example, my IBrowse is located at: Workbench:Programs/Internet/IBrowse If I did not change the default setting of OpenURL it will not be able to locate my IBrowse and start it. That's it, now you will be able to open the links in the WhatIFF? articles and download the software/games straight to your Amiga. How To Implement OpenURL in AmigaGuide If you want to add the ability to open links in your own AmigaGuide documents, then all you need to do it use the below commands: -------------------------------------------------------------------- | @ {"www.whatiff.info" system "openurl https://www.whatiff.info"} | -------------------------------------------------------------------- Please note, you need to remove the space after the @ sign to get OpenURL to work. A space has been added to stop the code becoming a button and show how it is created.
TopDigiPaint: Basics - Part 1
Guides ============================================================================= DigiPaint: Basics - Part 1 - by: Timo Paul ============================================================================= Introduction The first program I used on the Amiga, or that I can at least remember was DigiPaint. Using an Amiga was a magical experience in the 80s, I think you had to be there at the time to realise how advanced the Amiga was for the time. Using DigiPaint for the first time was like encountering something from the future. But with all the power came complexity, while DigiPaint is not an overly complex program to use it can be a bit confusing for those whom have never used it or are returning to it after being away for a while. In this new tutorial series we will explore how to use DigiPaint and what is possible with it. DigiPaint History To begin with let's delve into the history of DigiPaint, the first release was in 1986 and was released at the same time as DigiView. You might have seen DigiView as device that connects to a camera and allows you to digitise images in colour using a red/green/blue colour wheel. Since there was no software to edit photos on the Amiga, NewTek also released DigiPaint shortly after. The final release was version 3 in 1989 for 50.00 USD. It was the first paint package to take advantage of the HAM mode, prior to DigiPaint you could only use a maximum of 32 colours, there were no versions released for the AGA machines. However it does run on AGA Amigas and takes advantage of a faster CPU making for a smoother user experience. We will concentrate on the last release of DigiPaint, version 3 as it has several useful features such as: - Texture mapping with anti-aliasing - Controllable transparency - Rainbow and anti-aliased fonts - Brush rotation and resizing with anti-aliasing - Interface designed by Jim Sachs Getting Started If possible try to purchase the boxed version of DigiPaint 3 as the boxart is gorgeous and manual will prove invaluable. However, it is not necessary for this tutorial series and you will do fine with downloading the ADFs from the Internet. Installation is simple, just drag the disk to your desired location and launch the application from there. A quick note here, if you are running Amiga OS3.1+ you might encounter some problems when quiting from the program. Quiting is done from the menu bar but the requestor is cut off on newer Workbenches, you can get aroud this by using (Left Amiga + V). Using this combination only works when you use Quit from the menu bar. Starting DigiPaint3 will bring up a black screen with a panel with buttons if you use Brilliance it will seem familiar. Pressing the right mouse button will bring up the menu bar, it will not appear from the top of the screen but from the top of the tool bar. To begin with bring up the drop down menu and go to Prefs -> Open Workbench. By default Workbench is closed but since we will be working with the article in MultiView being able to switch between screens will make things easier. In this tutorial we will concentrate on drawing shapes as DigiPaint works a bit differently from other art packages. Looking at the left side of the toolbar you will see the drawing tools. From the left the buttons are as following: * Freehand (Keyboard shortcut: s) * Freehand Continuous (Keyboard shortcut: d - unfilled, D - filled) * Polygon/Straight Line (Keyboard shortcut: v - unfilled, V - filled) * Rectangle (Keyboard shortcut: r - unfilled, R - filled) * Circle (Keyboard shortcut: c - unfilled, C - filled) * Ellipse (Keyboard shortcut: e - unfilled, E - filled) * Fill (Keyboard shortcut: f - off, F - on) Next to the drawing/painting buttons you have 'Brush Size', 'Brush Shape'. Let's try to re-create an element from the images on the back of the box, it has the wood floor, with a floating globe and cube. To begin with we will make the 3D cube effect which is surprisingly easy with DigiPaint. Select the 'Polygon/Straight Line' tool and use it in 'Fill' mode, you can do this by clicking on 'Fill' first or pressing 'V'. DigiPaint polygon mode works differently to other programs in that once you have two lines they will be connected, creating a shape. By moving the mouse and clicking with the left mouse button you can add more lines to create a shape. When you you are satisfied click on the right mouse button. For this tutorial we will use the default colours, select the lighter green colour and draw a square with the top and bottom at 45 degree angles, the left and right should be straight. When selecting your colour remember to click on the colour on the left of the gradient, by default it will be yellow. A white box will surround the colour and then you can choose the lighter green. Once you have one side of your box you usually would be able to copy and paste it down and then fill it with another colour but since DigiPaint does not have a fill tool. However, there is another way you can do this, and that is by cutting/copy your image, flipping it around and stamping it down in another colour. To cut an image and not include the black background you need to go to the menu bar first and find, Brush -> No Background. If you do not do this first when you pick up a part of the image it will grab the black background as well. Setting 'No Background' will fix this problem. Next use the 'Scissors' tool and create an outline around your one side cube. When it has been picked up we then need to flip the brush, this is done from the menu again: Effect -> Flip Horizontal After selecting this your brush will be flipped and we can stamp it down on the other side to create a 3D cube effect, but before doing that we need to change the colour. This is done by clicking on the left colour of the gradient, you might need to click on it more than once, then click on the lighter/darker green colour swatch. You will be able to tell it has been selected by the left colour box changing to the selected colour. A white outline will appear on the colour selector indicating it is active. The neat part about this is if you are using the gradient tool, you can stamp down a gradient of the brush, and changing the gradient by choosing different colours on the left and right of the gradient selector. However we will stop their for the moment and go into detail on using the gradient and texture tool in part 2. Good luck with your experimentation with DigiPaint and see you in the next issue!TopAccessing BBSs Without A Modem
Guides ============================================================================= Accessing BBSs Without A Modem - by: Timo Paul ============================================================================= Getting Online with BBSs Without a Modem If you were computing in the 80s and 90s, the screech of the modem down the telephone line will bring back (hopefully!) fond memories. With the advent of ADSL and now fibre Internet access, connecting to a BBS via a modem has become a rare, if not impossible, task. However, as with all things retro computing, enthusiasts have kept the BBS flame alive and developed modern ways to connect. One of these modern methods is Telnet, a client/server protocol that provides access to virtual terminals on remote systems over a local network or the Internet. Created in the 1960s, Telnet stands for Teletype Network and was initially used as a tool for network administration. By the mid-90s, as the Internet grew in popularity, many BBS operators added Telnet support, allowing users to connect over the Internet rather than via a telephone modem. Since Telnet does not offer built-in encryption, it has fallen out of widespread use due to security concerns. However, some modern Telnet-based BBSs enhance security by using SSH tunnelling or similar techniques to encrypt the connection. Despite Telnet's text-based roots, many BBSs still feature ANSI art, graphics, and menu-driven interfaces that create a nostalgic user experience. Telnet vs. Dial-Up Modem Connections If you think about dialling into a BBS back in the day, the process is fundamentally the same: you control the remote computer by sending commands. However, instead of transmitting data over a phone line, Telnet uses the TCP/IP protocol for communication. This means you can connect to a BBS using modern Internet connections, even on (ahem!) vintage systems like the Amiga, provided they have a compatible TCP/IP stack. Popular TCP/IP stacks for Amiga computers include Roadshow, which is still being developed and supported, and AmiTCP, an older but functional option. Once your Amiga is connected to the Internet, all you need is a Telnet client, and you're ready to relive the golden age of BBSs. A great choice for the Amiga is DCTelnet, a Telnet client that works very well. How to Get Started 1. **Set Up Internet Access** First, you'll need to connect your Amiga to the Internet via a TCP/IP stack. I recommend Roadshow, as it is actively developed and supports modern Internet protocols. By purchasing Roadshow, you also support the ongoing efforts of Amiga developers. Alternatively, older programs like AmiTCP can also work and are free. 2. **Install a Telnet Client** Once your Internet connection is up and running, the next step is installing a Telnet client. For the Amiga, DCTelnet is the ideal choice. Be sure to install it using the included installer; simply copying the program drawer can lead to issues with missing files or improper configuration. 3. **Find a BBS** Many classic BBSs are no longer active, but a new generation of Telnet- accessible BBSs has emerged. These modern BBSs often retain the nostalgic feel of the originals while offering updated content and features. To find active BBSs, check out resources like Telnet BBS Guide (www.telnetbbsguide.com) or ask on the major Amiga forums. 4. **Connect to a BBS** Once you have found a BBS, such as one from the Telnet BBS Guide, you can connect to it. In the past, you would have dialled a telephone number, but now, it's a URL, usually in this format: `strangeplanet.org:6800`. Using DCTelnet makes connecting very simple. Click on "Connect", and type in `strangeplanet.org,6800`. Note that the ":" is replaced with a ",". If you forget to use the "," DCTelnet will not be able to connect to the BBS. Final Thoughts Connecting to a BBS via Telnet is a fantastic way to relive the golden age of computing while exploring the vibrant Amiga BBS community. Or if you wish to visit other platform specific BBSs there is a whole new world of ANSI art and text-based gaming waiting to be explored. While Gemini can be seen as a modern equivalent of the "look" of BBSs, it does not offer the same immediate communication and community experience that a BBS does. So, best of luck with your Telnet journeys and see you out there in the BBS ether! A great place to start is ciaamiga.org:6400, an old-school BBS in the best way. It's hosted on an Amiga 1200/030 with 32MB of RAM and 8GB of disk space!TopArticles
CONTENTS ============================================================================= -= A R T I C L E S =-------------------------------------------------------- ----------------------------------------------------------------------------- -= DELL Monitors and 15 kHz - Part 1: Will it work? =- In part 1 Martyn Bampton looks at various DELL monitors that are meant to support 15 kHz. Find out what Martyn has discovered. -= The Amiga, you, us, the community =- Our resident Amiga philosopher has some thought provoking words about the community and the future of the Amiga. -= ChatGPT and Amiga: How Wrong Can It Get It? =- I set ChatGPT a task of helping me write an article about what hacks can be applied to Kickstart ROMs, find out how it turned out inside. -= Increase interest in your pixel art =- Roald Strauss dives into the world of pixel art and how we can create a standard format across all platforms. ----------------------------------------------------------------------------- #Articles - WhatIFF? Issue 4.16 - April 2025#TopDELL Monitors and 15 kHz - Part 1: Will it work?
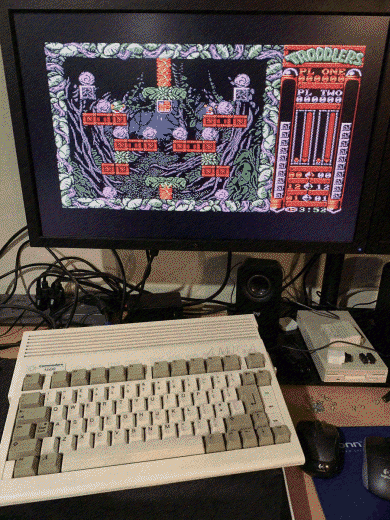
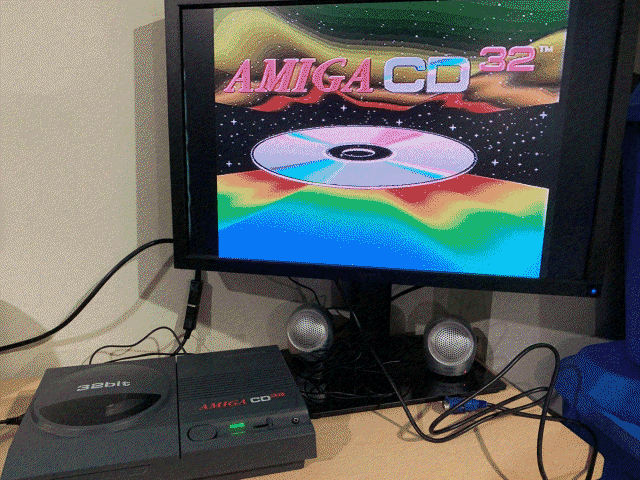
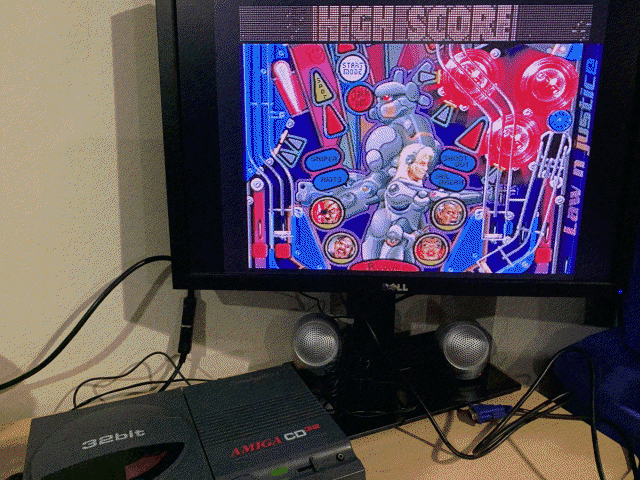
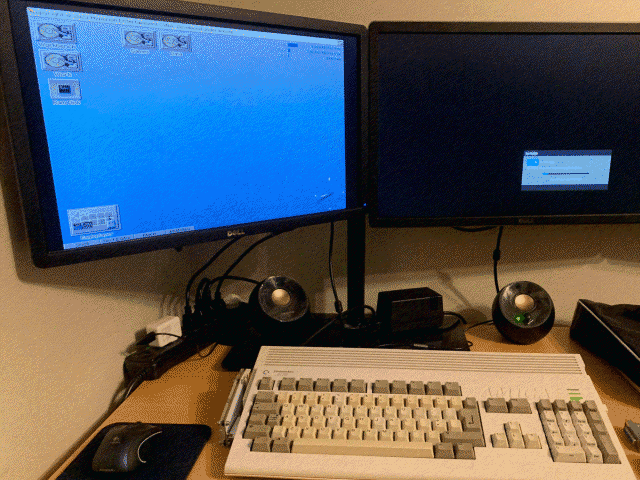
Articles ============================================================================= DELL Monitors and 15 kHz - Part 1: Will it work? - by: Martyn Bampton ============================================================================= In this two part article I thought it would be useful to share my experiences with some Dell monitors and their ability to display native Amiga 15 kHz video over VGA. I should say that this isn't a monitor review as such but an informal look at what works (Part 1) and how to make it better (Part 2). You're probably aware that "some" Dell LCD/LED monitors "may" display 15 kHz signals with several Websites detailing which do and which don't and lots of forum posts about it. Such monitors are fairly inexpensive with the cost of delivery being more expensive in some cases. You also have to consider the age of a monitor and any potential useful life it may have left as well as possible delivery damage. Disclaimers such as "worked last time I used it", "as-is", "no returns", "sold for parts and repair" don't instill confidence in the buyer. After doing my research and thinking about it for while - weighing up the pros and cons versus an expensive upscaler for each of my desks - I decided to chance the Dell 15 kHz option. The odds seemed good so I ordered a few Dell monitors reported to have 15 kHz support on these lists: * https://goldenchild2.blogspot.com/2023/04/amiga-500-ntsc-vga-15khz-monitor-list.html * https://15khz.miraheze.org/wiki/Main_Page * https://www.amiga.net.au/15KHz%20Monitors.html Monitors Tested (multiples of each) DELL 2410f 15 kHz VGA ImageDELL 2410f CD32 Composite Image 1
DELL 2410f CD32 Composite Image 2
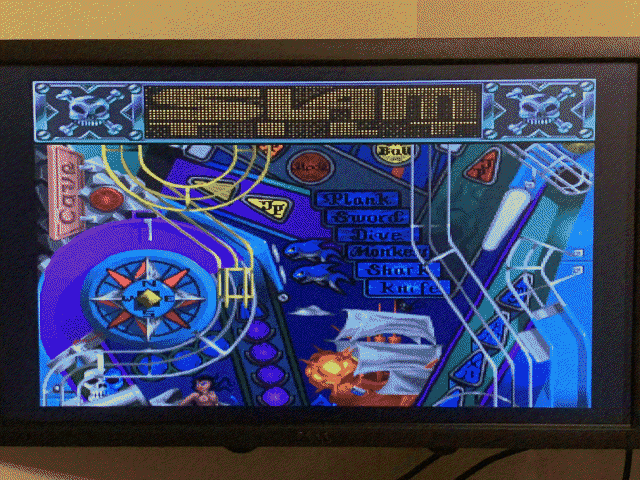
U2410f - No revision or date marked or so I thought, it's on a daft pull out tab, thanks for mentioning that Roy! Rev A02 (September 2010) and Rev A07 (August 2012) 24" display, reported to have the best support and it has a tonne of inputs, HDMI, DP, 2 x DVI, VGA, Component and Composite. It even has picture-in-picture! It's a very heavy monitor though, 6 Kg without the stand (which wasn't included)! Really, my monitor arm struggled with it. I tested two of these monitors, I assume they're of similar age from the same batch from the same seller. DELL U2212HMc A1200 15 kHz VGA
DELL U2212HMc A1200 31 kHz VGA
U2212HMc - Rev A03 (June 2012) A nice 22" monitor which is a little more modern looking and much, much lighter than the U2410f. It has DP, DVI and VGA inputs. Two monitors tested, both Rev A03 from the same seller. P2414Hb - Rev A00 (September 2013 and October 20213), Rev A01 (June 2014) The P2414Hb is another decently designed 24" monitor, sharing the design and inputs of the U2212HM. I also got two stands and they're very nice too, if overly... "Dell." 5 Monitors tested in this batch, 4 Rev A00 and 1 Rev A01 from two different sellers. Note: Revision versions are something to be aware of. Sometimes different revisions of the same product code may not support 15 kHz inputs so be aware of that. This was my main concern as many multiple listings won't guarantee the item (and therefore revision) you'll receive. It seems that Dell uses XXYY in these model numbers where XX is the size and YY is the year. Testing To test each monitor I used several RGB to VGA adapters - my original silver A4000 390682-01 adapter, a buffered adapter from AMIGAStore.eu and a very nice AMI-RGB2VGA Ultimate vertical line remover. This adapter has 3 DIP switches allowing you to filter out noise at various frequencies (9.5, 18, 36 and 72 MHz). I used a PAL Amiga 500 and tested each monitor in turn with each adapter, first just to the Kickstart screen and then loading Workbench 1.3 and a game (Troddlers) from floppy. I was cautiously optimistic leaving room for disappointment but I was very happy to find that every monitor I tested displayed 15 kHz! There was very little signal noise and the display filled most of the screen with little adjustment needed. I did see vertical lines when using the first two adapters so I was interested to see what it would look like through the AMI-RGB2VGA Ultimate. It was much reduced, really it made a big difference the lines were still there but much fainter. With some display setting tweaking you can reduce it further. I didn't notice any ghosting, blurring or lag in testing or in subsequent use across a variety of games. Of course everyone and every monitor is different and your gaming experience may vary. Since the U2410f has a composite input I tried it with a PAL CD32, again it worked without issues, obviously not as clear as VGA but fine for games. The next thing to try was 31 kHz modes in Workbench (AmigaOS 3.2) on a PAL A1200, specifically how each monitor copes with switching to and from 15 kHz for games. Again I had no issues with all the monitors displaying everything from the early boot menu, to games, to the higher resolution PAL and NTSC Workbench screenmodes. I should say that interlaced modes still flicker, there's no flicker fixing but they are displayed correctly. Of course you'll have to adjust your overscan preferences, monitor display settings and use a tool like MonSpecsMUI or MonEd (and some tricks) to get the best result. I'll go over this in more detail in Part 2 but the point here is the monitors work surprisingly well in my experience. You can have a rock solid display of around 700 by 500 pixels with AGA and an RGB to VGA adapter and switch to lower resolution 15 kHz games/apps and back easily which is amazing! Just like a multiscan CRT monitor. I was hoping the vertical lines in the 31 kHz modes would be reduced by the AMI-RGB2VGA Ultimate but the AGA chipset runs at a higher frequency producing higher frequency components. However, when launching a game you get the same 15 kHz benefits with reduced lines, Wing Commander looked brilliant with the AMI-RGB2VGA Ultimate! I'll cover this more in my AMI-RGB2VGA Ultimate review. Conclusion After a lot of testing I can say that the U2410f, U2212HMc and P2414Hb monitors I received all worked with 15 kHz native Amiga RGB video via simple 23 pin RGB to VGA adapters. In addition the U2410f worked with a CD32 (and a BBC Master 128) over composite. PAL and NTSC were both displayed and the picture quality is generally good with the some vertical lines present. A vertical line remover like the AMI-RGB2VGA Ultimate can improve things noticeably. While these monitors are used, may be dimmer, have blemishes or even fail, they are a solid option if you can find them at a good price. All of the monitors tested are over a decade old and past their prime. Brightness and general condition looks somewhat degraded and in most cases I didn't even get a stand. However they will work fine for my purposes and for those set ups without RGB2HDMI or an Indivision Flickerfixer. They're a cheaper option than many upscalers and much better than those cheap SCART to HDMI adapters. I'm glad I gave them a chance.
TopThe Amiga, you, us, the community
Articles ============================================================================= Amiga Community - by: Ivan Sorensen ============================================================================= The Amiga, you, us, the community In any hobby there is always conflict. Sometimes it is between different interpretations of what the hobby is always about. Maybe it is between different ages of users or between different sub-categories. Often it is about commercial interests versus hobbyists and sometimes it is simply because people like to argue. The Amiga is no different and I think all of you reading this has seen your share of debates, arguments and long standing feuds between individuals, groups and companies. One of the joys of a hobby like retro computing is that it is both a very communal hobby and a very solitary one. The communal aspect is both practical: If you want new software someone has to code it, if you want new hardware someone has to build it. It is also human: We like to talk about our shared interests, show off neat things we have and indulge in a bit of past history and nostalgia. If you are trying to make something work, it's helpful to have someone to ask. If you just beat Breathless, it's nice to have someone else tell you "good job". On the other hand, retro computing is also often a solitary experience: Whether you are a builder, a tinkerer, a musician or a gamer, odds are you do much of it alone. There is a zen to sitting and working with something that you not only do on your own, but the activity is not a common or shared one. You can disappear into your thoughts for a little and ignore the world. With the transition of this publication to a new editor, I thought it was a good time to perhaps give an encouragement to Amiga users and that is to be a user of the Amiga. Perhaps that sounds self evident but let me explain. The biggest danger of the Amiga scene is not the infighting or the companies or the tribes. It is apathy. It is games being developed without being played, hardware being tested for 2 minutes and then put away, systems that get booted once in a while to play a demo and then sit for months. For the Amiga scene to continue flourishing, it needs action. It needs people doing things. It needs to be a computer. Use your Amiga. Find something you have never done before. Transfer an activity to the Amiga. Complete a game series you always wanted to. If you buy a new piece of hardware, let people know how it worked not just for a benchmark but in consistent usage. If a game is released, give feedback to the creator and help track down bugs. All things eventually pass. The Amiga will too. But if I don't it is today.TopChatGPT and Amiga: How Wrong Can It Get It?
Articles ============================================================================= ChatGPT and Amiga: How Wrong Can It Get It? - by: Timo Paul ============================================================================= When I had an idea for a new article I thought it could prove to be interesting to ask ChatGPT for help, to see in a way how much of the heavy lifting it could or not do. The main idea of the article was to investigate some of options for patching a Kickstart ROM, aside from what some people might think of this as being unnecessary, this came about from my last article about patching a Kickstart ROM to make an NTSC Amiga boot into PAL by default, Excursions Into NTSC. Prior to this article I had not paid too much attention to what can be done to Kickstart, but my article kickstarted (sorry!), my interest into what is possible. From my limited knowledge, I knew about the PAL patch and the EIDE.device that can be added to allow users to boot from the onboard IDE on the TF1260, but what else is there? So, I went off to ChatGPT and typed "What ROM mods can be applied to Amiga Kickstart ROMS?" and it came up with theses answers. Apologies for the length of this, but since we are an Amiga- Guide magazine we can get away with this type article. So, without further ado let's get into it ... Question: What ROM mods can be applied to Amiga Kickstart ROMS? ChatGPT Answers: Amiga Kickstart ROMs can be modified or patched in various ways to enhance functionality, compatibility, or add features. Here are some common modifications (ROM mods) that can be applied to Amiga Kickstart ROMs: 1. Custom Boot Logos or Themes Modify the startup screen to include custom logos, colors, or text. Tools like LogoHack allow editing of the startup message or graphical elements. #Point 1: The first point that it mentions is a real patch or hack that can be done but the software LogpoHack does not exist, the real software is called at AmigaBootLogo => https://github.com/JensRestmeister/AmigaBootLogo We can discuss if this a usetool tool or not since many people use a hard disk nowadays but this is not in the scope of the article. 2. FastROM/FastKick Patches Enhance system performance by optimizing routines in the Kickstart ROM, reducing boot times, or improving memory access. #Point 2: Originally I thought ChatGPT was referring to adding EIDE.device for faster hard disk access. But as was pointed out on EAB it is referring to the moving of the ROM into Fast Memory via FastROM which does speed up Workbench actions. 3. WHDLoad Compatibility Patch Kickstart ROMs to improve compatibility with WHDLoad, which allows you to run old games and demos from hard drives. This may involve adding missing libraries or modifying existing components. #Point 3: Hmm, this definetly put up a red flag for me, the entire reason for WHDLoad is that it allows games to be booted up on all systems from the hard disk, it does not make sense to "improve" WHDLoad compatability from the Kickstart. 4. Workbench Enhancements Integrate more recent or custom versions of Workbench libraries and utilities, such as: SetPatch (for additional updates). Updated versions of exec.library, intuition.library, or other key system components. #Point 4: This time ChatGPT got it right, you are able to update the ROM with updated versions. 5. Kickstart 1.3 with 2.0+ Features Add features from later Kickstart versions (like 2.0 or 3.1) to older ROMs (e.g., 1.3), such as improved filesystem support or better memory management. #Point 5: In theory this is possible, as one user on EAB commented they have seen users have added the SCSI.device to 1.3 ROMs. 6. Add Filesystem Support Patch the ROM to include additional or updated filesystem drivers, such as support for FAT32, large partitions, or more efficient filesystems like PFS or SFS. #Point 6: Ahh, another red flag again, the file system is contained on the harddisk in the RigidDiskBlock (RDB) part. Think about when you update an Amiga harddisk to Professional File System for example, this data is being copied to the hard disk not the ROM. 7. Preloading Key Utilities Integrate commonly used tools, such as HDToolBox or early versions of network drivers, directly into the Kickstart ROM. #Point 7: Add useful tools to the ROM, hmmm this does not seem possible, just considering the space limitations of the ROM would make this this just another AI "Hallucination". 8. Bug Fixes Some Kickstart versions have known bugs. Community patches are available to fix these issues, especially for Kickstart 3.1 and earlier versions. #Point 8: Interesting this point, essentially what is it talking about is Kickstart 3.2 which as you all know is now at version 3.2.2. Almost there ChatGPT. 9. Decompressing or Compacting the ROM Use tools to decompress a Kickstart ROM to analyze or modify its content. Conversely, you can compact modified ROMs for use in hardware with limited storage. #Point 9: As far as I know the Kickstart is not compressed, double checking about this on EAB confirmed that. Definitely getting into the zone of "hallucinations" now! 10. AmigaOS 3.2+ Updates Official updates to Amiga Kickstart, like those introduced with AmigaOS 3.2 or 3.2.2, bring quality-of-life improvements, better hardware support, and bug fixes. Community mods may replicate or extend these features. #Point 10: This seems redundant as we already have updated ROMs with each new release of OS3.2. 11. Localization Integrate support for additional languages, like adding localized keyboard mappings or language-specific libraries. #Point 11: Pointless, the entire reason we have Locale if for this reason and it is a better solution since you can change and save your prefs, if this was kept in Kickstart you would be unable to save your settings. 12. Custom ROMs for Emulation Modify Kickstart ROMs for specific purposes in emulators like WinUAE or FS-UAE, such as enabling specific CPU or chipset configurations that aren't standard. #Point 12: This seems like a complete "hallucination" to me, enabling chipsets for example would be done via the UAE settings. Plus if, as we are, considering this in a real Amiga, you are stuck with the chipset you have. We have dived out of the real world and are firmly in the realm of AI "hallucinations". 13. Integration of 3rd-Party Libraries Directly include libraries like warp.library, mathffp.library, or mathieeedoubtrans.library to improve mathematical operations or other specialized functions. #Point 13: Now we are finally back in the realm of reality, this has been done, an example are the ROMs that have the EIDE.device added so people can boot from the faster TF1230/60 IDE port. However, it is rare to have libraries added to the ROM. Tools for ROM Editing: Remus: A tool for disassembling, editing, and reassembling Kickstart ROMs. Phoenix: Allows for more extensive customizations, including adding or removing modules. KickMaker: Helps to build custom ROMs for specific needs. UAE ROM Scanner: Useful for testing compatibility with modified ROMs. Remember to always work with legally obtained ROMs and respect copyright laws when modifying or distributing them. With recommended software, you do have to be careful with ChatGPT, it can for the most give you accurate/correct answers, however there are times where it starts to make up stuff. I did an Internet research to see if any of the software I was recommended exists, as the first software recommendation in point one was incorrect. Remus, is a real tool and still available for download. => https://www.doobreynet.co.uk/ Phoenix does not appear to exist according to my searches, however if I am wrong in this please contact the magazine so I can update this in the next issue. KickMaker also does not come up in my searches, so another "hallucination" but again if I am wrong please contact the magazine so this can be rectified in the next issue. WinUAE ROM Scanner, I am not sure what ChatGPT is trying to say here, from what I know you can set up WinUAE to scan for ROMs upon starting WinUAE but I do not use a PC and use FS-UAE on the Mac instead. If anyone knows more about this please contact the magazine. Final Thoughts It seems like AI has suddenly become a very large part of our lives, while it has existed in various forms via video games, content suggestion and internal application support, ChatGPT was the first time we got a form of AI that represents what we have seen and read in science fiction. While it is undeniable that AI is here and will is already helpful in our lives we still need to careful. Imagine someone doing a report on retro computers for school and chose the Amiga. They will have had no experience and most likely will choose ChatGPT. The information they will get will be incorrect but they will be unaware of having received incorrect data. As we put more content onto the net, content that has been created with AIs that get their information from the Internet, we will create a sort of feedback loop where AI will be creating answers and content based on the content that was created by it in the first place and then posted to the Internet. In a way you could say that AI will start eating itself, a terrifying though for the future. While I do not paint a rosy picture of the future with AI, I still do believe in its potential. I use ChatGPT to support my lessons, though I always have to double check the spelling and sentence structure when it creates some text for me. In my case I deal with learners who have dyslexia and often need to create sentences or game ideas and when I am overburdened ChatGPT has been helpful but it also has given incorrect spellings and sentences that lack nuance and meaning. For me ChatGPT is a good way to get new ideas but it is something that I do not trust and always have to double check its output.TopIncrease interest in your pixel art
Articles ============================================================================= Increase interest in your pixel art - by: Roald Strauss ============================================================================= I'm a big fan of multiplatform releases. I like how WhatIFF? Magazine can be experienced on both Amiga and modern phones, tablets, and computers online via https://www.taws.ch. I also like that it now includes an option of playing background music while reading, as well as a "Dark Mode" option, thus offering multiple variants of the magazine. By being available on multiple platforms while offering such preference options, it becomes interesting to a bigger group of readers. Similarly, I also find it cool when game-developers create their games for multiple platforms. It is for this reason that I, as a musician, enjoy making multiple filetype versions of my tracks, so they can be used by gamedevs targeting different platforms. I wrote an article about this back in WhatIFF? Magazine issue 2.11 called "Custom Music vs Stock Music". Instead of just creating an MP3 file, I also export and convert to as many other formats as possible, such as XM, MOD, MIDI, SNESMOD etc. I even offer some of these filetype versions in different qualities / filesizes. The MOD version, for example, is often offered in both a high quality 14-bit version, as well as a medium and low quality 8-bit version, thus logically matching different limitations and constraints of various platforms. Here over a year later, I'd like to revisit this topic; "multiple versions of your art", but this time focusing on another art form: Pixel graphics. Looking back, I have to acknowledge that the only reason I've been selling the amount of licenses I have for my music, is exactly because my tracks have been available in multiple filetype versions. I can especially thank one particular variant of these "exotic" filetypes. The Amiga Protracker MOD format is without a doubt the filetype I'm getting the most requests for. Not from Amiga developers though. It's mostly been from Atari Jaguar developers. But that is besides the point. The point is that it has paid off for me (and the gamedevs too of course) to create and offer different filetype versions of my tracks. So what does this have to do with graphics? Well, in short: If this approach works for music, then it should logically also work for graphics, don't you think? Perhaps even more so, since the demand for pixel art seems to be much higher than the demand for music. At least that's the impression I'm getting when browsing the various gamedev related Discord servers and forums here and there. The amount of requests for pixel graphics and artists seem to outnumber the requests for music and musicians at least 10 to 1. When hanging out on these creative sites, I often see graphics artists (as well as musicians) scouting for a team too hook up with, and/or a game project to become a part of. But I rarely see anyone actually hooking up, despite them being rather persistent about it. Finding a good match isn't something you just do. And that's one of the reasons why I instead prefer to just do my music when I want how I want. Then the right gamedevs can find my tracks on IndieGameMusic.com and request a license. Overall less time demanding for all, cheaper for the gamedev and less frustrating for me. I'm thinking there must be pixel artists out there who'd like that too? Instead of wasting time searching for customers, just spend the time doing whatever art you feel like doing, whenever you feel like being creative, in whatever style that intrigues you at the time. Then convert to multiple palette versions to increase the number of potential customers. Put all versions on display online and wait for the right gamedev to find you. I see a lot of pixel artists posting examples of their work here and there already. Quite often rather impressive huge tile sheets, which they've clearly put a lot of work and time into. And it's usually done with a rather limited palette; only a few colours used, just like pixel graphics should be. Unfortunately, the colours used are often picked from a 24-bit palette, and most of the classic platforms can't display that many colours, which means that the graphics simply aren't compatible with these classic platforms. And I think that's a shame, because the developers on these classic platforms are obvious potential customers for pixel graphics. It is after all where pixel graphics originated from. And all of those graphics could be made compatible with a lot of these classic platforms with very little effort. And we're not just talking about a handful of more potential customers. Almost all of the classic platforms has had active communities for decades. And quite a lot of games are still being released for all of them too, because of annual gamejams taking place in each community nowadays. So supporting these classic platforms should logically result in a noticeable increase in potential customers for your pixel art. This will of course mean that your customers might not come from the platform you imagined. But does that matter? Personally, I'm happy as long as my tracks get used in a game on any platform. I really don't care what platform it is, do you? Developer's motivation I recently created a post on a retro game developer forum, asking the developers what made them keep the motivation to develop games for the classic platforms. The replies can be summarised into 12 statements: 1. Having tools to speed up the boring parts of the development 2. Being able to create releases for multiple target platforms with relative ease 3. Receiving a cup of coffee, or some other token of appreciation every now and then; a sale or donation or even just positive feedback for a game they created 4. Being able to continue the work on the game quickly whenever there's a little free time available 5. Having fast'n'easy access to stock assets like music and graphics, and/or be in contact with artists who will and can deliver assets 6. Having fast'n'easy access to look-up knowledge databases, and/or be in contact with other people who can help out 7. Being challenged technically and creatively (just enough to still be able to solve everything) 8. Achieving technical results that people didn't think was possible / haven't seen before on the particular platform 9. Being allowed to do things his own way, without being told to do things differently. This goes for both the developer, musician and artist 10. Finding a project where (almost) all parts are interesting 11. Avoiding pressure from people who are impatient for the project to be completed: Don't announce the project before it's (almost) complete 12. Preventing piracy of the finished project Number 5 was particularly interesting. It essentially tells us that we as artists can in fact motivate developers to make more retro games, simply by creating and offering stock assets to them. Your graphics might even be the very thing that inspires them to get started on a project! In other words, you can potentially create your own customers simply by being creative and offering the world your creations. And by making different versions of your graphics, it'll increase chances of matching a game project. Most pixel artists are already halfway there: You've already limited the number of colours used. So all you need to do now is to replace those colours with colours that are actually available on each platform. The only question is: How much are you willing to change your original graphics? That's often a matter of pride. Personally, I'm okay with a lower quality version of my music existing, as long as there also exists a higher quality version. Which classic platforms can we expand to? A few of the classic platforms do actually offer a 24-bit palette. For example; Atari Jaguar, Nintendo 3DS, Amiga AGA, Sega Dreamcast, and Sega Saturn. And let's just throw in the Nintendo 64 as well, even though it technically only displays a 21-bit palette. So your graphics are already usable on those platforms, without making any changes to them. Posterising your 24-bit graphics down to a lower level, so it becomes compatible with older devices, won't present a huge difference at first either. At 18-bit (262,144 possible colours) you can add the Nintendo DS and VGA/SVGA platforms to the list, and it's doubtful you'll be able to see any significant difference in your graphics, despite going from a palette of 16.8 million possible colours to "only" 262,144 possible colours. At 16-bit (65,536 possible colours) you can include the Sharp X68000. And going further down to 15-bit (32,768 possible colours), you can add the Super Nintendo, Gameboy Color, Sega 32X, and MSX2+ developers to the list of potential customers. Keep in mind that even though the platforms are capable of displaying all of these colours, there's also a limitation on how many distinct colours they can show on the screen at the same time. So far this number has been above 255, except for the Gameboy Color, which can only show 56 simultaneous colours on the screen. At 12-bit (4,096 possible colours) we find the Atari STE, Amiga OCS, Apple IIGS, Game Gear and Amstrad Plus. The number of simultaneous colours is now down to just 16 and 32. At this level, you should also note that the Amstrad Plus only has a resolution of 160x200 pixels - and each pixel is double as wide as the height (2:1 ratio). However, it also offers 16 hardware sprites at 16x16 pixels in a 1:1 ratio with its own 16-colour 12-bit palette. So at this level, the conversions begin to be a bit more complex. Then we reach the 9-bit group (512 possible colours), which consists of Atari ST (16 simultaneous), Sega Genesis / MegaDrive (61 simultaneous), MSX2 (256 simultaneous), and TurboGraphX-16 (482 simultaneous). At 8-bit (256 possible colours) we find the Enterprise (16 simultaneous colours), and at 6-bit (64 possible colours) there is the Sega Master System, which can show 31 simultaneous colours, and EGA platforms which can show 16 simultaneous colours. Can we go lower? Yes, we can! The Amstrad CPC has a palette of just 27 colours, of which it can show 16 simultaneous colours in a resolution of 160x200 pixels in a 2:1 ratio. The Commodore 64, with 16 colours, can show all 16 at the same time in the same resolution as the Amstrad CPC. Though it has some other restrictions regarding the number of simultaneous colours in each 8x8 pixels. The Commodore 64 also offers hardware sprites of 24x21 pixels single colour, or 12x21 pixels 2:1 ratio 3-colour sprites, of which 2 colours must be shared across all sprites. And the Nintendo Entertainment System, with a palette of 54 colours, can show 25 at the same time. As you can see, the further down the list we go, the more limited and complex things become. So it's up to you to decide how much effort you want to put into it, and pick the platforms you want to make your graphics compatible with. The lower you go, the more platforms you'll cover, but the conversion will also become more complex, and your graphics will look increasingly different from the original. (Unless, of course, it was designed with one of these small palettes from the start). A few helpful tools There are many conversion tools you can use for this kind of work. I'm not going to make a huge list. Just mentioning a few: At https://www.8bitworkshop.com there's an online tool called Dithertron, which will convert an image to various classic platforms. GrafX2 is another tool that many pixel artists use to create or convert graphics when targeting these classic platforms. ConvImgCPC is a converter specifically for converting images to the Amstrad CPC and Amstrad Plus. You can also download palettes for the various older platforms, install them in GiMP, and then convert images to each palette by indexing your high-res pictures while applying dither. Where's the gold? So the next question is, of course: "Which platforms are worth the effort?", probably thinking it must be the ones that have the most active homebrew scene. Logically, whichever platforms have the most annual game releases must be the ones worth targeting, in order to get a higher chance of a sale, right? Well yes, but that's not my own personal experience. It also depends on how many other eager artists the platform already has, and whether your style happens to match an ongoing game project on that platform. But let's just list a few stats for 2024 anyway. Number of game releases per platform in 2024: Platform | # | Source ---------------------+-----+---------------------- Amiga | 38 | lemonamiga.com Amstrad CPC/Plus | 60 | cpc-power.com Atari ST/TT/Falcon | 23 | Commodore 64 | 121 | lemon64.com DOS | 30 | DOS (CGA/EGA) MSX | 250 | msxgamesworld.com Sega Master | 32 | smspower.org A brief look at that short list would suggest that MSX is "the" platform to target, since it had 250 game releases in 2024. But: The developers I am personally getting the most requests from, come from a platform with only a few annual game releases. So your customers won't necessarily come from the most active platforms. They may come from whatever platform you decide to support, by creating a version of your artwork that's compatible with that particular platform. We never know where a potential match resides. A few examples Curious to see how much effort it would take to do such graphics conversions, I did a couple of tests myself: I tried converting 2 images and a spritesheet. (Spritesheet taken from https://www.ukkosjourney.com). The results can be found in the Coverdisk folder of this issue, and one of the examples can also be seen at https://imgur.com/a/Vn6XGPF (My apologies to the sensitive people for using an AI-generated image for one of the examples. It was my very first (and probably also last) time ever using an AI-generator. I'm no artist myself, and I needed an image I could use for the experiment, so...) Conclusion: It really didn't take much effort to do the conversions. In fact, it was so easy to do that I'm having difficulties understanding why we aren't seeing pixel artists doing this more. Real artists would of course want to polish the results to make them even better, but it's still my impression that the whole thing is a rather effortless process. The vision I imagine with the examples I created, is that the developer must add the title of the game, as well as credits info, and then use the image either as a loading/splash screen or a title screen for his game. Offer an attractive license model Your artwork is now targeting all the gamedevs on a wide range of classic platforms. Including a bonus group of gamedevs: The ones who are interested in creating their game for multiple platforms. Especially if one license covers all palette versions. That's what I do with my music: Developers who buy a non-exclusive resale license for the MOD version of my track, are also allowed to use the high-quality WAV version for marketing videos, or use the WAV file to create an audio CD with the game's soundtrack, to include with the physical edition of the game. And if the developer wants to create and release the game for both Amiga + Super Nintendo + Nintendo 64 + MS-DOS, then he's free to use the MOD and SPC and XM and MIDI version of my track with a single license. For me, a non-exclusive resale license covers a game title regardless of how many platforms and filetypes. (It's another thing with the platform exclusive license though. That one has to be paid per platform - if the developer wants exclusivity that is). It's good to offer options. So you can do that too: Grant a single license permission to use all palette versions of the graphics for the project, no matter how many platforms the game is released for. This will make your assets more attractive. Even if the game developer ends up only making a single version of the game, the fact that all the graphics (and music) is available for multiple platforms might be the very thing that makes the developer choose your assets instead of other offers. Offer 24-bit high resolution posters And that brings me to another thing the graphics artist can do to become even more attractive: Create your title/splash screens in 24-bit high resolution, and then scale down for the low resolution platforms. Because that way you'll be able to offer the retro developer a high-quality poster for his game, which he can choose to include as a large printed physical version in a physical edition of his game. Some of these retro gamedevs quite enjoy making physical editions of their games, and include all sorts of accessories with it. It's all part of the fun for them. So by offering this option from the start, it will make your assets pack even more attractive. Consider even more palette versions This article has focused on how to target more platforms with your pixel graphics, by adjusting the palette to become compatible with the classic platforms. But there is also another way you can increase the interest in your pixelart with multiple palette versions: By making different lighting variants of your graphics. If you created a spritesheet with daytime lighting, then also create a variant with nighttime lighting. That way it'll become attractive to two gamedevs with different settings in mind - and/or those who wish to have both settings available in the same game. Wrapping up Since you're still reading this, I assume you're beginning to see the potential advantage in offering multiple versions of your pixelart. So the only thing we have left to figure out now is: Where do you display your artwork in all of these different palette versions? And that is indeed a good question. Because I sadly don't know of any site that offers such a detailed indexation of artwork. And I don't expect anyone will ever be making such a site either. (Never say never of course). The only reason musicians like myself have a site like https://www.indiegamemusic.com that offers such a detailed indexation and advanced search options for music, is because it was made by some geeky nut with a big passion for it. (Yours truly). So I don't really see any other options for you than to keep using the sites you're already using, and simply start adding names and search tags of compatible platforms to your entries, so that they have a chance of being found by gamedevs on those platforms. If there happen to be another geeky nut out there with a large amount of passion for stock graphics in many forms, he/she has my full support and encouragement to start creating IndieGameGraphics.com :-) Good luck with all your projects in the future!TopWelcome to voices of the people behind Amiga hardware and software.
CONTENTS ============================================================================= -= T A L K I N G * A M I G A =---------------------------------------------- ----------------------------------------------------------------------------- -= Paul Vince: Amiga Game Selector (AGS) =- Amiga Game Selector (AGS) creator Paul Vince sits down with WhatIFF? to discuss the development and future of AGS. -= Rob Cranley: SOLAS Board=- We talk to the mind behind the SOLAS board, how it came to be and what it can offer to Amiga users. -= Timothy Deters: FinalWriter Update =- With the latest update to FinalWriter out in the wild we have a quick chat to the man behind the latest updates. ----------------------------------------------------------------------------- #Talking Amiga - WhatIFF? Issue 4.16 - April 2025#TopRob Cranley Interview
Talkingamiga ============================================================================= Interview: Rob Cranley - SOLAS Board by Timo Paul ============================================================================= 1. Hello Rob, thank you for agreeing to this interview, to start with can you tell us about yourself? My pleasure! I'm Rob, originally from Ireland but currently living in Scotland. I'm an engineer with a background in automation and control systems, and I work developing medical devices. My previous job involved some robotics and automation work, so a bit of hardware, software and firmware development, but my current job is more towards the materials engineering side of things. My Amiga hobby helps keep that coding and electronics part of my brain going. I was always interested in electronics and coding, and started out both at an early age, first on my school's BBC Micro and then on my own Atari 800XL. Experiments as a 12-year-old building DIY add-ons for the poor Atari didn't end well, and it ended up damaged. As a result, I ended up getting an Amiga as a replacement, and have been using them ever since. (You'll be glad to know that I recently rescued that old Atari from my parents' attic and repaired it, and it's now fully working!) 2. You created the SOLAS board, can you explain what it is and does? Solas (Irish for light) is a small board that's intended to fit on the Amiga 1200 clockport. The primary function is to give the Amiga the ability to control RGB LEDs, similar to those commonly found in modern gaming PCs. It uses standard connectors commonly used on PC motherboards (often called ARGB, 5VDG or other names) and communicates with the LEDs using the same protocol, so standard PC LED strips, fans and so on can be controlled. The controller on Solas will display the LED patterns autonomously; software on the Amiga side is only required to change the settings (e.g. the pattern, colour and speed of the LEDs), or to access some of the extra functions it has to offer. Through the magic of feature-creep, Solas ended up with many other features too. It has inputs for temperature sensors, a fan speed controller, a clockport splitter, an audio input (so that Solas can make the LEDs react to audio), and an i2c port which lets you attach various small devices such as LCD screens, environmental sensors and more. The LCD can be used to display the readings from the temperature sensors, as well as messages sent from the Amiga. On the software side, there's a main control program that lets you adjust the settings, as well as a commodity for reporting the temperatures and controlling the fan speed, and an ARexx host to allow the use of ARexx to control Solas. The software is mostly finished and usable, but there are still tweaks happening and so there might be more features added in the future... 3. You have gone through several iterations of the board, how different is the current version from the first release? Well, it depends on how you look at it. In basic terms, the major functions are all the same, but the first couple of versions were essentially prototypes. The first version even uses a different controller chip! But most of the changes beyond that are small - things like adjusting the shape to accommodate some Indivision boards, switching to a 4-layer PCB and fixes for edge cases that were discovered by various beta testers. There were bus issues that only showed up with certain accelerators, for example, and were due to a combination of shortcuts taken by some accelerator makers and incorrect assumptions on my part. In total there have been 7 versions of the PCB, and I'm hoping I have all the major hardware issues sorted by now. 4. The SOLAS is quite a unique product what gave you the idea to create it? Solas started out as a very simple project. One of my friends in the Scottish Amiga user group asked me if I could add a 5V power connection inside his A1200 to connect to a Bifrost to enable the high brightness modes, and also to allow him to connect some other LEDs internally. No problem, I said. But it was during the Covid lockdown so I had a bit of time on my hands, and very quickly the project changed from being a small cable adaptor for the floppy drive power connector to a PCB. Once it reached that point, I thought about having the Amiga control the LEDs, and for that, connecting it to the clockport made sense. I've always enjoyed programming PIC chips, and so I chose one that suited connecting to the clockport. Once I had that chip, I realized there were many pins left unconnected, and started thinking about what else I could use them for. Temperature sensors were an obvious one, as was the audio sampling, and I kept adding more functions until I had used up most of the pins. Because the board had some 5V and 12V power pins exposed, there was a risk of short circuits causing some serious damage inside the Amiga. To reduce this risk, I decided it would be best to have the board mounted directly on the A1200 motherboard. That way it had a "proper" location and wouldn't need some other method of securing it inside the Amiga case. But since there are lots of other devices out there that also connect to the clockport, I felt it was a good idea to integrate a clockport splitter on the board as well, something I first built in the '00s to allow me to run a Catweasel and a HyperCOM 3 card at the same time. 5. Were you confident in there being a market for it? To be honest, I didn't really think about it that much. RGB lighting isn't really something I'm big into myself - I don't mind it, but it doesn't bother me either way. The main plan was to just build a few, mainly for the original friend who wanted the LEDs and other local Amiga users who liked it. But most of the people who saw the prototype working did say that there would be a lot of interest in it, and so there is! 6. What difficulties did you encounter during development, if any? Well, I already touched on one of the issues regarding certain accelerators and bus timing, but there were lots of other little bumps along the development road. Another issue arose when trying to control the LEDs themselves. The PIC chip chosen for the board is reasonably powerful and runs at 32MHz, but normal C code was too slow to reliably communicate with the LEDs, which use a very tightly timed bitstream to set the RGB values of each LED in turn. I eventually solved it by using assembly for the timing- criticalLED refresh routines, and it's been fine ever since. This timing does mean the LED refreshes always get the highest priority, and other communication has to be paused briefly, which meant the communication with the host Amiga over the clockport had to be carefully managed. 7. Since the release of the A1200.net translucent cases have you seen an increase in interest? Yes, I think so! There has been a steady stream of interest since I started showing Solas to the world, but I really noticed it at the Kickstart show in the UK. There were a number of people with the new coloured "Asahi" cases there, and they were all asking me about getting one. Unfortunately I didn't have the boards available at the time, but I think most of them have one now. 8. Was it necessary to modify the boards in any way to fit the newer cases? No, Solas is mainly designed to fit directly on the motherboard and doesn't really interact with the case itself, so no adjustments were necessary. But since it was released I've had quite a few people ask me about versions for different cases, like Checkmate cases and big box Amigas... 9. Currently the SOLAS is only available for the A1200, do you have plans to make versions for the A500, A600, or even big box Amigas? I didn't initially, because it was so tied to being physically mounted on the A1200 clockport. But so many people asked me about it that I modified some of the beta boards to be used with a clockport cable instead. Electronically, there's no difference, but connecting with a cable means it can be mounted anywhere and connected to any clockport, including the various adaptors available for the A500 and A600, and the clockports commonly found on Zorro cards. Some software changes were required, but Solas works with all of these extra clockports that have been tested. Mounting the board is a key consideration for such setups however, because of the danger of shorting out the power rails to other parts or the case, and there are so many different possibilities that it's impossible to suit every situation. There are mounting holes in the PCB though that can be used to mount it on suitable spacers or similar. Recently though, a guy going by the handle of Kavanoz has created an ISA card specifically for mounting Solas. It fits in the mostly unused ISA slots that are present in many big- box Amigas, and provides a safe way of mounting Solas. A clockport connection is still required using a cable to a nearby Zorro card, but power is provided through the ISA slot. A small modification to Solas is needed for this to work (moving some connector pins to the rear of the board, but nothing too complicated. 10. Do you have plans for additional features? Yes and no. The hardware is more or less feature complete, but there are a few things on the to-do list on the software and firmware side. One big thing is to start using interrupts for communication with the Amiga. This will mean data transfers can be faster and more reliable, but the current system works well enough for most uses so it's a long-term goal. I also want to add support for more i2c devices, and ideally develop a driver library for it that's compatible with the de facto standard i2c.library API that's used for some other i2c implementations on the Amiga. This would allow compatibility with any devices supported on those other controllers. But a particular i2c module I'm hoping to add support for is one to measure voltages and power consumption internally, so the PSU output can be monitored through software on the Amiga side. Other long-term goals on the software side include creating a standard API for RGB lighting, and another for temperature sensors, thus opening the door for anyone to write software that supports sensors on new accelerators, other clockport temperature modules, i2c sensors and so on. All I need is time ;) Or someone who can write library code to volunteer for the job. 11. Have you ever been surprised at how people have been used the SOLAS? I think most people use it for the main features, but there are a few surprising uses I've heard of out there. One of the early adopters wasn't interested in the LEDs at all, and only used it for monitoring temperatures and controlling a fan. There's another user who has two Solas boards in his A1200 tower, I think one is daisy-chained off the clockports of the other. There are lots of RGB fans and LED strips in that machine! And, possibly my favourite, but one of the Scottish Amiga users added an external LED connector to the case of his Amiga and spread a long length of LEDs across his room! 12. Beyond the SOLAS do you have other hardware projects planned? I always have so many projects (hardware and software) in my mind, but never have enough time to get to them all. But there are two projects that I currently have at early prototype stage. One is a pair of wireless modules that allow you to use classic Amiga peripherals wirelessly. There are adaptors that let you use wireless USB keyboards, mice and controllers, but this project (which I've tentatively called "AirJoy") lets you use your old Zipsticks, CD32 pads, tank mice and original Amiga keyboards by plugging them into a battery-powered sender module, and plugging a receiver module into the relevant ports on the Amiga. I have prototype modules built, and they generally work quite well, with minimal lag and around an 8-hour battery life using a mobile phone-style battery and USB-C charging. The other project I have in the early stages is a board that adds an Amiga-style clockport to the Atari 800XL, allowing it to use Solas and lots of other clockport hardware. It connects to the PBI bus, and could probably be adapted to work with the 1090XL busboard project, as well as the XE- series machines. 13. If people wish to purchase a board how can they get in contact with you? I'm currently doing a slow roll-out of the first batch of manufactured boards. In the future they might be available through various Amiga distributors, but for now I'm handling the kitting and shipping myself. I've recently cleared my waiting list though, so I'm happy to take requests from people for boards. I've just put together a webpage that details the various options available. People can submit their request there and I'll get back to them to finalise the order. The address is https://robthenerd.com/getsolas/solasconfig.php and the Solas project page can be found at https://robthenerd.com/solas 14. Thank you for your time Rob, before we finish do you have any final words? Having seen the Amiga fade away from use, it's amazing to see the huge resurgence of interest in the system as a part of the overall wave of interest in retro computing, and the explosion of activity in the Amiga community is nothing short of incredible. Twenty years ago, Amigas were getting thrown in the bin, and nobody would have thought there would be such a vast array of new hardware, games, software, user groups and publications (both digital and printed). It's a great time to be an Amiga fan! Thank you for the questions, and keep up the great work with WhatIFF.TopPaul Vince Interview
Talkingamiga ============================================================================= Interview: Paul Vince - Amiga Game Selector (AGS) by Timo Paul ============================================================================= 1. Hello Paul, thank you for taking the time for this interview, to start with can you tell us a bit about youself? Well I'm a pretty un-interesting 54 year old from Slough in England. If you don't know anything about Slough, it has a Mars Bar factory, the UK version of the Office TV series was based here and it's about 3 miles from Windsor, where the King lives. Me, I am a bit of a techy kind of guy. I've had computers since the 70's and my life outside work pretty much of revolves around them. 2. How did you get started with the Amiga? I started on the Sinclair ZX81, then a TI99/4a and then a couple of ZX Spectrums; the 48k+ and the 128k toastrack. What drew me to the Amiga was mostly games. I used to read the Spectrum magazines and see the adverts with the Amiga and ST graphics in them and I just had to have one. I chose the Amiga as it had better graphics and there was a good deal going at Silica Systems on the A500. I got my A500 in 1988 with my first pay check from my first job. I got the ten star game pack, F/A18 Interceptor, Carrier Command and a 512kb RAM expansion. I'm sure it came to about ?600. This got me hooked. I quickly expanded the system with an A590 hard disk and started programming, doing art and making music. I would never say that I was great, but I was OK. In 1992 I got my A1200 from Diamond Computer Systems where I was working at the time. I still have this A1200 and it still works great. The A1200 took me to the next level with large hard disks, loads of RAM and AGA graphics. I got quite good at AMOS programming and made a few utilities and game concepts but never went much further as a few year later I built my first PC and the Amiga was mothballed. 3. You are the creator of the Amiga Game Selector, for those who do not know about it, can you explain what it is and what it does? Amiga Game Selector (AGS) is a Workbench distribution and game launcher for the Commodore Amiga. It has the complete collection of WHDLoad games and demos from Retroplay's collection which are accessed by a comprehensive and well organised set of menus. The launcher is pretty much all inclusive and the user can run all the included games and demos as well as the documentation, game database, emulators, docs disks, help files the complete collection of WhatIFF? guides without having to load Workbench. The game launcher that I use is Arcade Game Selector 2 by Magervalp which is a really flexible launcher that can use any Amiga screen mode and uses scripts to run everything from the menus. This allows for a lot of customisation of the launcher screen and also a lot of options for running software. The Workbench side has a quite extensive collection of Amiga software and media files and uses standard Workbench 3.1. I decided early on to give the user an idea of what the Amiga can do, but to be a base systems that allows them to add their own stuff as well. 4. When did you first start work on the AGS? My first project on the Amiga was a WHDLoad database and collection of screen shots and cover art. To make this I wrote a program that manages the process. This is written in Purebasic, which is a direct descendant from Blitz Basic. I started this project just after lockdown 2020 when I got my old A1200 out of storage. I'd been out of the Amiga scene for 20 years and concepts like WHDLoad were completely new to me. My database project morphed into a PC based WHDLoad launcher that uses Win UAE.I was already quite familiar with WinUAE having written one of the first online tutorials for it in 2001. Whilst making this WHDLoad collection, I started to play with Arcade Game Selector 2 and wrote some code that created a set of launch scripts for my WHDLoad games. This sat on my PC until the A500 mini came out. I got my A500 mini on day one and me being me, I started to prod around the emulator and how it ran. Jimmy Johansson was doing the same thing with Aminimiga at the time and between us we managed to get the mini running workbench and other games. That's when I got the idea to port my AGS2 scripts and run them on the mini. 5. What was the inspiration behind AGS? AGS is completely fueled by my OCD and completionist attitude. I wasn't happy with the clunky A500 mini carousel and wanted to get a complete collection of games and demos on it that could be easily run. Having the WHDLoad images and database and quite a good idea on how to adapt the AGS2 scripts meant that I had a working concept in a few weeks. 6. How long did it take to develop and did you develop it on the Amiga or PC/Mac? The A500 mini came out in 8th April 2022. I started AGS a week later and the first A500 Mini Game Selector came out on 29th April 2022. So about two weeks in total. If you include the database development, I started that in lockdown June 2020 so just under two years for everything. All AGS development is done on Windows or in AGS itself. I use my own database manager to generate the scripts and images for the launcher. It also updates the whdload hdf file for the games and demos. I use Paint.net for the graphics, notepad ++ for text and I wrote my own graphics converter to change the png base images to iff. On the Amiga side I use mostly Deluxe Paint to remap the images for the AGS themes and tweak other graphics and of course Directory Opus for file management. Everything I use on the Amiga side to make AGS is included with the release versions of AGS. 7. What were some of the difficulties that you encountered during development? Dealing with a 30 year old operating system is not easy. Things have moved on since 1992 and trying to make AGS work on all kickstarts and loads of different hardware specs has been a challenge. One of the great advancements is the larger storage devices which takes away a lot of the challenges of trying to fit everything in. 8. How has it changed/improved since you first started on the project? AGS has grown and improved in every version. The initial release was just a plain launcher that ran the whdload slave with no speed regulation. This changed to running the icon files which added over 200 utility and data disks (No other collection does this!). There's also now over 250 official launcher themes and another 300 third party ones. Because AGS didn't access the included database on the A500 mini, it didn't know to speed up or slow down the games that it ran. This meant that I had to test 4500 games and demos to manually set the speed of any software that was problematic. The scripts have also become a lot more optimised and are designed to be cross platform. This means that I can use the same install on a real A1200 as well as in WinUAE. I'm still finding better ways of doing things and making the scripts easier to manage. Also the facebook group members are great with suggestions. Things like the favourites system and expert mode were all suggestions from the group. I just have to spend a few days thinking about the solution and 99 times out of a 100 I find one. 9. Are there any additions or changes that you still wish to do? In terms of the launcher, I'd like to make an RTG big screen version for running on big TV's. There's also loads of extra media and content that I'd like to add. I also have a list of hundreds of new themes that I'll do as well. I'd also like to include a collection of proper CD32 games. 10. AGS has been released for the A500 Mini, Raspberry Pi models, UAE, real hardware and PiStorm, do you have other platforms that you hope to release AGS on, such as on consoles? The Retroarch version of AGS already runs on consoles that support files over 4gb. At the moment, I have it running on my Android phone, a Retroid Pocket 2s and my Steamdeck. I do want to make a FAT32 compatible version for handhelds like the PSP or Switch. AGS also runs on Mister as well. I have three targets in terms of Amiga operating systems. Workbench 1.3 (using JOTD's JST launcher, CD32 with themed launchers and a standalone bootable image for running on PC's without having to load Windows. 11. There are a number of similar products to AGS, what do you think differs AGS over the others? Oh, there's loads! The launcher is the biggest thing. MegaAGS/AmigaVision is probably the closest system to AGS but lacks the layout, system regulation, custom themes, docs, emulators, extra games and more. Chris Edwards who makes PiMiga, has made it possible to run the AGS launcher in his distribution as it's so good. The WHDLoad collection in AGS is complete. I haven't removed anything so you get all the foreign languages, all the different memory requirements, all the different chipset requirements and all the different supported systems. Besides Retroplay's collection, AGS also includes over 500 extra games and demos including PD Games, Educational Games, RTG Games and a set of PC conversions like Doom and Quake (obvously I don't include the data files!). There's a selection of emulators as well. You can run over 600 C64 games and 350 ZX Spectrum games direct from the launcher. In terms of the Workbench side, AGS isn't as mature as say AmiKit or PiMiga. They are designed as complete solutions. AGS is designed as a base that you can expand on. It does better with the included content like the 11,000 sound samples and the 36,000 mods but it only includes basic Internet access and doesn't have as much software on it in comparison. To be honest though, Amikit and PiMiga have been in development far longer than AGS, so they will obviously be better set up. 12. Where can users find the software and are there tutorials on installation available? Amiga Game Selector is available from www.amigagameselector.co.uk. There is extensive documentation included on how to install AGS. I've tried to make it as simple as possible. Most installation involve burning an image file or copying some files. After that everything is plug and play. There is an official installation youtube video here. https://www.youtube.com/watch?v=mtW6tHOLvN0&ab_channel=EasyEmu There are also dozens of videos made by my facebook group members that cover installation and the basics of the launcher. You can also buy ready made cards/sticks from www.retro32.com who are one of the AGS sponsors. 13. Thank you for your time and replies, before we finish do you have any final comments or words? Firstly, thank you for letting me include the WhatIFF? collections with the latest version of AGS. I'm sure that the users will find the articles really interesting. I also would like to thank the AGS community for their support over the last few years. I guess that my final words are, if you ever loved gaming on the Amiga, AGS is a pretty good way of reliving those moments. Oh, and it's completely free!TopCONTENTSTimothy Deters Interview
Talkingamiga ============================================================================= Interview: Timothy Deters - FinalWriter by Timo Paul ============================================================================= 1. Timothy thank you for taking the time for this interview, to begin with, can you tell us about yourself? Not much to say really. I'm 48 and I tinker with various projects. Mostly lately I have been toying with cellular devices. 2. How did you get started with the Amiga? I got my first A1000 in 1987 3. What do you like about the Amiga most? Honestly it was my childhood. 4. You are working on updating Final Writer, did you work on other Amiga software prior to FinalWriter? No I did not. 5. How did you get involved in the FinalWriter update project? I tracked down Woody and negotiated an agreement we were both happy with. 6. In the UK Wordworth was the best regarded Amiga word processor, how was FinalWriter viewed in the American Amiga scene? For me personally I came from Prowrite and migrated through the Final series. 7. Did you communicate with the original team or people from SoftWood? Yes I did. 8. What features have you been adding to FinalWriter version 7? We've been mainly enhancing and modernizing older features. However we have added antialiasing, Network printing, real time spell checking. 9. How are you developing FinalWriter, i.e. on an Amiga or PC/Mac? It has been worked on by multiple developers so I cannot speak for them. 10. Currently the demo runs on AROS 68K/Apollo OS, are there plans to make a version for OS3.1/3.2 machines? Yes, there is. 11. Beyond the current version what other features do you want to add? Updated modern file formats. Possibly an Updated GUI. 12. Currently there is a demo available and a version with the A600GS, is the A600GS, why did you decide to release it this way? It was an agreement between AmigaKit and I. However for me personally it made sense. 13. Do you have plans to release a physical version of FinalWriter, with printed manual and box? At some point I might. 14. Timothy, thank you for your time, do you have anything you would like to say before we finish the interview? I just hope everyone enjoys the changes we made.Topadvertisements
CONTENTS ============================================================================= -= A D V E R T I S E M E N T S =--------------------------------------------- ============================================================================= ****************************************************** | * | Retro8Bit Heaven! * | =========================================== * | All you need for your beloved 8 and 16 bit * | machines. * | * | Cartridges, badges, wearables, full systems * | media, merchandise, boxes, joysticks, games * | and much more! * | * | Check us out at: * | * | * ******************************************************TopWelcome to the links section!
CONTENTS ============================================================================= -= L I N K S =--------------------------------------------------------------- ============================================================================= https://www.amiganews.net/en/ One of the most up to date and comprehensive sources for Amiga news from around the globe. English Amiga Board, the majority of the users are from Europe, a very friendly and helpful Amiga forum. https://www.exxoshost.co.uk The resource if you need help or information about the new Terrible Fire cards. https://www.amibay.com A great place for buying and selling Amiga hardware, they also have some very nice people to give advice about. Of recent it has become very hard to register on the website since their server migration. https://www.amiga.org Probably the longest running Amiga forum on the world wide web, most American Amiga users are on this board. https://www.amigaworld.net Another large Amiga website covering all Amigas, includes news, discussions and classifieds. https://www.amigans.net English Amiga website covering next generation, emulation and classic Amigas. https://www.amigafuture.de The longest running Amiga print magazine, issues are available in English and German. https://www.amiga-addict.com Newest English Amiga print magazine, if you are missing the likes of Amiga Power and Amiga Format, then this is the magazine for you. Commodore and Amiga print magazine avilable in English and Polish. Lots of games content. https://mancave-ramblings.blogspot.com Our own John Scolieri's personal website. ================================================================== If you have a link that you would like added to list contact: submissions@whatiff.info ----------------------------------------------------------------------------- #Links - WhatIFF? Issue 4.16 - April 2025#TopWelcome to the Amiga vendors section!
CONTENTS ============================================================================= -= A M I G A * V E N D O R * L I N K S =------------------------------------- ============================================================================= Alinea https://www.amiga-shop.net openurl Amedia Computers http://amiga68k.com Amiga 68k https://amigakit.amiga.store Amigakit http://amiga1.com Amiga MC1 https://www.amigashop.org Amiga Shop https://amigastore.eu AmigastoreEU http://amigaonthelake.com Amiga on the Lake https://www.arananet.net/pedidos Arananet Retro Products https://www.arcadeshopper.com Arcade Shopper http://buy.elbox.com BuyElbox https://electronicsisfun.com Electronics Is Fun http://www.ggsdata.se GGS Data https://shop.myamigashop.com My Amiga Shop http://www.relec.ch/fr Relec https://retroami.com.pl RetroAMI https://www.retropassion.co.uk Retro Passion https://retroready.one Retro Ready https://www.sellmyretro.com Sell My Retro https://retrorewind.ca Retro Rewind https://sordan.ie Sordan https://www.tindie.com Tindie https://www.vesalia.de Vesalia ----------------------------------------------------------------------------- #Amiga Vendor Links - WhatIFF? Issue 4.16 - April 2025#TopWelcome to the Amiga Groups section!
CONTENTS ============================================================================= -= A M I G A * G R O U P * L I N K S =--------------------------------------- ============================================================================= ******************************************************************* * * United Kingdom United States Canada Germany Sweden * * France Belgium Czech Republic Denmark Finland * * Australia Russia Ireland Scotland Malta Japan * * ******************************************************************* ----------------------------------------------------------------------------- #Amiga Group Links - WhatIFF?#Topuk
Amigagroups ============================================================================= Amiga Group Links ============================================================================= United Kingdom Amiga North Thame http://www.amiganorththames.co.uk/ Birmingham Amiga Group https://www.facebook.com/groups/BhamAmigaGroup/ Kickstart Amiga Group https://www.kickstartamigagroup.org.uk/ LINCS Amiga Group (LAG) http://lincsamiga.org.uk/ Norwich Amiga Group https://norwichamigagroup.co.uk/ North West Amiga User Group http://www.bambi-amiga.co.uk/spudmiga/nwag/index.html South West Amiga Group http://www.southwestamiga.org.uk/ ----------------------------------------------------------------------------- #Amiga Group Links - WhatIFF?#Topusa
Amigagroups ============================================================================= Amiga Group Links ============================================================================= USA Sacramento Amiga Computer Club http://www.sacc.org/ Central Texas Amiga Computer Society http://main.org/ctacs Central New York Amiga Computing Enthusiasts https://www.meetup.com/CNY-Amiga-Computing-Enthusiasts Central Texas Commodore Users Group https://www.meetup.com/Central-Texas-Commodore-Users-Group/ Metroplex Commodore Computer Club http://www.amigamccc.org/ Southern California Commodore and Amiga Network http://www.portcommodore.com/dokuwiki/doku.php?id=sccan:start Fresno Commodore User Group http://www.dickestel.com/fcug.htm Westchester Amiga User Group http://www.westchesteramigausergroup.org/ Amiga Computer Users Long Island https://www.facebook.com/groups/202303702519 Southeast Amiga User Group https://www.facebook.com/groups/SoutheastAmigaUserGroup/ Stamford Peterborough Amiga Group https://www.facebook.com/groups/spaguk The Other Group of Amigoids http://togausergroup.org/ ----------------------------------------------------------------------------- #Amiga Group Links - WhatIFF?#Topcanada
Amigagroups ============================================================================= Amiga Group Links ============================================================================= Canada Amiga Computer Users of Edmonton http://www.amicue.org Amiga Users of Calgary http://www.amuc.ab.ca Toronto PET Users Group (TPUG) http://www.tpug.ca * Started in 1979, TPUG is also the operator of the annual World of Commodore computer show. ----------------------------------------------------------------------------- #Amiga Group Links - WhatIFF?#Topgermany
Usergroups Amigagroups ============================================================================= Amiga Group Links ============================================================================= Germany AUCB Treffen http://www.amigaclub-bautzen.de/ Amiga Club Munster http://acmuenster.de/ ----------------------------------------------------------------------------- #Amiga Group Links - WhatIFF?#Topsweden
Amigagroups ============================================================================= Amiga Group Links ============================================================================= Sweden Swedish User Group of Amiga http://suga.se/ Amiga Computer Group http://www.amiga-cg.se/ Syntax Society http://www.syntaxsociety.se/ ----------------------------------------------------------------------------- #Amiga Group Links - WhatIFF?#Topfrance
Amigagroups ============================================================================= Amiga Group Links ============================================================================= France Triple http://www.triplea.fr/ AFLE http://afle.free.fr/ AmigaPower http://www.amigapower.net/ ----------------------------------------------------------------------------- #Amiga Group Links - WhatIFF?#Topbelgium
Amigagroups ============================================================================= Amiga Group Links ============================================================================= Belgium Belgian Amiga Club http://www.amigaclub.be/ ----------------------------------------------------------------------------- #Amiga Group Links - WhatIFF?#Topczech
Amigagroups ============================================================================= Amiga Group Links ============================================================================= Czech Republic Luky & Amiga Klub Forever + Czech PowerPC User Group http://powerpc.lukysoft.cz ----------------------------------------------------------------------------- #Amiga Group Links - WhatIFF?#Topdenmark
Amigagroups ============================================================================= Amiga Group Links ============================================================================= Denmark Amiga Club Denmark http://www.amigaclubdanmark.dk/ Danish Amiga User Group https://www.facebook.com/groups/101927439851660 ----------------------------------------------------------------------------- #Amiga Group Links - WhatIFF?#Topfinland
Amigagroups ============================================================================= Amiga Group Links ============================================================================= Finland Finnish Amiga Users Group http://saku.amigafin.org/ ----------------------------------------------------------------------------- #Amiga Group Links - WhatIFF?#Topaustralia
Amigagroups ============================================================================= Amiga Group Links ============================================================================= Australia Sydney Amiga Users Group http://www.saug.org.au Amiga Users Group https://www.amiga.net.au/ MAUG https://www.facebook.com/groups/MAUGr/ Perth Amiga User Group (PAUG) https://www.facebook.com/groups/perthamigausergroup/ ----------------------------------------------------------------------------- #Amiga Group Links - WhatIFF?#Toprussia
Amigagroups ============================================================================= Amiga Group Links ============================================================================= Russia Amiga Information Center (AIC) http://amiga.org.ru ----------------------------------------------------------------------------- #Amiga Group Links - WhatIFF?#Topireland
Amigagroups ============================================================================= Amiga Group Links ============================================================================= Ireland Amiga Ireland Meetup https://www.facebook.com/groups/amigaireland ----------------------------------------------------------------------------- #Amiga Group Links - WhatIFF?#Topscotland
Amigagroups ============================================================================= Amiga Group Links ============================================================================= Scotland Scottish Amiga User Group https://www.facebook.com/groups/626138110921245 ----------------------------------------------------------------------------- #Amiga Group Links - WhatIFF?#Topmalta
Amigagroups ============================================================================= Amiga Group Links ============================================================================= Malta Amiga Malta https://www.facebook.com/groups/amigamalta ----------------------------------------------------------------------------- #Amiga Group Links - WhatIFF?#Top----------------------------------------------------------------------------- #Amiga Group Links - WhatIFF? Issue 4.16 - April 2025#japan
Amigagroups ============================================================================= Amiga Group Links ============================================================================= Japan Commodore / Amiga Fan Club Japan http://cfc.amiga.co.jp/ ----------------------------------------------------------------------------- #Amiga Group Links - WhatIFF?#TopInvents Corner
CONTENTS ============================================================================= April 2025 * I N V E N T S / C O R N E R =- by Kevin Saunders =============================================================================TopCover Disk Number 4.16
CONTENTS ============================================================================= -= April 2025 Cover Disk Contents =--------------------------------------- ============================================================================= This issue we have some great graphics and games tiles provided by Roald Strauss for cross platform game development. In addition you can also access the updated music available for listening during reading the magazine. And as usual teh printable PDF disk label. * Multiple Palette Graphics * PDF Disk Label * Updated Music Playlist Music credits: "Dreamer" - by MisthaLu "Moments" - by MisthaLu "Realm of Illusions" - by MisthaLu "Goodbye Friend" - by Mis_DK "Not Yet" - by Viraxor "WhatIFF" - by Viraxor "WhatIFF2" - by Timo PaulTopWhat's coming up in the next issue?
CONTENTS ============================================================================= -= N E X T * I S S U E - 4.17 - A U G U S T 2025 =------------------------- ============================================================================= Due to a change of editorship, the current content has not been confirmed as of this issue. Please check the WhatIFF? website or EAB for updates. ----------------------------------------------------------------------------- #Next Issue - WhatIFF? Issue 4.16 - April 2025#TopMeet the writing staff of WhatIFF?
CONTENTS ============================================================================= -= W R I T I N G * S T A F F =----------------------------------------------- ============================================================================= WhatIFF? is an independent magazine created by Amiga enthusiasts from around the world looking for a more serious magazine. The main writers at the moment are a small group but hope to grow in coming issues. * Main Writing Staff * Andy Vaisey Bill Panagouleas Ivan Sorensen John Scolieri Kevin Saunders Kristian Hesketh Martyn Bampton Roald Strauss Rob O'Malley Steve Lord Timo Paul Tristan Shiflett We are always interested in new articles, guides or stories, if you have something you wish to submit please send it to: submissions@whatiff.info ----------------------------------------------------------------------------- #Writing Staff - WhatIFF? Issue 4.16 - April 2025#Topandyvaisey
Writers ============================================================================= Name: Andy Vaisey ============================================================================= Aliases: aNdy/AL/COS (EAB) Contact info: andyvaisey@whatiff.info Websites: www.cosine.org.uk www.arkanixlabs.com ============================================================================= Bio:Topbillpanagouleas
Writers ============================================================================= Name: Bill Panagouleas ============================================================================= Aliases: Pyromania (EAB) Contact info: bill@whatiff.info Websites: www.discreetfx.com ============================================================================= Bio:Toptimopaul
Writers ============================================================================= Name: Timo Paul ============================================================================= Aliases: amifan (EAB) Contact info: timopaul@whatiff.info Websites: www.whatiff.info www.binarybeats.xyz ============================================================================= Bio: My journey with the Amiga started in either '87/'88 when the family got an A500 (Back then it was a computer for the whole family), I remember the monitor and A500 boxes almost being as high as myself. Before this time I had only been exposed to the ZX Spectrum and C64, using the blue Workbench for the first time was an amazing experience. When I saw DigiPaint in action I could not believe my eyes. From that moment I was a devoted Amiga user going through various Amigas, A500+A570, A600, A3000 and A1200. Over the years my Amiga has been used to creating digital artwork and for making or shall I say trying to make music. Then in the year 2021 I decided for some crazy reason that the Amiga scene needed a digital magazine similar to Amiga Report. It was my intention to have something that picked up where the great Amiga magazines such as Amiga World and Amazing Computing left off, providing a more serious look at Amiga usage through tutorials and reviews.Topstevelord
Writers ============================================================================= Name: Steve Lord ============================================================================= Aliases: stevelord (EAB) Contact info: stevelord@whatiff.info Websites: www.thedorkweb.substack.com ============================================================================= Bio: Steve enjoys doing impossible things on his Amiga 4000 and CDTV. Whether it's using his CDTV for email, playing Internet radio through his bluetooth speakers from his Amiga 4000, or talking to the world via the ISS from either. If people say the Amiga couldn't do it, he's probably looking for a way to do it. Steve writes his WhatIFF articles mostly using Arnor ProText.Topjohnscolieri
Writers =========================================================================== Name: John Scolieri =========================================================================== Aliases: klx300r (EAB) 328gts (amigans.net) aGS@C64_AMIGA (Twitter) Contact info: johnscolieri@whatiff.info Websites: mancave-ramblings.blogspot.com =========================================================================== Bio: Like many Amiga users my first computer addiction was the mighty Commodore 64! One day close to Christmas of 1986 I drove to my local Commodore store called Comspec...I was in high school and played rep hockey at the time and didn't have the time I used to when I was in grade school to visit Comspec each weekend to check out the latest magazine and games. Imagine my surprise when I stepped into the store and immediately in front of me was THE AMIGA! It was looping the Defender of The Crown intro and I fell in love instantly! From that day on it was my mission to buy that Amiga but I had just worked a few part time jobs to help pay for my first ever used car and didn't have a hundred bucks to my name lol. The Amiga was close to $2,000 Canadian dollars (after taxes) and unlike my C64 my parents didn't fall for the 'I need it for school' rant again. To (try) to make a very long story short I didn't save up to buy my Amiga until I started University in 1989. In the mean time I saw another Amiga called the Amiga 500 at Comspec and it was a lot cheaper than THE AMIGA but my eyes and heart and soul were only set on THE AMIGA! When I finally bought it that was the proudest/happiest moment I've ever felt and I jumped straight into University with Excellence! word processor and Logistix spreadsheet/ database. In my 2nd year I bought my first ever hard drive, a whopping 33MB which had its own case which sat atop my Amiga 1000 case. Later fast ram side cars showed up and I mingled with Manx Aztec C compiler in computer science class. Of course all the great games with awesome music/sound effects made my Apple/PC friends envious! By my 3rd year we had a small Amiga computer club and a few of us got our first accelerator boards for our Amiga which was called LUCAS and was based on a design in a Transactor magazine. It had a 68020 at 16 MHz with FPU on it and it really helped out with the more complicated spreadsheets and compiling programs. Life was good, the Internet was just starting up, I graduated University and got my first full time job and then the bad news of Commodore going bankrupt hit the newspapers, magazines, and BBS boards! There was so much activity going on still in user groups and computer stores so us Amiga users just figured that it would sort itself out. At work there were only PC's running AutoCAD and I despised using the early Windows systems and couldn't wait to get back home to my Amiga. Over the years busy with work and 'adult life' many of my Amiga friends moved on to PCs and I ended up getting my first Amiga 1200 and later Amiga 4000 for great prices. I was still amazed how the Amiga community was still active and so helpful up to the early 2000's. By then I was married and working harder than ever to save up to buy a home instead of renting an apartment and my Amiga's were left at my parents house until around 2010 or so I read about a brand new Amiga which was coming out based on PPC CPU called the AmigaONE X1000 running a new AmigaOS4. I was skeptical at first after hearing about the technical issues with the earlier SE, XE boards with the initisal AmigaOS4 release but after consulting with some friends I joined the beta test team to get one of the first X1000 boards and I immediately felt at home with AmigaOS4.1 and have used it as my home Amiga ever since. Once I got some space set up in my house I got my Amiga's out of my parents house finally and eventually my original Amiga 1000 sits next to my AmigaONE X1000 and original C64 and of course my Amiga 1200 and 4000 came along too and with new accelerator cards and ram boards and spare motherboards and parts etc etc etc. Here I am today grateful to the Amiga computer and especially to the amazing Amiga community who back then and today has always been resilient, creative and helpful !Topkevinsaunders
Writers ============================================================================= Name: Kevin Saunders ============================================================================= Aliases: Invent (EAB) Contact info: kevinsaunders@whatiff.info Websites: www.patreon.com/KevinSaunders www.youtube.com/KevinSaunders www.twitter.com/invent71 www.instagram.com/invent71/ www.ko-fi.com/kevinsaunders ============================================================================= Bio: My journey with the Amiga started around 1988, The first time seeing the Amiga 1000 in the shop window playing animations such as the Amiga Juggler I fondly remember. My Brother and I saved up for an A500, and eventually bought an A4000 (cybervision 64 card) and then an A1200 with an 030 accelerator. I loved collecting every Amiga Magazine with demo disks. My interest in game designing for the Amiga started with deluxe paint and I did dabble with The Miracle Keyboard but that skill in music didn't last. It is because of the Amiga that I now work in video animation and game design.Topivansorensen
Writers ============================================================================= Name: Ivan Sorensen ============================================================================= Aliases: Weasel Fierce Contact info: ivansorensen@whatiff.info Websites: everydayamiga.posthaven.com ============================================================================= Bio: Danish Amiga fan since the 90s. Started with a 1200 and a 1200 is my machine today. I am interested in the casual and the philosophical aspects of the Amiga computer. My cats enjoy Turrican.Toprobomalley
Writers ============================================================================= Name: Rob O'Malley ============================================================================= Aliases: anaki rob Mr.Roboto Contact info: anakirob@whatiff.info Websites: systemofsound.org ============================================================================= Bio: Rob has been making music on Amiga ever since in the mid to late 90's his guitar teacher suggested that he get a drum machine to practice along to, and he instead opted to use OctaMED on his Amiga 500+ with A590 to craft beats and basslines Favourite quote: '...all she wanted to do was play with my ears all night' :PToproaldstrauss
Writers ============================================================================= Name: Roald Strauss ============================================================================= Aliases: MisthaLu, Mr.Lou Contact info: E-mail: mr_lou@dewfall.dk Discord: MisthaLu IRC: MisthaLu or mr_lou Websites: www.8bitMemoirs.com www.IndieGameMusic.com ============================================================================= Bio: I was introduced to the Amstrad CPC464 at age 10, and had a great childhood because of all the BASIC coding I could do. I am also a musician. And when I discovered I could program my Amstrad to play music,by inputting tons and tons of DATA lines, things became even more interesting. When everyone left the Amstrad CPC in favour of either the PC or Amiga, I stayed with my trusty CPC464 - until a couple of mates lured me over to the Amiga many years later. Since no one ever introduced me to options like AMOS or Blitz Basic, it sadly meant that my coding days were over - for a period of time anyway. Instead, I used my Amiga 600 for lots and lots of Protracker MOD creations. From 2012 to 2017 I wrote "8-bit Memoirs", which is a semi biography about those good old days. Download from https://www.8bitMemoirs.com. (Use a download tool so you can resume). Nowadays, all these years later, I'm still just as creative as I've always been. I still create music - even Amiga Protracker MODs. And I'm still just as intrigued by (now retro) game-development as I was back in the day. My geeky hobby is to create my tracks in multiple different filetype formats, and offer licenses to gamedevs on many different platforms at https://www.IndieGameMusic.com.Topjman
Writers ============================================================================= Name: Contributing writer Jman ============================================================================= Aliases: Jman Contact info: Websites: ============================================================================= Bio: Article submission metadata: Date: 20240309 Author: Jman License: CC BY-SA 4.0TopTristanshiflett
Writers ============================================================================= Name: Tristan Shiflett ============================================================================= Aliases: Manical Contact info: Discord: Manical#1992 / manical90 Websites: manical.neocities.org ============================================================================= Bio: Manical started making music for the Amiga in early 2021 (April) and has released at some demoparties, and is planning to go to more along the way. He's in the demogroups MoonShine and Hokuto Force as a musician, and soon to be a coder or graphician. He started out with Protracker for his first 3 mods, then moved to FastTracker primarily, and then he started exploring Impulse Tracker and started making tracks with Furnace. His songs have gotten good reviews by many famous people in the demoscene, such as Jammer, Purple Motion, Skaven, and cTrix (Most known for his gAtari). Since his music journey, he's entered Syntax 2021, Mysdata 2022, Boozedrome VI (Which his track that he entered ended up on the official Boozedrome tape which was limited to 50 copies). Favorite quote: 'You see, we are here, as far as I can tell, to help each other; our brothers, our sisters, our friends, our enemies. That is to help each other and not hurt each other.'Topmartynbampton
Writers ============================================================================= Name: Martyn Bampton ============================================================================= Aliases: Contact info: mbampton@whatiff.info Websites: ============================================================================= Bio: Like a lot of us I got my first computers during the late 80s and 90s, an exciting time for home computer owners. It seemed like every week brought something new and there were loads of computers and accessories to choose from. If you had the budget ;) My family had a Spectrum and then a BBC Micro but *my* first computer was an Amiga 500, all generous hand-me-downs from my uncle. I did play games of course - Lemmings, Pinball Dreams and Stunt Car Racer spring to mind but I also loved messing about in Deluxe Paint, eventually becoming half decently productive. I never had a console and I was never interested in truth, actually I don't think I really played on a console until my friend got a Playstation. An A500 Plus came next and then in March 93 I upgraded to an A1200 with a "huge" 80 MB harddisk! It was with the A1200 and its harddisk that I was really able to get into productive computing as well as enjoying the new AGA specific games. I loved Animating with Deluxe Paint 4, I knew Wordworth inside and out got into generating fractal landscapes with VistaPro and 3D rendering with Real 3D. I would spend countless hours in Workbench, setting it up just the way I liked, I made my own icons very much inspired by MagicWB. Soon enough I need more performance and added a Blizzard IV, Squirrel SCSI and CDROM and I figured out how to make an RGB cable for my specific telly. Still... After Commodore went bankrupt and the chances of a successor to the A1200 evaporated I saved up and was able to buy a secondhand A4000 complete with 1942 monitor. The A4000 was amazing, even more so when I loaded it with a Cyberstorm Mk-III and a Cybervision 64/3D (with scandoubler) and maxed out the RAM. I had a eventually got a 17" monitor and ran Workbench in an unimaginably spacious resolution - compared to 640 x 512 anyway. By this time I was a long time loyal Amiga fan and enjoyed simply upgrading and pushing the limits, way beyond anything my younger self could have imagined. My A1200 was rehoused in an Infinitiv tower case and even ran Linux, launched from within Workbench. My A4000 spent some time as a Mac thanks to ShapeShifter and was my first computer to go online with a 56K modem! I knew I was fortunate to have these computers and upgrades and it was hard to leave them behind when I left the country. It's funny. Years pass, you forget things - you don't even realise you miss things and then someone releases a Mini A500 thingum and you start watching retro channels. Soon you end up on eBay and a week or two later you boot up an A500 for the first time in... Let's say a while. I kept nearly all of my Amiga gear, all apart from the very first A500 and A500 Plus. I was able to collect everything from my childhood home where it had been mostly stored safely all this time and bring it back with me. Now I have them again I hope to share my experiences with repairing, restoring and upgrading them with modern stuff over the coming months and years, maybe my trusty A4000 will boot once more! It was an amazing time to experience and I'm glad I can do so again with a fresh perspective.Topkristianhesketh
Writers ============================================================================ Name: Kristian Hesketh ============================================================================ Aliases: Octopus66 (EAB) Contact info: kristian@whatiff.info ============================================================================ Bio: I got my first Amiga in October 1993, an Amiga 1200, which remains my favourite machine of all time. This machine was upgraded over many years until it was a fully towered, 060 powered, CD-ROM beast. It was in 2002 that I needed a portable windows compatible for study reasons and so the real Amiga was left behind and eventually sold. It didn't take me long to download WinUAE though! Since then I have been emulating and keeping tabs on the scene, until 2023 when I realised that nothing but the real thing would do and got hold of an A500 and then an A1200. I much prefer the A1200 in it's original case and have now upgraded with a TF1230/50, PCMCIA CD-ROM, PCMCIA Wireless card, GoDrive, External Gotek, MouSTer x2, RTC, CF Hard Disk, Amiga OS 3.2. It has been great getting the machine online, sending my first Amiga e-mail and browsing BBS boards - things I have always wanted to do. Looking forward to much more fun with my Amigas and writing for this great magazine!